
Summary of Contents for Force Dimension omega Series
- Page 1 USER MANUAL omega.x haptic device version 1.7 06.2013 Force Dimension Route de Saint-Cergue 295 CH – 1260 Nyon Switzerland www.forcedimension.com...
- Page 3 FD-SDK refers to the Software Development Kit (SDK) for all Force Dimension products. omega.x refers to the base haptic device shared by the omega.3, omega.6 and omega.7 haptic devices. Unless specified, all instructions in this manual apply to all three...
-
Page 5: Table Of Contents
table of contents 1. device description 7 2. important safety instructions 8 3. setting up the omega.x 9 3.1 unpacking the device 9 3.2 installing the power supply 10 4. configuring the omega.x under Windows 11 4.1 installing the software 11 ... -
Page 7: Device Description
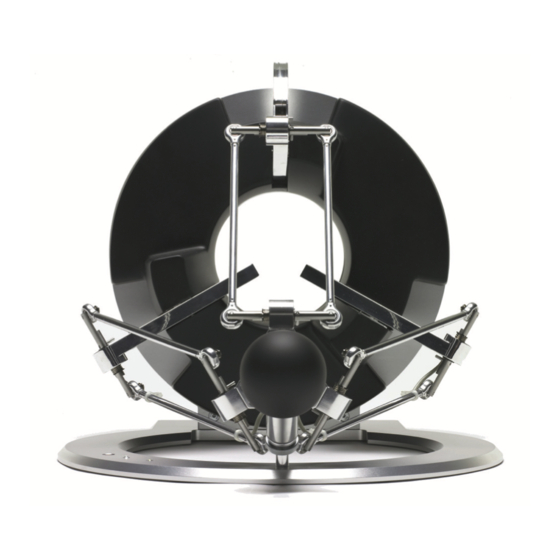
1. device description base plate status LED control unit force LED arms programmable button end-effector power switch force button power connector calibration pole USB connector calibration pit tightening knob... -
Page 8: Important Safety Instructions
2. important safety instructions IMPORTANT WHEN USING THIS UNIT, BASIC SAFETY PRECAUTIONS SHOULD ALWAYS BE FOLLOWED TO REDUCE THE RISK OF FIRE, ELECTRICAL SHOCK, OR PERSONAL INJURY. read and understand all instructions follow all warnings and instructions marked on this unit do not use or place this system near water place the unit securely on a stable surface make sure that the workspace of the omega.x is free of objects... -
Page 9: Setting Up The Omega
3. setting up the omega.x IMPORTANT PLEASE KEEP THE ORIGINAL PACKAGING ONLY USE THE ORIGINAL PACKAGING FOR STORING OR SHIPPING unpacking the device Before unpacking the device, remove the device stabilizer and the accessories box from within the box. Carefully remove the device and the end-effector stabilizer from the box, then remove the end-effector stabilizer. -
Page 10: Installing The Power Supply
Plug the power supply into the power connector. The system supports either 110/120 Volts or 220/230 Volts. Only use the Force Dimension power supply that came with your device. Re- placement power supplies can be ordered from Force Dimension. -
Page 11: Configuring The Omega.x Under Windows
\manuals subfolder All hardware user manuals are located in that directory. \lib,\include subfolders These directories contain the files required to compile you application with the Force Dimension SDK. Please refer to the on-line programming manual for more information. installing the driver USB drivers The omega.x requires the Force Dimension USB driver. -
Page 12: Configuring The Omega.x Under Linux
These directories contain the files required to compile you application with the Force Dimension SDK. Please refer to the on-line programming manual for more information. installing the driver The Linux version of the Force Dimension SDK requires the development packages for the li- busb-1.0 and freeglut to be installed on your Linux distribution. -
Page 13: Configuring The Omega.x Under Mac Os
SDK. Please refer to the on-line programming manual for more information. installing the driver The Apple version of the Force Dimension SDK uses Apple’s native USB drivers, which are in- cluded in Mac OS X 10.4 and higher. No further installation is required. -
Page 14: Using The Omega
7. using the omega.x device geometry omega.x translation axis The position of the end-effector can be read from the controller. The system converts the en- coder values into (X, Y, Z) coordinate, expressed in IUS (metric) unit. Figure 2 shows the coordi- nate system. - Page 15 omega.6 and omega.7 extensions (optional) The omega.6 and omega.7 provide a rotational structure. Rotation information can be retrieved as a reference frame expressed by a 3x3 rotation matrix: figure 3 – reference frame of the omega.6 and omega.7:...
-
Page 16: Operating The Omega
operating the omega.x status indicators The status LED displays the status of the system. > LED OFF the system is off > LED ON the system is ready > LED BLINKING (fast) the system requires calibration > LED BLINKING (slow) the omega.6 extension requires calibration While the status LED is ON, it is possible to read the position of the end-effector, but no forces can be applied. - Page 17 When the brakes are on, a viscous force is created that prevents rapid movement of the end-effector. Also, enabling the brakes via the Force Dimension SDK simulta- neously disables the forces.
- Page 18 This velocity threshold can be adjusted or removed via the Force Dimension SDK. Please refer to the on-line programming manual for more information.
-
Page 19: Running The Hapticdesk Program
HapticDesk program Under Windows, the HapticDesk is available as a test and diagnostic program. HapticDesk allows the programmer to: > list all Force Dimension haptic devices connected to the system > test each device position reading > test each device force/torque capability >... -
Page 20: Running The Demonstrations Programs
running the demonstrations programs Two demonstration programs can also be used to diagnose the device. The source code and an executable file for each of the demonstration programs are provided in two separate directories named \gravity and \torus. Once the system is setup, we suggest running gravity to check that everything is working properly and to evaluate your system's performance independently of the graphics rendering performance. - Page 21 torus example The torus example displays an OpenGL scene that can be haptically explored. figure 7 – torus example note – OpenGL and the OpenGL Utility Toolkit (GLUT) must be installed for your compiler and development environment to compile this example. Please refer to your compiler documentation for more information, or consult http://www.opengl.org/resources/libraries/glut.html...
-
Page 23: Technical Information
8. technical information omega.3 ∅ 160 mm x L 110mm workspace translation forces continuous 12.0 N resolution linear < 0.01 mm stiffness closed loop 14.5 N/mm dimensions height 270 mm width 300 mm depth 350 mm interface standard USB 2.0 rate up to 4 KHz power... - Page 24 The information in this document is provided for reference only. Force Dimension does not assume any liability arising out of the application or use of the information or product described herein. This document may contain or reference information and products protected by copyrights or patents and does not convey any license under the patent rights of Force Dimension, nor the rights of others.
Need help?
Do you have a question about the omega Series and is the answer not in the manual?
Questions and answers