Table of Contents
Advertisement
Quick Links
Advertisement
Table of Contents

Related Manuals for TBS technologies TBS8510


Summary of Contents for TBS technologies TBS8510
- Page 1 TBS8510 Transcoder Server User Guide 1 / 53 TBS8510 User Guide...
-
Page 2: Table Of Contents
Copyright © TBS Technologies 2005-2019 All Rights Reserved 2019-01-08 Catalog 1. Product Overview ..............................4 1.1 Product Presentation ..........................4 1.2 Product Specifications ..........................5 2. Quick Start ................................7 3. Home Page ................................9 4. Clients .................................. 9 4.1 General Setting ............................9 4.2 Clients .............................. - Page 3 7.3.1 SNMP ............................49 7.3.2 Sharing ............................49 7.4 Network ..............................50 7.4.1 Interface ............................50 7.4.2 Diagnostics ............................ 51 7.5 Third-Party Plugins ........................... 52 8. Let the System parameter changes take effect....................53 3 / 53 TBS8510 User Guide...
-
Page 4: Product Overview
But absolutely, this is not a convenient solution, and it will greatly increase the system cost. Now with TBS8510 real-time transcoding server you can receive and Transcode channels at the same time. This is a cost-effective solution for OTT IPTV providers. With Two Giga Ethernet Ports, it can be configured to transcode up to 80 SD or 30 Full HD streams, and equipped with 2 pieces of TBS Tuner/Capture PCI-e card (up to 16 tuners) to receive channels directly from satellite or ASI / IP inputs. -
Page 5: Product Specifications
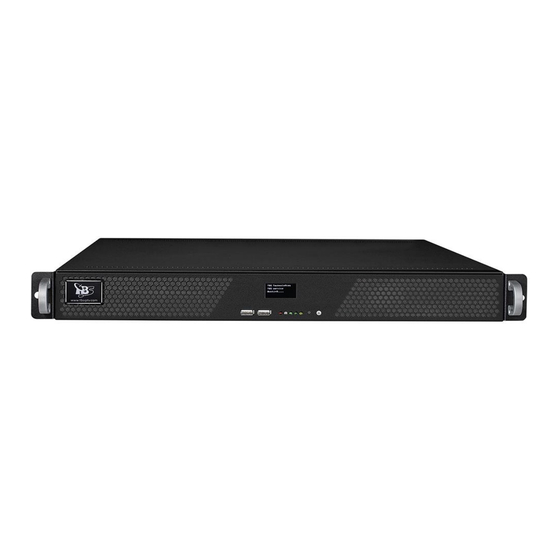
1.2 Product Specifications A:Metal Handles B:USB2.0 C:LED Indicator D:Power Input 3 Input 0 Input 7 Input 4 A:Power Supply B:IPMI C:USB2.0 D:USB3.0 E:LAN1 F:LAN2 G:VGA H: 8 TV Tuners B:remote control E:LAN1 default network port access 5 / 53 TBS8510 User Guide... - Page 6 1920x1080P, 1920x1080i, 1280x720P, 720x576i, 720x480i, 480x576, 544x576, 640x576, Resolution 704x576 Audio codecs AAC, MP3 Rate Control CBR/VBR up to 40 SD / 20 HD1080 AVC(H.264) streams Transcoder up to 20 SD / 18 HD1080 HEVC(H.265) streams Power 65W ~ 250W Consumption 6 / 53 TBS8510 User Guide...
-
Page 7: Quick Start
2. Quick Start When you get the TBS8510, use the default Ethernet LAN1 and connect the server's VGA to your monitor. Default network port Power on the server, after a while you can get follow information from your screen: You can see that the server default IP: 10.47.48.1/255.255.240.0... - Page 8 After login in, you can see the whole panel of TBS8510: 8 / 53 TBS8510 User Guide...
-
Page 9: Home Page
Allow Remote Devices this option is used to enable or disable the stream played from TBS8510. If you set to Yes, then you can use VLC play the stream from TBS8510. If you are using RTMP to send the stream to your CDN, then you can disable this to protect your stream. -
Page 10: Clients
You can click any of the IP to go into detailed page. If you want to protect your stream, stop this IP getting the stream from your TBS8510, you can set as bellowed: 10 / 53 TBS8510 User Guide... -
Page 11: Content Setting
5. Content Setting 5.1 General Setting 5.1.1 Summary Here you can see all channels status, check process profile which is using. You can click any of them to into the detail setting page. 5.1.2 Settings 11 / 53 TBS8510 User Guide... -
Page 12: Advanced Settings
5.1.3 Advanced Settings Unicast/Multicast/HTTP Stream Acquisition: You can set the buffer time in this section. TBS8510 Transcoder will cache the stream then start processing. HTTP Live Stream Acquisition: You can set the HTTP importing stream option in this section, including the Connection Timeout and Buffer Time. - Page 13 Press New Record, then you will have follow dialog: If you install TBS HDMI capture card (such as TBS6304) in the transcoder for stream capturing, please set as bellowed picture. In Frequency (Hz), you can enter any data. 13 / 53 TBS8510 User Guide...
- Page 14 Select the system type with DVB-S or other and enter the frequency value. Then press Save and you will see: 14 / 53 TBS8510 User Guide...
- Page 15 Fill all necessary value then press Save, and go to the transponder bottom press Scan: After press Scan, you can choose the tuner you want to use to scan this transponder, please choose the one which is not in use: 15 / 53 TBS8510 User Guide...
- Page 16 The satellite tuner will take a few seconds to scanning and it will automatically display the scan resul ts if the signal is working. After success scan, press OK. Then you can go to All Channels to configure the channels: 16 / 53 TBS8510 User Guide...
-
Page 17: All Channels
5.2.2 All Channels Let’s take channel HDMI00009d as sample. Click HDMI00009d, it will display the channel properties. Press Edit to start configuration: such as changing channel’s name to CCTV-5. 17 / 53 TBS8510 User Guide... - Page 18 Preprocessing: Choose the soft decryption profile you want to use. Post-processing: Choose the transcoding profile you want to use Output: If you want output HLS/ABR stream, you can choose the profile you want to use. 18 / 53 TBS8510 User Guide...
-
Page 19: Tv Channels
Example: You can output default HTTP, UDP as Post-processing profile or HLS/ABR as Output profile 5.2.3 TV Channels List all TV Channels 5.2.4 Radio Channels List all Radio Channels 19 / 53 TBS8510 User Guide... -
Page 20: Tuner Cards
Here you can see all tuner status. Follow picture, you can see there is no tuner in use. Press Edit to assign the transponder to the tuner. Let’s assign one transponder to Input-1 as below: Then press Save, go back to setting to commit: 5.2.6 Modulators Use with TBS DVB-C modulator 20 / 53 TBS8510 User Guide... -
Page 21: Import Stream Management
It is the same like channels CDN Upload setting. External Modules It is the same like channels External Modules setting: As our server IP is 10.47.48.1. Let’s take this UDP stream as sample udp://@10.47.48.1:4001 21 / 53 TBS8510 User Guide... -
Page 22: Multicast Stream Import
You can multicast this stream here CDN Upload It is the same like channels CDN Upload setting. External Modules It is the same like channels External Modules setting: Let’s take this udp stream as example udp://@239.255.0.1:1234 22 / 53 TBS8510 User Guide... -
Page 23: Http Stream Import
You can multicast this stream here CDN Upload It is the same like channels CDN Upload setting. External Modules It is the same like channels External Modules setting: Let’s take this HTTP stream as example http://10.47.48.123:9981/stream/channelnumber/8 23 / 53 TBS8510 User Guide... -
Page 24: Rtsp Stream Import
CDN Upload It is the same like channels CDN Upload setting, you can check here External Modules It is the same like channels External Modules setting: Let’S take this HTTP stream as example rtsp://192.168.8.145:554/hdmi 24 / 53 TBS8510 User Guide... -
Page 25: Hdmi/Sdi Capture Import
You can multicast this stream here CDN Upload It is the same like channels CDN Upload setting, you can check here External Modules It is the same like channels External Modules setting you can check here 25 / 53 TBS8510 User Guide... -
Page 26: Http Live Playlists
Double Buffer: If the stream still not smoothly you can enable this option to set double buffer. Actions Fetch the Playlist: After you create the playlist record, press Refresh button to get the channel list. Let’S take this list as example: http://10.47.48.2:81/all.m3u8 26 / 53 TBS8510 User Guide... - Page 27 If the playlist is ok, you will see the channels like this: You can click any channel to start configuration as below: 27 / 53 TBS8510 User Guide...
-
Page 28: Mpts Stream Import
Let’s using one MPTS for testing. The address is multicast: udp://@239.255.0.1:5002, press New Recorder then input like this: Press Save then input other value like this: Save again then go to the bottom press Scan: 28 / 53 TBS8510 User Guide... - Page 29 Wait a few seconds, it will automatically show the scan result like this: Press OK, then go to Program List ->View to configure every channels: Click any of channel to start your configuration. 29 / 53 TBS8510 User Guide...
-
Page 30: Local Files Import
It is the same like channels CDN Upload setting. External Modules It is the same like channels External Modules setting. Let’s use spider.ts file as sample: Then open the server samba folder with \\10.47.48.1 Either User name and Password is kylone. 30 / 53 TBS8510 User Guide... - Page 31 Open then go to files folder and put the spider.ts file to it Then close the window and go back to Content->Settings->Commit to let it work 31 / 53 TBS8510 User Guide...
-
Page 32: Multiplexing Settings
5.4.1 Multi Program TS Setting Here you can remux the channels inside this server, Press New Record to start configuration: Select the channels you want to remux, and press to add. Then set the output information: 32 / 53 TBS8510 User Guide... -
Page 33: Broadcasting Status
Go to Commit page and press Commit to take effect, wait a while you can check the status in status page: 5.5 Broadcasting Status 5.5.1 Multicast Status Here list all multicast output channels Click on any set of programs to set up multicast flow. 33 / 53 TBS8510 User Guide... -
Page 34: Modulators Status
Submit system changes to make it effective, multicast flow monitoring status 5.5.2 Modulators Status Here is the Modulators output status 5.6 CDN Upload Settings Here is the detail setting for RTMP 34 / 53 TBS8510 User Guide... - Page 35 Click Profiles you can create the RTMP upload profile: Inside the profile you can input the RTMP server address, the user name and password. Then click Close and go back to the channels RTMP setting, choose one channel: 35 / 53 TBS8510 User Guide...
- Page 36 Transcoding profile is the transcode profile used to transcode the channel then upload to CDN. If you want to upload to a new address which you have not created the profile, then you can manual input the RTMP address as below: The full RTMP address is: rtmp://push-xxx.com/live/test 36 / 53 TBS8510 User Guide...
- Page 37 In some case, if the RTMP server or client does not support FLV format, you can try with MPEG-TS format as below: The full HTTP address is: http://rtmp-push.xxx.com:1250/tvpad/test.httpts In this way you can use H.265 to push the stream to the CDN server. Every stream status you can find at status page as below: 37 / 53 TBS8510 User Guide...
-
Page 38: Profiles Setting
5.7 Profiles Setting 5.7.1 Preprocessing Profile This is the soft decryption profile setting. You can create new profile like this: 38 / 53 TBS8510 User Guide... -
Page 39: Post-Processing Profile (Transcode Profile)
Embed Watermark: You can upload the logo you want to show and set the position. Advanced: If you have new parameters, you can manually add here. 39 / 53 TBS8510 User Guide... - Page 40 Here is the example HD source with output H.264 and bit rate 2Mbps: 40 / 53 TBS8510 User Guide...
-
Page 41: Output Profile (Hls/Abr Profile)
Comparing with transcoding profile, it has option for ABR setting like this: You can see that you have 6 profile, you can enable and set by yourself. Then you can set the HLS chunk value here: 41 / 53 TBS8510 User Guide... -
Page 42: Status Page
Here you can get all channels status and you can separately stop, restart every channel. Transponder: You will have the transponder lock status here: Strength, SNR, and Bitrate. You can restart or stop the transponder with the option button. Restart: Stop: 42 / 53 TBS8510 User Guide... - Page 43 You can monitor all channels’ status here. If any channel is not working well, you can separately restart it with restart button. CDN Uploads: Here you can check the RTMP uploading status. You can check its working time and the upload bit rate. You can also separately restart it. 43 / 53 TBS8510 User Guide...
- Page 44 Here you can see the users’ IP and ports which are connected to the transcoder. You can also see the channel which is in using, its output data rate, its connected time, and status. If you want to have more configuration on the status, please go to page Media Players. 44 / 53 TBS8510 User Guide...
-
Page 45: Resources (Output Stream Address)
Click to download the playlist, you will have the whole channels list like this: http://192.168.0.188:81/all.m3u8 Channel URL is the URL for every channel such as: http://192.168.0.188:4750/6021/0/base/stream.ts If you set the channel output as multicast, it will show the multicast URL like this: 45 / 53 TBS8510 User Guide... -
Page 46: System Page
You can Stop or Start the Media server. When you click Stop, all channels will be stopped to stream. If you want to let it running again, just click Start. Central Management If you enable the remote service, it will show the remote status. 46 / 53 TBS8510 User Guide... -
Page 47: Data Time
You can Backup or Restore the system configuration, and you can change the License key here. Be careful about the Factory Defaults, applying it will delete all modules. Then you will need to contact us to recover the transcode modules. 47 / 53 TBS8510 User Guide... -
Page 48: User Interface
7.1.4 User Interface You can change the web UI Theme here. 7.2 Users 48 / 53 TBS8510 User Guide... -
Page 49: Services
For detail information about SNMP, please send email to support@tbsdtv.com. We can customize it for you. 7.3.2 Sharing As to Kylone default folder, we enable the samba service. After you put the files to kylone, you can disable the service. 49 / 53 TBS8510 User Guide... -
Page 50: Network
7.4 Network 7.4.1 Interface You can click the port you want to configuration such as enp8s0: After you finish setting, don’t forget to press Commit to let it work. 50 / 53 TBS8510 User Guide... -
Page 51: Diagnostics
In some case, you might want to check the server status with ping, DNS, HTTP. Here let us take a sample with Ping: Press Ping and wait a few seconds, then you will have follow result: 51 / 53 TBS8510 User Guide... -
Page 52: Third-Party Plugins
7.5 Third-Party Plugins TBS8510 Transcoder supports local uploading of external modules. After uploading the local module file, it will be scanned, and the module list will be automatically loaded. 52 / 53 TBS8510 User Guide... -
Page 53: Let The System Parameter Changes Take Effect
After any change, you have to click Commit here to let it work. It will take a few seconds to restart all streams. If you have any question with TBS8510, please send email to support@tbsdtv.com, we will provide professional support as soon as possible.
Need help?
Do you have a question about the TBS8510 and is the answer not in the manual?
Questions and answers