
Related Manuals for Tanaka MPC-102A

Summary of Contents for Tanaka MPC-102A
- Page 1 Mini-Pour/Cloud Point Tester Model MPC-102A/102L Instruction Manual Ver.2.21 090120 Read this manual thoroughly before using the product, and store in a safe place for future reference. TANAKA SCIENTIFIC LTD, TOKYO, JAPAN...
-
Page 2: Foreword
FOREWORD Thank you for purchasing the Mini-Pour/Cloud Point Tester Model MPC-102A/102L from Tanaka Scientific Limited. This instruction manual provides necessary information for using the MPC-102A/102L. Read this manual thoroughly before use and ensure that you have understood its contents. This manual employs the following precautionary notation. For your safety, ensure that you understand these precautions and heed them at all times. -
Page 3: About This Instruction Manual
The content this manual is subject to change without notice due to enhancements to ● the performance and functionality of the instrument. If this manual is lost or damaged, contact Tanaka Scientific Limited or an authorized ● distributor for a replacement copy. -
Page 4: Warnings And Cautions For Safe Use
WARNINGS AND CAUTIONS FOR SAFE USE Failure to follow all of the warnings and cautions listed below may result in damage to the instrument and/or serious personal injury. Tanaka Scientific Limited will not assume any responsibility for faults or accidents arising from failure to adhere to these instructions. - Page 5 ・ Do not use force to bend any cords or cables. ・ Ensure that all electric connections (plugs, sockets, connectors, etc.) are free of dust. ・ Keep all cables and electrical connections free of water and other liquids. ・ Failure to adhere to the above precautions may result in electric shock, damage to the instrument, cords and/or cables, and/or fire due to overheating.
- Page 6 Operational Precautions Warning: If the instrument makes any abnormal noises or exhibits any abnormal behavior, stop operation immediately, turn the power off at the mains, and contact Tanaka Scientific Limited or an authorized distributor. Consumables, Accessories and Replacement Parts Caution: Use only Tanaka Scientific Limited genuine consumables, parts and accessories or such parts as recommended by Tanaka Scientific Limited.
-
Page 7: Table Of Contents
Contents FOREWORD..........................0 ABOUT THIS INSTRUCTION MANUAL ..................1 BEFORE USE ..........................1 WARNINGS AND CAUTIONS FOR SAFE USE ................2 Contents............................5 Section Names and Functions ..................... 6 Operational Principles......................8 Installation..........................9 3.1. Installation Site .......................... 9 3.2. Connection of the Coolant Circulation Device (MPC-102L Only) ........ -
Page 8: Section Names And Functions
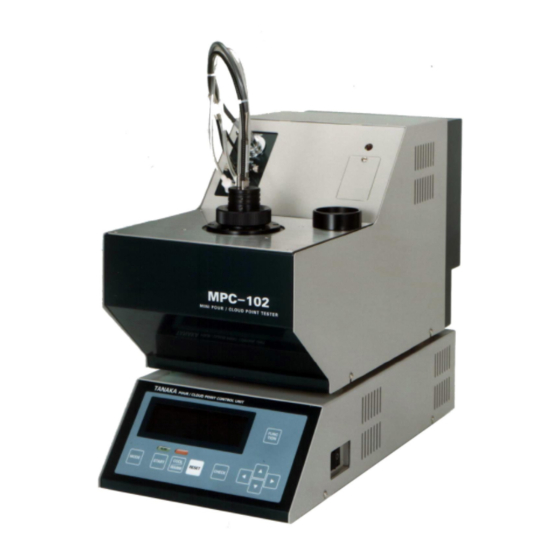
Sensor Detector Insulator Display Control Panel Main Switch Fig. 1: General View of Model MPC-102A/102L Main Switch: Turns the instrument on or off. Control Panel: Keys and switches for operating the device (See Fig. 2 on page 7) Display: Displays test conditions, instrument state and test results (See Fig. 2 on page... - Page 9 ③ ⑤ ⑦ ⑧ ⑩ Fig. 2: Model MPC-102A/102L Control Panel ① Fluorescent Display: Displays test mode, specimen temperature, pour/cloud point results (when flashing), and Expected flow point. ② MODE Key: Changes test mode. ③ START Key: Starts testing. ④ RUN Lamp: Indicates when testing is in progress. (Green) ⑤...
-
Page 10: Operational Principles
2. Operational Principles The MPC Series employs Tanaka Scientific's unique air pressure system (certified as U.S. standard ASTM D 6749) to detect pour points (solidification points). Air pressure is applied to the surface of a specimen, with subsequent motion of the sample surface measured to detect sample flow. -
Page 11: Installation
3. Installation 3.1. Installation Site Warning: The instrument must be installed on a flat, sturdy surface to prevent the instrument from falling over. Install the instrument on a strong, level bench in a ventilated place. Do not expose the instrument to any of the following: ・... -
Page 12: Connection Of The Coolant Circulation Device (Mpc-102L Only)
3.2. Connection of the Coolant Circulation Device (MPC-102L Only) Caution: Do not use methanol as cooling medium. O-ring of solenoid valve may have damage and the unit will not work correctly. 70% of ethylene glycol and 30% of distilled water mixture will be the best for this unit. - Page 13 in electric shock, damage to the instrument, cords and/or cables, and/or fire due to overheating. Warning: Ensure that supply voltage meets the specifications of the product. Do not turn the power on until all electric connections are secured. Incorrect power supply specifications or loose electric connections may damage the instrument and result in electric shock and/or other electrical accidents.
- Page 14 Coolant outlet MPC-102L Only Coolant inlet MPC-102L Only Circuit Protector 10 A RS-232C Connector Power cord Coolant circulation device (IN) (To water drain) AC Outlet MPC-102L Only Coolant circulation device (OUT) (To water tap) Fig. 4: Rear view of Model MPC-102L - 12 -...
-
Page 15: Routine Daily Inspection
・ The Expected pour point has been correctly entered Warning: Do not attempt to repair the instrument yourself. In the event that the instrument exhibits any abnormal behavior whatsoever, contact Tanaka Scientific Limited or an authorized distributor. - 13 -... -
Page 16: Prior To Testing
5. Prior to Testing 5.1. Turning the Power on After turning the main power switch on, the display panel should display the main screen shown in Fig. 5: . Pressing the FUNCTION key at this point will give you access to detailed settings, as shown in Fig. -
Page 17: Setting The Coolant Temperature (Mpc-102L Only)
5.2. Setting the Coolant Temperature (MPC-102L Only) Caution: Never press the START key unless coolant is circulating normally. Starting the unit with no coolant present may damage the thermo-module that cools and heats the bath. Start the coolant circulation device and enter a temperature (refer to the Coolant Circulation Device Instruction Manual). - Page 18 (1) The specimen cup and pressure conducting tube should be removed from the detector, cleaned with an appropriate solvent and dried prior to use. Wipe any oil from the temperature and cloud point sensors with a tissue or a waste cloth. (2) With the metallic tip facing away from the detector assembly, insert the pressure conducting tube into the hole in the detector around the temperature sensor (see Fig.
-
Page 19: Test Mode Selection
5.4. Test Mode Selection The instrument contains 25 preset test modes, which are combinations of test type, pressure and detection interval (see Fig. 8). Selecting the correct mode can be time consuming, and so the test modes that are available to users can be customized (refer to the attached Maintenance Manual for more information). -
Page 20: Setting The Expected Pour/Cloud Point
5.5. Setting the Expected Pour/Cloud Point Caution: Ensure that an approximate pour/cloud point is entered prior to every test run. If an appropriate estimation is not entered or the value entered is much greater than the actual pour/cloud point, the testing procedure may be prolonged or produce incorrect results. - Page 21 the display cycles with each press of the FUNCTION key is: Main Display Screen → Details Screen → Sample Name Input Screen → Main Display Screen When specimen name input is disabled, the Sample Name Input Screen cannot be accessed by pressing the FUNCTION key.
-
Page 22: Test Procedure
6.1. Starting a Test Warning: If the instrument makes any abnormal noises or exhibits any abnormal behavior, stop operation immediately, turn the power off at the mains, and contact Tanaka Scientific Limited or an authorized distributor. Press the START key ( ). - Page 23 Note (5):The level of cooling/heating is indicated by a red LED at the upper right of the test unit. The led is continuously lit to indicate full output (100%), extinguished to indicate no output (0%), and flashes to indicate any intermediate output levels. As the output level is nearly always changing, the led is almost always flashing.
- Page 24 The intensity of light measured will not fall within the specified range if the sensor is faulty, the detector is incorrectly set, or there is a problem with the specimen. If the error message continues despite the sensor functioning correctly and being correctly setup, the specimen itself is the problem, and cannot be tested using this instrument.
- Page 25 6.2.4. Cooling The bath is cooled at preset rates, with different rates used above and below the switching temperature of 40°C ( ) above the Expected pour point. The product is shipped to cool at a rate of 4°C/min ( ) until the switching temperature is reached and at a rate of 1°C/min ( ) thereafter.
- Page 26 6.2.6. Cloud Point Detection ※ This step is only applicable to cloud point testing modes (“CP” or “PP/CP” displayed in the test mode field). The cloud point is detected when the intensity of light measured at the bottom of the specimen cup drops due to clouding.
- Page 27 6.2.7. Pour Point Detection ※ This step is only applicable to pour point testing modes (“PP” or “PP/CP” displayed in the test mode field). When specimen flow is found to have stopped (see Section 2 on page8), the pour point temperature flashes in the current specimen temperature field (see Figure 17 and see Figure 18) ).
- Page 28 6.2.8. Data Printouts ※ This step is only applicable if an optional printer is connected. After pour/cloud point detection, the Expected pour/cloud point and measured point are automatically printed. To print detailed experimental information, such as such as specimen temperature and pressurization times during testing, press the START key once after the summary data has printed ( Note, however, that data cannot be printed after the RESET key has been pressed.
-
Page 29: Data Storage Functionality
7. Data Storage Functionality This instrument has the capacity to automatically store the results of the last 50 tests. To access the results history, press and release the RESET key while holding down the MODE key. The Test History Screen shown in Fig. 19 is displayed. The most recent test results are always shown as data No.1, with data id numbers in increments of one. -
Page 30: Maintenance And Post-Sales Servicing
Tanaka Scientific Limited or an authorized distributor. Contact details are provided with the product warranty at the end of this manual. When placing an order, be sure to quote the product model "MPC-102A" or “MPC-102L”. The most commonly used consumables and accessories are listed in Table 3 Table 3: Consumables and Accessories for Model MPC-102A/102L ・... -
Page 31: Troubleshooting
1. Tanaka Scientific Limited will send a replacement part to the local distributor or directly to the customer. The user or local distributor executes replacements and inspections. 2. The customer will need to send part or all of the faulty equipment to Tanaka Scientific Limited for repairs. -
Page 32: Post-Delivery Notes
This manual and the Maintenance Manual are part of the instrument. Should you lose either manual, contact Tanaka Scientific Limited or an authorized distributor for a new copy. For safety, keep a copy of the address and telephone number of Tanaka Scientific Limited or an authorized distributor. -
Page 33: Specifications
Related Specifications: Pour point test standards: ASTM D 6749, D97, ISO 3016 Cloud point test standards: ASTM D 2500, ISO 3015 Type: Bench Top, Air cooled (MPC-102A) or Liquid cooled (MPC-102L), Single position Testing Limitations: MPC-102A 51°C to -30°C (at room temperature: 20°C) PC-102L 51°C to -65°C (when -35°C coolant is circulated using the optional... -
Page 34: Standard Accessories
Connection cable (signal) 0.6m·································································································· 1 pc Instruction manual ······················································································································ 1 copy Maintenance manual ·················································································································· 1 copy <Above common to MPC-102A and MPC-102L> Coolant circulation hose ∅10×∅14 2m [with insulation pipe] ···················································· 2 pcs Hose Clamps ······························································································································ 4 pcs Dripping plate ····························································································································· 1 pc <Above for MPC-102L only>... - Page 35 ・Coolant circulation device for MPC-102L (Recommended by Tanaka Scientific Limited) Model : TCU-40 Ultra-low temperature bath circulator made by Tanaka Scientific Limited. Bath Capacity: Approx. 8.0L Power Supply: 120 or 220-240 VAC 50/60 Hz 500W Dimensions and Weight: 320(W) x 590(D) x 725(H) mm Approx. 60.0 kg ・Water pressure regulator with pressure gauge: Necessary when a tap water line is connected...
-
Page 36: Product Warranty
3. If any faults occur due to normal use within the warranty, the product will be repaired free of charge. 4. Be sure to notify Tanaka Scientific Limited when repairs being requested are covered under the warranty. 5. The following faults or damage are not covered by the warranty: ・...