Table of Contents
Advertisement
Quick Links
Advertisement
Table of Contents

Related Manuals for Cartek GT

Summary of Contents for Cartek GT
- Page 1 USER GUIDE AND INSTRUCTIONS JULY 2016...
-
Page 2: Table Of Contents
CONTENTS INTRODUCTION PAGE 1 SPECIFICATION PAGE 2 SAFETY NOTES PAGE 3 INSTALLATION PAGE 4 FITTING PAGE 5 SWITCH CONNECTIONS PAGE 6 ENGINE KILL CONNECTION PAGE 7 FINAL CONNECTION PAGE 8 ADDITIONAL WIRING CONSIDERATIONS PAGE 9 MULTILINGUAL WIRING DIAGRAMS FAULT DIAGNOSIS PAGE 10 CONTACT INFORMATION Unit 25, Mitchell Point... -
Page 3: Introduction
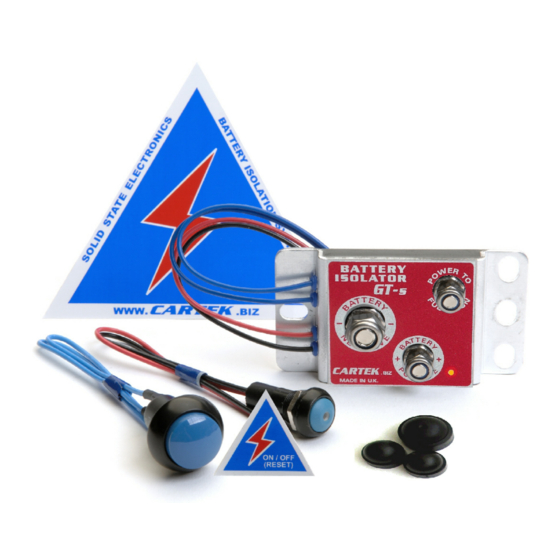
INTRODUCTION Battery Isolator GT is a fully electronic ‘master/kill switch’ system designed specifically for race car applications. This system contains no moving parts and the solid construction provides very high resistance to shock, vibration, water and dirt. Using the latest MOSFET technology this isolator provides safe, spark-free isolation of the vehicle’s battery and engine electrics in accordance with FiA safety regulations. -
Page 4: Specification
SPECIFICATION Typical installation ALTERNATOR STARTER MOTOR CAR BATTERY BATTERY ISOLATION VIA NEGATIVE TERMINAL POWER FEED FOR ENGINE KILL EXTERNAL KILL B A T T E R Y BUTTON I S O L A T O R CHASSIS MOUNTED CLOSE TO BATTERY INTERNAL ON/OFF M O T O R S P O R T . -
Page 5: Safety Notes
THIS PRODUCT IS DESIGNED FOR MOTORSPORT USE ONLY AND SHOULD NOT BE USED ON ROAD/STREET VEHICLES OR ON PUBLIC HIGHWAYS. NO WARRANTY IS MADE OR IMPLIED REGARDING ANY CARTEK PRODUCTS TO PROTECT USERS FROM INJURY OR DEATH. USER ASSUMES ALL RISKS. -
Page 6: Installation
INSTALLATION Step 1. FITTING The Isolator should be mounted directly to the vehicle’s metal chassis close to the vehicle’s battery but away from any high temperature sources. The Isolator should be mounted securely with unpainted screws/bolts to provide good electrical contact with the chassis. -
Page 7: Switch Connections
INSTALLATION Step 2. SWITCH CONNECTIONS The Isolator can be controlled by any number of on-off/kill switches although the usual configuration is one internal on-off button and one external kill button. The internal switch needs to be of a latching type, either toggle or pushbutton, such that the ON position makes the circuit while the OFF position breaks the circuit. -
Page 8: Engine Kill Connection
INSTALLATION Step 3. ENGINE KILL CONNECTION For cars equipped with an alternator the Battery Isolator needs to kill the engine by cutting power to the engine ECU, Fuel system or Ignition system. One way to find a suitable point within the car's electrical system to kill the engine is to: START ENGINE. -
Page 9: Final Connection
INSTALLATION Step 4. FINAL CONNECTION Once Steps 1,2 & 3 are completed a final connection should be made from the negative terminal of the vehicle battery to the Battery Isolator terminal marked BATTERY NEGATIVE. This connection should be made with cable of 100-200Amp capacity and by keeping as short as possible will offer maximum weight saving of the complete installation. -
Page 10: Additional Wiring Considerations
INSTALLATION ADDITIONAL WIRING CONSIDERATIONS If the alternator has an old style warning bulb (not LED) which is connected to the ignition switch then a diode must be placed in series as shown. e.g. 1N5819. CHARGING WARNING LAMP DIODE ALTERNATOR STARTER MOTOR FUSE PANEL IGNITION... -
Page 11: Multilingual Wiring Diagrams
INSTALLATION - MULTILINGUAL (GB) Installation diagram (FR) Installation des connexions (DE) Installationsanschlüsse (GB) ALTERNATOR (GB) STARTER MOTOR (GB) BODY ELECTRICAL SYSTEMS (FR) ALTERNATEUR (FR) DÉMARREUR (DE) LICHTMASCHINE (DE) ANLASSER (FR) SYSTÈMES ÉLECTRIQUES DU VÉHICULE (DE) ELEKTROSYSTEM DES FAHRZEUGS (GB) CAR BATTERY (FR) BATTERIE DE VOITURE (DE) AUTOBATTERIE (GB) START BATTERY (Optional) -
Page 12: Fault Diagnosis
FAULT DIAGNOSIS Once fully installed, the Isolator is switched ON by activating the internal ON-OFF switch/button. On activation the Isolator performs a system check before electrical power is switched on. If any fault is detected then the Isolator will remain in the OFF state and display the fault status via the LED in a sequence of flashes: 1 flash - External kill button pressed or circuit broken.
Need help?
Do you have a question about the GT and is the answer not in the manual?
Questions and answers