Advertisement
Advertisement

Related Manuals for MasterSounds UNION AUDIO FX


Summary of Contents for MasterSounds UNION AUDIO FX
- Page 1 Operation Manual...
-
Page 2: Table Of Contents
Index 1: Safety instructions 2: Overview 3: Front panel controls 4: Rear panel controls 5: Warranty 6: Technical specification pg10 Operation Manual Index... - Page 3 1: Important safety instructions - Read first READ THE INSTRUCTIONS - Read and retain these instructions for future reference. Adhere to all warnings printed here and on the console and its power unit. COVERS - Do not remove the power unit cover. Operate the console with its cover correctly fitted.
-
Page 4: 2: Overview
2: Overview The new MasterSounds FX unit is designed to perfectly integrate with the entire MasterSounds DJ mixer catalogue, maximising the use of both the Aux send system and mix insert feature in a way no other FX unit can. FX offers three products in one box - an analogue emulating FX section with analogue output, an analogue filter unit, and an analogue distortion system.Analogue emulation provides 8 high quality... -
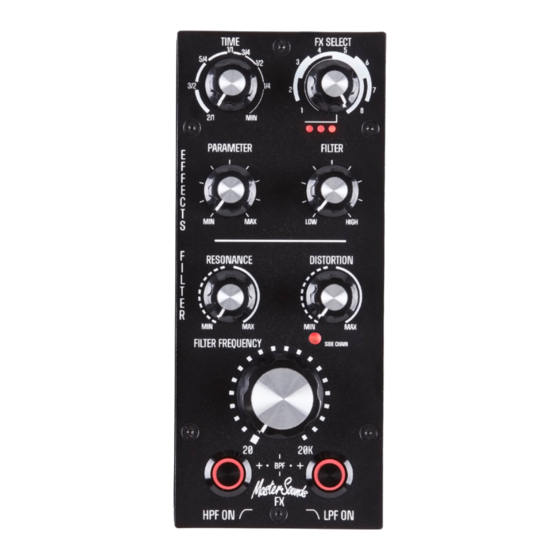
Page 5: 3: Front Panel Controls
3: Front panel controls TIME – Select the FX time signature you wish to achieve by turning the rotary dial. FX SELECT – Rotate the FX select knob from 1-8. Each number represents a different effect. (See FX section on pg 6 for a description of each effect). - Page 6 Effect No Effect Type Time Paramater Filter FX Description Stereo Pitched Delay Delay Time Feedback HPF Frequency Analog style delay with high-pass filter Delay Non Pitched Delay Time Feedback HPF Frequency Mono delay with high-pass filter Delay Pitched Echo Delay Time Feedback HPF Frequency Mono delay with reverb on feedback...
- Page 7 There are 2 ways to use the FILTER FREQUENCY knob. You can set up the AUX send knob on your MasterSounds DJ mixer to the desired level, then use the FILTER FREQUENCY knob to add the desired effect into the mix.
-
Page 8: 4: Rear Panel Controls
Insert two of the supplied TRS jack leads to the AUX OUT on the rear of your MasterSounds DJ mixer: L for the left channel and R for the right channel. Then connect the leads to the corresponding L & R on the AUX RETURN of the FX unit. -
Page 9: 5: Warranty
5: Warranty MasterSounds warrants that the Mixer shall be free of defects in workmanship and materials for a period of twelve months from the date of purchase. In the event that the product fails to operate as intended, MasterSounds will repair or replace the product subject to the following conditions. -
Page 10: 6: Technical Specification
<-95dBu 20Hz to 20kHz un-weighted Noise 0.003% Insert IN to Insert OUT 0dBu Distortion THD+N ±21dBu Maximum Signal Level 10Hz – 50kHz +0/-1dB Frequency Response 20Hz to 20kHz Filter Range MasterSounds reserves the right to change the specification without notice. Operation Manual Technical specification... - Page 12 FX Operation Manual Copyright © 2018 MasterSounds Audio. All rights reserved www.mastersounds.co.uk...
Need help?
Do you have a question about the UNION AUDIO FX and is the answer not in the manual?
Questions and answers