Table of Contents
Advertisement
Quick Links
Advertisement
Table of Contents
Troubleshooting

Summary of Contents for P-Squared SRM
- Page 1 Operations Manual Last Updated: 11/10/2013 P Squared Ltd...
- Page 2 Goods without the Company’s prior written Warranty Returns consent; Please contact P Squared to obtain a returns authorisation prior to returning any (vi) the defect has not arisen from a design made, furnished or goods for warranty repair.
-
Page 3: Table Of Contents
Setting Up The Myriad Intelligent Interface (MII) ................. 23 What Is MII? ............................23 Start Button Colour Status Key ......................23 Starting & Stopping Playback In Myriad From The SRM ..............24 Preview Cart Player Mode ........................ 24 Virtual Mic Live Light ......................... 24 Setting Up The Myriad Intelligent Interface .................. - Page 4 Settings Page 3 - PFL Modes (available on all channels) ............... 49 Settings Page 4 – Remote Modes ....................50 Saving Settings And Existing Setup Mode ..................51 Technical Specifications ........................52 Notes: ..............................58 P Squared Contact Details ........................59 Table of Contents | Copyright © P Squared Ltd 2013...
-
Page 5: Introduction
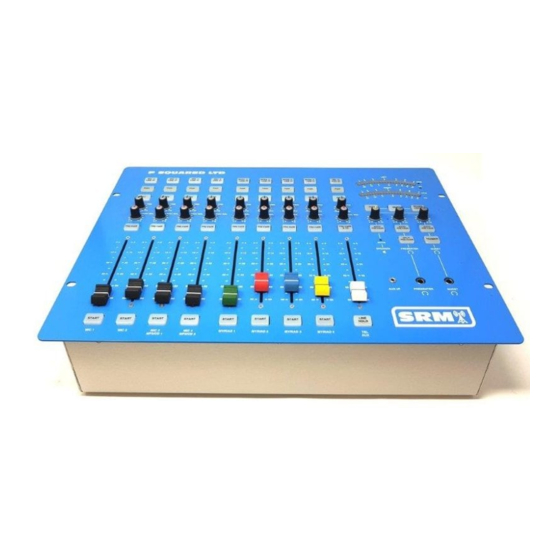
SRM Operations Manual Introduction The SRM is a small, fixed format broadcast audio mixer designed to provide a versatile and robust mixing solution for small and medium scale radio stations. We set out to design a mixer that would combine key broadcast radio features with a layout that would appeal to novice and broadcast professionals alike. -
Page 6: Layout & Dimensions
Layout & Dimensions Dimensions Width: 482.6mm Height: 355.0mm Depth: 107mm Layout & Dimensions | Copyright © P Squared Ltd 2013... - Page 7 SRM Operations Manual Layout & Dimensions | Copyright © P Squared Ltd 2013...
-
Page 8: Channel Overview
1 x Telephone / AUX Channel Select between telephone interface mode and stereo ‘AUX’ inputs. When in telephone, you can connect an analogue telephone line to the SRM to allow you to make and receive phone calls through the mixing desk (standard handset required). -
Page 9: Microphone / Line Channels (Channels 1-4)
‘on-air). To use this feature, first pull the fader right down (otherwise it will be broadcast anyway), then press the Pre-Fade button. You will now be able to hear Microphone / Line Channels (Channels 1-4) | Copyright © P Squared Ltd 2013... - Page 10 8 - Start Button: This button is only operational when in Line mode and it is used to send a start signal to compatible external devices (such as some CD players) via the Remote Start Output (see rear of channel). Microphone / Line Channels (Channels 1-4) | Copyright © P Squared Ltd 2013...
-
Page 11: Rear Panel Layout & Function
Line mode and it is used to send a ‘start’ signal to compatible external devices such as some CD players. This Remote Output is effectively a closing contact between the tip of the ¼” jack and the sleeve. Microphone / Line Channels (Channels 1-4) | Copyright © P Squared Ltd 2013... -
Page 12: Myriad / Line Channels (Channels 5-8)
This is an essential tool for radio. Let’s say you have a guest in the studio. You need to check that their mic levels are ok and adjust the Trim on their Myriad / Line Channels (Channels 5-8) | Copyright © P Squared Ltd 2013... - Page 13 Press Start When Cart Is Playing (solid green) – This will pause the Cart Player in Myriad. You will also see that if the Fader is closed then the corresponding Cart Player in Myriad will switch to ‘Preview’ mode. Myriad / Line Channels (Channels 5-8) | Copyright © P Squared Ltd 2013...
-
Page 14: Rear Panel Layout & Function
Line mode and it is used to send a ‘start’ signal to compatible external devices such as some CD players. This Remote Output is effectively a closing contact between the tip of the ¼” jack and the sleeve. Myriad / Line Channels (Channels 5-8) | Copyright © P Squared Ltd 2013... -
Page 15: Telephone / Aux Channel (Channel 9)
PAN mode. Telephone / AUX Channel (Channel 9) | Copyright © P Squared Ltd 2013... - Page 16 Please note that the button will flash when a phone call is received and will illuminate when the desk is connected to the call. See section on Telephone Interface for more detailed operation. Telephone / AUX Channel (Channel 9) | Copyright © P Squared Ltd 2013...
-
Page 17: Rear Panel Layout & Function
BT line and should not need adjusting under normal circumstances. 3 - Line (phone) – This allows you to connect the SRM to a standard BT analogue phone line. You will need an RJ11 (male) to BT (male) cable to connect from your BT phone socket to the SRM. -
Page 18: Monitor Section
The LED Meters can be switched to display in PPM or VU modes (see SRM Setup Mode) with PPM set as the default. In PPM mode, the display shows an average volume of a short time period so the display is more consistent and easier to work with. - Page 19 4 - Presenter Headphone Volume: The middle volume knob (blue top) is used to control the volume of the main presenters headphones. Please note that the SRM has an adjustable headphone limiter which prevents the volume of the headphones from going too high. Once the...
- Page 20 Controller output on the rear panel. 8 - Split Pre-Fade: This option allows you to set the SRM to play Pre-Fade audio to the left side of the presenters headphones and PGM / REC / BCAST Listen (whichever is selected) to the right hand side of the headphones.
-
Page 21: Rear Panel Layout & Function
SRM will start to limit Monitor Section | Copyright © P Squared Ltd 2013... - Page 22 The Monitor Output feed is muted whenever a Microphone Channel fader is opened. This output can be fed to an amplifier or directly to powered studio speakers. Monitor Section | Copyright © P Squared Ltd 2013...
-
Page 23: Setting Up The Myriad Intelligent Interface (Mii)
Cart Players and that the Cart Players are connected to Myriad Channels 1-4 on the SRM. This means that when you drop a Cart in to Cart Player 1 on Myriad, the Start button on Myriad Channel 1 on the SRM will illuminate. You can press this Start button to begin playback in Myriad and you can also pause playback by pressing the button again. -
Page 24: Starting & Stopping Playback In Myriad From The Srm
In addition to the functionality described above, MII also enables the Myriad Cart Players to check that the fader on the corresponding channel on SRM is in the open of closed position. If the fader is in the closed position (i.e. all the way down to the bottom) then the Cart Player will automatically switch into ‘Preview’... -
Page 25: Setting Up The Myriad Intelligent Interface
Windows XP Pro computers. You will also need to be running Myriad v3.6.1 or higher to use MII. 1. Plug a standard USB A to B cable in to the back of the SRM mixer (see below) and plug the other end into your Myriad playout PC. - Page 26 USB Serial Converter listed. This is the SRM. Don’t shut this window as you also need it for the next step. 4. The next stage is to identify the virtual COM port that the SRM is using to communicate with the PC.
- Page 27 6. Login to Myriad as a User that has access right to allow you to edit the Myriad Settings menu. 7. Click on the Settings Menu > Myriad Settings > Myriad Settings option. Setting Up The Myriad Intelligent Interface (MII) | Copyright © P Squared Ltd 2013...
- Page 28 8. Once the Myriad Settings window loads, select the Intelligent Int. tab (should be on the right hand side of the top row of tabs). This tab allows you to setup MII and configure the Myriad MII options. Setting Up The Myriad Intelligent Interface (MII) | Copyright © P Squared Ltd 2013...
- Page 29 Connection Details section. 2. Select P Squared SRM from the ‘Connected To’ drop down list. You will see the SRM logo displayed to the right of the list. Please note that P Squared SRM may be the only listed mixer.
-
Page 30: Trouble Shooting Mii
Change Player To Preview Mode When Fader Down Even If It In Use: If this option is ticked, the Myriad Cart Players will switch to preview mode when the corresponding faders on the SRM are in the down position. This will still allow playback but Myriad will tag them as in preview mode in the playlogs. -
Page 31: Myriad Reports 'Invalid Port Number' On Start-Up
Check that the SRM mixer is powered up. b. Check that the USB cable linking the SRM to the Myriad PC is fully plugged in at both ends. c. Use Device Manager (see Setting Up The MII above for more details) to ensure that the USB Serial Converter device is listed and working correctly. -
Page 32: Connecting The Telephone Equipment To The Srm
Male RJ11 to BT phone plug (male) cable to connect from the SRM to the BT phone socket on the wall. (Tip: You should get one of these with your telephone handset). -
Page 33: Using The Telephone Interface
SRM Operations Manual Use the RJ11 to BT Plug cable to connect the ‘Line’ socket on the SRM (Channel 9 rear panel) to the BT analogue phone line socket on your wall. Use the RJ11 to RJ11 cable to connect from the Handset socket on the SRM to the socket on your handset (usually on the side, rear or bottom of the handset). -
Page 34: Procedure For Making A Call And Routing It Through The Mixing Desk
4. When you are ready to transfer them to the SRM, pull down the TEL/Aux fader and press the PREFADE & TB button. This will allow you to hear the person on the phone and for them to hear you but for it to not be broadcast via the PGM or REC bus outputs. - Page 35 SRM Operations Manual 5. The call is now being routed via the SRM mixer and talkback to the caller is enabled via the microphone connected to Microphone Channel 1. With your headphones on and by talking into the microphone connected to Microphone Channel 1 you should be able to hear your caller and they should be able to hear you.
-
Page 36: Recording A Telephone Call While You Are 'On Air', For Broadcasting Later
Recording A Telephone Call While You Are ‘On Air’, For Broadcasting Later The SRM also makes it possible to record a telephone call to your Myriad playout system (or other recording equipment) when you are ‘on air’ without the listeners hearing your telephone call. -
Page 37: Table Of Contents | Copyright © P Squared Ltd
8. You will also need to press the REC button in the Monitoring section. This will switch both the LED Meter display and the selected speakers and headphones to ‘listen’ to the REC Output Bus (and not what you are broadcasting using the PGM Output Bus. Using The Telephone Interface | Copyright © P Squared Ltd 2013... -
Page 38: Trouble Shooting
Trouble Shooting Reducing Noise Using The R-BAL and C-BAL Adjustments The Telephone Interface on the SRM is factory setup to work with a standard BT telephone line and in most circumstances, should not need adjusting in any way. Occasionally the electronic characteristics of telephone lines can vary and this may lead to unwelcome ‘noise’... -
Page 39: Srm Setup Mode
The SRM can be setup using a combination of buttons on the mixer to enter the special Setup Mode, and once in Setup Mode, additional button combinations can be used to adjust the mixers basic programming. -
Page 40: Restore Factory Defaults
Restore Factory Defaults If you need to return your SRM back to its factory defaults, please follow the follow procedure. 1. Unplug the SRM. 2. Ensure all faders are closed. 3. Hold MONITOR REC and MONITOR AUTO PREFADE and PRESENTER AUTO PREFADE and GUEST AUTO PREFADE buttons all at the same time. -
Page 41: Switching On 48V Phantom Power On/Off Microphone Channels
For this reason, you can switch phantom power on and off for each of the Microphone / Line channels on the SRM. To switch phantom power on or off on a Microphone / Line channel on the SRM, use the following procedure: 1. - Page 42 A single meter sweep indicates entry into Setup Mode and the buttons can be released. 3. Once the sweep on the LED Meter has completed, the LED Meter should be indicating the number 1 on the scale. SRM Setup Mode | Copyright © P Squared Ltd 2013...
- Page 43 SRM Operations Manual It is important that the LED Meter indicates number 1 as the settings for the SRM are divided into separate ‘pages’ with different settings on each ‘page’. The phantom power settings are on ‘page’ one so the LED Meter must be displaying ‘1’ before you continue. If another number is indicated on the LED Meter (i.e.
- Page 44 Simply press the Mic/Line button until the light flashes twice, pauses and then flashes twice again. The channel is now in ‘mode 2’ and phantom power will be supplied when the channel is switched to microphone mode. SRM Setup Mode | Copyright © P Squared Ltd 2013...
-
Page 45: Other Channel Configuration - Advanced Settings
The following section outlines other settings that can be altered using a similar method to above. The first thing to consider is that the SRM settings are divided up into ‘pages’ with related settings collected onto specific pages. This allows us to use a few buttons to alter a number of settings with the same buttons performing different roles depending on what settings ‘page’... -
Page 46: Selecting The Settings Page You Want To Work With
2. First you need to put the SRM in Setup Mode. To do that hold MONITOR AUTO PREFADE and PRESENTER AUTO PREFADE and GUEST AUTO PREFADE buttons and press the MONITOR PGM button 5 times within 2 seconds. A single meter sweep indicates entry into setup mode and the buttons can be released. - Page 47 SRM Operations Manual To step through the available setting ‘pages’ press the GUEST TALKBACK button. Each press will advance the settings ‘page’ number by one. SRM Setup Mode | Copyright © P Squared Ltd 2013...
-
Page 48: Available Settings
So for example, the Mic/Line button on the SRM is used to select the mode for the Microphone / Line channels (on settings ‘page’ 1). If it is flashing twice, then pausing before flashing twice again then mode 2 is selected. -
Page 49: Settings Page 2 - Pgm & Rec Button Modes (Available On All Channels)
PFL Auto Cancel On Fader Open - PFL button selects/indicates current mode Mode 1 – Enabled (default) Mode 2 - Disabled Auto Pre Fade on Monitor, Presenter Headphones and Guest Headphones SRM Setup Mode | Copyright © P Squared Ltd 2013... -
Page 50: Settings Page 4 - Remote Modes
Channel 4 Mode 1 Line Mode 3 Channel 5 Myriad Mode 6 Line Mode 3 Channel 6 Myriad Mode 6 Line Mode 3 Channel 7 Myriad Mode 6 Line Mode 3 SRM Setup Mode | Copyright © P Squared Ltd 2013... -
Page 51: Saving Settings And Existing Setup Mode
To exit Setup Mode and save your settings, hold down the GUEST TALKBACK button for 2 seconds. The LED Meter display will perform a ‘dual sweep’ to indicate that the SRM has existed Setup Mode, the GUEST TALKBACK button can now be released. -
Page 52: Technical Specifications
-130dB with 150 Ω source. Stereo Inputs -92dBu ref 0dB (fader down, no routing) Distortion Total Harmonic Distortion: 0.015% at 1kHz, 0.015% at 10kHz ref +8dBu Range PAN Range: Off/-3dB Centre/Off Balance Range: ± 6dB Technical Specifications | Copyright © P Squared Ltd 2013... - Page 53 2 x RJ11-6-4 Telephone Line/Handset 1 x Remote Output 6.35mmm Stereo Jack socket Main Outputs: 2 x XLR-3 pin male (PGM Output) 1 x Stereo line pair phono sockets (REC Output) Monitor/Control: Technical Specifications | Copyright © P Squared Ltd 2013...
- Page 54 67cm (W) x 44cm (D) x 25cm (H) (Gross Boxed) Information and specifications correct at time of writing. P Squared reserves the right to alter or amend settings and specifications without prior warning. Copyright © 2011 P Squared Ltd Technical Specifications | Copyright © P Squared Ltd 2013...
- Page 55 Program Outputs (XLR) – Monitor & I/O Panel Signal Screen Hot Signal Cold Signal Presenter & Guest Headphones (1/4” Stereo Jack) – Monitor & I/O Panel Signal Left Audio Signal Right Audio Signal Ring Ground Sleeve Connectors & Pin Outs | Copyright © P Squared Ltd 2013...
- Page 56 Common Ground Sleeve USB Serial Use a standard USB A to B lead to connect the SRM to your Myriad PC. Only use good quality, pre- made USB leads. Main Power – IEC Only use the supplied, pre-moulded power lead for the SRM.
- Page 57 SRM Operations Manual Connector diagrams provided courtesy of Sonifex Ltd. Connectors & Pin Outs | Copyright © P Squared Ltd 2013...
-
Page 58: Notes
Notes: Notes: | Copyright © P Squared Ltd 2013... -
Page 59: P Squared Contact Details
1-2 Maritime House Livingstone Road Hessle East Riding Of Yorkshire UK, HU130EG Telephone: +44 (0)1482 350700 Fax: +44 (0)1482 350701 Email (sales): sales@psquared.net Email (support): support@psquared.net Web: www.psquared.net www.thesrm.co.uk P Squared Contact Details | Copyright © P Squared Ltd 2013...
Need help?
Do you have a question about the SRM and is the answer not in the manual?
Questions and answers