Table of Contents
Advertisement
Quick Links
Advertisement
Table of Contents

Related Manuals for Dawson EMV-220 METRIC

Summary of Contents for Dawson EMV-220 METRIC
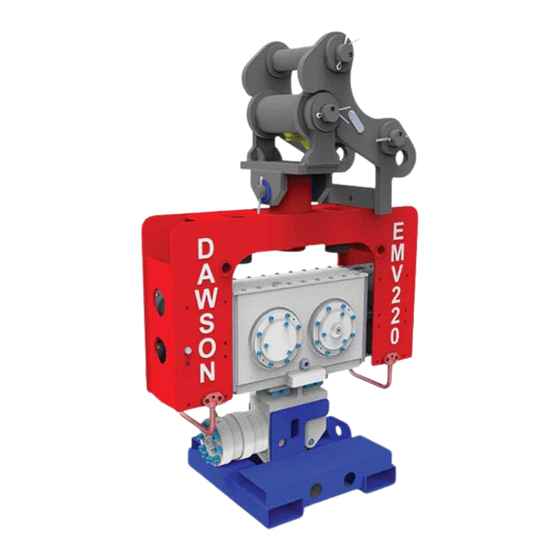
- Page 1 OPERATORS INSTRUCTIONS & SPARE PARTS LIST 220.000.00.00 EMV220v4 METRIC HOSE KIT...
- Page 3 EMV 220 OPERATORS INSTRUCTIONS & SPARE PARTS LIST PART No. 220.000.00.00 (Serial no.220-025 onwards) June 2015 v4...
-
Page 5: Table Of Contents
CONTENTS www.dcpuk.com EC Declaration of Conformity Introduction 2.1 Basic Safety Points 2.1.1 Who is responsible? 2.1.2 Working conditions 2.1.3 Working near underground obstacles 2.1.4 The Danger Area 2.1.5 Transporting the Vibrator 2.1.6 Transporting piles on site How does the EMV220 work? Mounting Instructions 4.1 Mounting the Vibrator 4.2 Hydraulic hoses - layout and connections... - Page 6 GENERAL NOTES www.dcpuk.com...
-
Page 7: Introduction
EMV product. It is not intended to be an exhaustive detailing of the manufacturers detailed knowledge of the product. Technical advise on this product is available through the manufacturer and their network of worldwide distributors. Please contact: Dawson Construction Plant Ltd Chesney Wold Bleak Hall Milton Keynes England... - Page 8 BASIC TECHNICAL SPECIFICATION EMV220 EMV22 www.dcpuk.com FIG.1 SPECIFICATIONS EMV220 UNITS METRIC STATIC MOMENT 2.3 kgm 200 in Ibs FREQUENCY 50 hz - 3,000 rpm CENTRIFUGAL FORCE 220 KN 50,236 lbs.F AMPLITUDE 12 mm 0.45 in REQUIRED HYDRAULIC FLOW RATE * 90 L/min 24 gpm MIN.
-
Page 9: Basic Safety Points
BASIC SAFETY POINTS • There should be visual contact between operator and slinger (spotter) at all times. • Monitor the piling operation constantly – interrupt the process immediately if any danger occurs. • Do not operate the vibrator if any person is within the Danger Area –... -
Page 10: The Danger Area
2.1.4 THE DANGER AREA Personnel are at risk when within this area from: • Falling piles – should the pile be handled incorrectly • Unexpected overturning of the excavator When transporting the vibrator, ensure it is placed correctly in the stand. 2.1.5 Once in place on the stand the jaws must be closed. -
Page 11: How Does The Emv220 Work
HOW DOES THE EMV WORK www.dcpuk.com Modern pile vibrators basically work in the same way. Pairs of high-speed contra-rotating eccentric weights are geared together so as to produce net vertical vibratory forces. The vibrations produced are transmitted to the pile through a powerful hydraulic movement) as the gearbox itself. - Page 12 & sequence valve gearbox saddle assembly hydraulic drive motor transport stands gearbox eccentric weight drive gear direction of motion resulting direction of force Motion of a pair of eccentrics Corresponding Sinusoide Time...
-
Page 13: Mounting Instructions
MOUNTING THE VIBRATOR allowed to hang freely once installed. Remove the bucket prior to installing the EMV. the Dawson adaptor bracket. Standard brackets are available for different machine size ranges. Typically, one end widths by using a kit of bushes and spacers. -
Page 14: Hydraulic Hoses - Layout And Connections
HYDRAULIC HOSES - lines (already connected to the vibrator) have metric 16 S. The pressure line is LAYOUT & CONNECTIONS usually connected to the bucket ram “extend” circuit and the return line to the bucket ram “retract” circuit. The third, and smaller, drain line is fed either directly back into the hydraulic tank on the excavator, or connected to the breaker circuit Connect to bucket ram extend hose... -
Page 15: Operating Instructions
OPERATING INSTRUCTIONS www.dcpuk.com PREPARATIONS - BEFORE functioning and performing correctly and that the EMV method of piling is DRIVING / EXTRACTING PILES In order to meet this responsibility please note the following points:- Bundles of sheet piles should be set out on the job site so as to Ensure that all piles have Ø40mm(Ø1½”) holes cut in them approximately 250mm(10”) down from the top edge prior to commencement of the piling operation. -
Page 16: Extracting Piles
Check which way around the pile has to be lifted before inserting the lifting chain – was the previous pile pitched left or right handed? Insert the lifting chain correctly (no twists, knots etc) through the lifting hole in Allow enough free chain length for the pile to rotate to vertical during the lifting process without jamming against the underside of the clamp body. - Page 17 Ensure that it is safe to move the dipper arm. Release the stand from the jaws of the vibrator by operation of the retract bucket ram control function in the cab. Manoeuvre the vibrator above one end of the pile to be extracted so that there is enough distance to allow safe insertion of the lifting chain through the hole at the top of the pile.
- Page 18 Top fasteners Lower fasteners Safety stops gearbox casing hits the safety stops (100mm). When driving piles a maximum with the lower.
-
Page 19: Maintenance
Visual inspection of the EMV by a competent person on a daily basis and before being taken into service can prevent many potential problems from occurring. personnel using original Dawson parts. The use of other parts will be positioned so as to be stable at all times. - Page 20 several times – any binding or hesitancy with its operation should result anchorage point should be in good order showing no signs of damage, wear or cracking. Remember if in doubt change it – Chains, Chain Clamps & Couplers Inspect the condition of the Hard Jaws. To be acceptable these should look to be in almost as new condition.
- Page 21 movement will allow the assembly to rattle around, make more noise and cause in turn more wear. If the axial play exceeds 1mm it will be necessary to tighten the nut. To do this remove the coil/spring pin with a punch and hammer, tighten the nut further and drill and pin it in the new position.
- Page 22 It is recommended that the unit be inspected and serviced by the manufacturer. EVERY 100 Apart from undertaking to do the relevant preventative maintenance work HOURS and checks as described above Dawson will inspect the structural integrity unchecked. Bearings and gears will also be inspected to check for signs of...
-
Page 23: Trouble Shooting
TROUBLE SHOOTING www.dcpuk.com Please ensure that troubleshooting, inspection work and repairs are undertaken or by your local approved Dawson distributor. The following guidelines are 7.1.1 Check that base machine hydraulics lines are correctly connected EMV CLAMP DOES – see section 4.2. Operate control lever in both directions to check NOT CLOSE 7.1.2 Remove the check valve cartridge from the rear of the clamp... -
Page 24: Emv Clamp Closes But The Unit Will Not Vibrate
EMV CLAMP CLOSES sure output of the excavator is too low the EMV will not run at all. This BUT THE UNIT WILL NOT VIBRATE before oil can pass to the drive motor. the clamp close line and monitoring the pressure at which the valve opens. -
Page 25: Oil Blowing Out Of The Motor Blow-Off Valve
Compensator Relief Valve Cartridge with Adjusting Screw & Locknut 7.4.1 Drain line restricted or blocked – stop work immediately. OIL BLOWING OUT OF THE MOTOR BLOW-OFF VALVE Motor Blow Off Valve 7.4.1.2 Check the drain hose for damage – look carefully as the bore of the hose can be crushed even when the outside of the hose looks to be in good order at a casual glance. - Page 26 7.4.2 Drain line being pressurised – check that the line is not connected to a supply line e.g. the pressure line from a breaker circuit. 7.4.3 Long drain hose or the hose bore too small – either of these can contribute to an increase in back pressure.
-
Page 27: Clamp Closes Itself Immediately After Being Opened
This fault can only occur on older units prior to serial number 45-083 without the CLAMP CLOSES ITSELF IMMEDIATELY AFTER BEING OPENED clamp the drive motor can then rotate slowly. Once the control lever is released the motor effectively becomes a pump, driven by the inertia of the eccentric Check the condition of the Hard Jaws –... - Page 28 8.0 HYDRAULIC METRIC HOSE KIT PART No. 220.000.00.00 (Serial no.220-025 onwards)
- Page 30 HOSES Item Serial No. Description Qnty 0284-08-24 1/2” 4SP C/L = 1200mm 0084-08-24 0184-08-24 1/2” 4SP C/L = 745mm 0084-08-24 0184-08-24 1/2” 4SP C/L = 830mm 0084-08-24 0285-06-18 3/8” 2SC C/L = 1230mm 0085-06-18 0185-06-18 3/8” 2SC C/L = 970mm 0085-06-18 0185-06-18 3/8”...
-
Page 31: 9.0 Parts Lists For The Emv220
9.0 PARTS LISTS FOR THE EMV220 PART No. 220.000.00.00 (Serial no.220-025 onwards) - Page 32 Replace Replaced by X = +/- 0.5 ROUGH MACHINE N9 X . X = +/- 0.25 Sheet Date FINE MACHINE N8 X . XX = +/- 0.05 DAWSON CONSTRUCTION ANGLES +/- 0.5° Drawing no. GRIND PLANT LTD. DIMENSIONS IN MILLIMETERS...
- Page 33 Replace Replaced by X = +/- 0.5 ROUGH MACHINE N9 X . X = +/- 0.25 Sheet Date FINE MACHINE N8 X . XX = +/- 0.05 DAWSON CONSTRUCTION ANGLES +/- 0.5° Drawing no. GRIND PLANT LTD. DIMENSIONS IN MILLIMETERS...
- Page 34 Replace Replaced by X = +/- 0.5 ROUGH MACHINE N9 X . X = +/- 0.25 Sheet Date FINE MACHINE N8 X . XX = +/- 0.05 DAWSON CONSTRUCTION ANGLES +/- 0.5° Drawing no. GRIND PLANT LTD. DIMENSIONS IN MILLIMETERS...
- Page 35 Replace Replaced by X = +/- 0.5 ROUGH MACHINE N9 X . X = +/- 0.25 Sheet Date FINE MACHINE N8 X . XX = +/- 0.05 DAWSON CONSTRUCTION ANGLES +/- 0.5° Drawing no. GRIND PLANT LTD. DIMENSIONS IN MILLIMETERS...
- Page 36 Replace Replaced by X = +/- 0.5 ROUGH MACHINE N9 X . X = +/- 0.25 Sheet Date FINE MACHINE N8 X . XX = +/- 0.05 DAWSON CONSTRUCTION ANGLES +/- 0.5° Drawing no. GRIND PLANT LTD. DIMENSIONS IN MILLIMETERS...
- Page 37 Replace Replaced by X = +/- 0.5 ROUGH MACHINE N9 X . X = +/- 0.25 Sheet Date X . XX = +/- 0.05 DAWSON FINE MACHINE N8 CONSTRUCTION ANGLES +/- 0.5° Drawing no. GRIND PLANT LTD. DIMENSIONS IN MILLIMETERS...
- Page 39 Replace Replaced by X = +/- 0.5 ROUGH MACHINE N9 X . X = +/- 0.25 Sheet Date X . XX = +/- 0.05 DAWSON FINE MACHINE N8 CONSTRUCTION ANGLES +/- 0.5° Drawing no. GRIND PLANT LTD. DIMENSIONS IN MILLIMETERS...
- Page 41 TIGHTENING TORQUES FOR SCREWS WITH STANDARD METRIC THREAD Preload values F based on Tightening torques M Wrench size for Grades in N based on Grades in Nm Screw size Hex head screw Socket head screw 10.9 12.9 10.9 12.9 Inch Inch M4 x 0.7 3,900...
- Page 42 Dawson Construction Plant Ltd Chesney Wold. Bleak Hall, Milton Keynes, MK6 1NE, England Tel: +44 (0) 1908 240300 Fax: +44 (0) 1908 240222 D.C.P. RESERVES THE RIGHT TO DISCONTINUE EQUIPMENT AT ANY TIME, OR CHANGE SPECIFICATIONS OR DESIGNS WITHOUT NOTICE OR INCURRING OBLIGATIONS...
- Page 43 PRE-DELIVERY INSPECTION SHEET EMV’S, VPC’S AND EMD’S MACHINE TYPE EMV550 EMV450 EMV400 EMV300 EMV70 EMD140 EMD70 Serial No: ADAPTOR BRACKET / QUICK HITCH ASSEMBLY Adaptor Pin Diameter Length Photo taken before dispatch: Bushes List Additional Spares Supplied SADDLE ASSEMBLY HOSES Hoses Condition Sandwich Mount Condition Spring Guard Condition...
- Page 44 A GUIDE TO EMV GENERAL MAINTENANCE PROCEDURE (USED WITH PDI CHECK SHEET) DEALER NETWORK GLOBAL SUPPLY, LOCAL SUPPORT. DAWSON CONSTRUCTION PLANT CHESNEY WOLD, BLEAK HALL, MILTON KEYNES, MK6 1NE ENGLAND TEL. +44 1908 240300 FAX. +44 1908 240222 EMAIL. DAWSON@DCPUK.COM...
- Page 46 ADAPTOR BRACKET ASSEMBLY Remarks: • Check for wear on pin adaptor • Visual inspect weld condition • Check bushes for wear • Check pin is ok, free from warping Severe wear to pin Wear to bush Wear to adaptor • Check for wear to post •...
- Page 47 GEARBOX ASSEMBLY Remarks: • Check general condition • Check temperature of bearing - (Run on test pile for 15mins, check and compare, temperatures on bearing caps should be even) • Visual check for oil leaks - Bearing Cover / Gasket •...
- Page 48 HOSE ASSEMBLY Remarks: • Check general condition • Check spring guard condition Severe damage to hose assembly • Insure ttings are all tight • Check for running leaks...
- Page 49 4mm new jaw 2mm acceptable wear level limit SECTION OF JAW CLAMP ASSEMBLY Remarks: • Check Static and Moving jaw wear on teeth and general damage • Inspect chain for damage Severe damage and wear to teeth on jaws on left, in comparrison new jaw on right Damage to chain link •...
- Page 50 STAND Remarks: • Inspect general condition of stand...
- Page 51 DAWSON EMV INSPECTION PROCEDURE Dawson Construction Plant Ltd Chesney Wold. Bleak Hall, Milton Keynes, MK6 1NE, England Tel: +44 (0) 1908 240300 Fax: +44 (0) 1908 240222 D.C.P. RESERVES THE RIGHT TO DISCONTINUE EQUIPMENT AT ANY TIME, OR CHANGE SPECIFICATIONS OR DESIGNS WITHOUT NOTICE OR INCURRING OBLIGATIONS...
Need help?
Do you have a question about the EMV-220 METRIC and is the answer not in the manual?
Questions and answers