
Summary of Contents for NMC UDO LP400 Series
- Page 1 UDO LP400 USER GUIDE v5.2 Presented by 100 Providence Pike North Smithfield, RI 02896 (800) 453-2727 www.nationalmarker.com...
-
Page 2: Table Of Contents
UDO LP400 User Guide _____________________________________________________________________________________________________ Table of Contents I. Product Description II. Technical Support & Assistance III. Switches, Indicators & Connections IV. Setting-Up the UDO LP400 Printer A. Installing Cables B. Installing Vinyl Rolls C. Installing Printer Ribbons V. Loading UDO LP400 Software & Printer Driver VI. -
Page 3: Product Description
UDO LP400 so that you may utilize your new sign and labeling system to its fullest capabilities. If you require assistance with your UDO LP400 or would like to offer any comments or suggestions, please contact NMC at the address below. Technical Support & Assistance Attn: UDO LP400 Technical Support... -
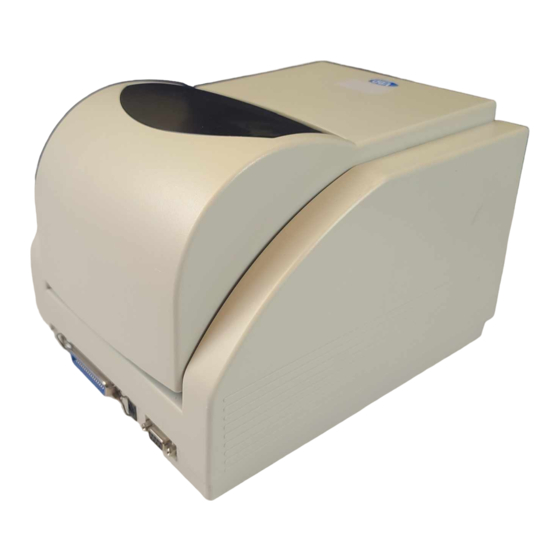
Page 4: Switches, Indicators & Connections
UDO LP400 User Guide _____________________________________________________________________________________________________ III. Switches, Indicators and Connections UDO LP 400 LABELMAKER The table below summarizes the functions of the various printer switches (buttons), indicators and connections (see diagrams on page 3). Device Name Function Usage • ON / OFF On –... - Page 5 UDO LP400 User Guide _____________________________________________________________________________________________________ III. SWITCHES, INDICATORS & CONNECTIONS (cont.) 3. READY Light 7. Top Cover 4. POWER Light 2. FEED button 1. ON / OFF Switch 8. Cutter / Discharge Back of Printer 6. USB Port 10. Power Adapter 5.
-
Page 6: Setting-Up The Udo Lp400 Printer
Do not attempt to disassemble the printer if it malfunctions. • All rights reserved. No part of this document may be reproduced or issued to third parties in any form without the express written permission of NMC – National Marker Company. •... -
Page 7: Installing Vinyl Rolls
UDO LP400 User Guide _____________________________________________________________________________________________________ B. Installing Vinyl Rolls (Figs. 2-4): 1. Select the desired vinyl roll and remove from packaging. 2. Open the printer lid and press down on the two (2) purple buttons to open the Print Head (Fig. 2). 3. -
Page 8: Installing Printer Ribbons
UDO LP400 User Guide _____________________________________________________________________________________________________ C. Installing Printer Ribbons 1. Remove the printer ribbon from its packaging. (Note: The black, blue & red ribbons have a blue outer casing; thus, they will need to be unwound until the appropriate color is revealed.) 2. -
Page 9: Loading Udo Lp400 Software & Printer Driver
‘CD drive’, and double-click ‘start.exe’. 4. A “Printer Port Detection Tool” box will open. This screen will recommend which port the UDO LP400 Series Printer should use. Write this port down for later use and click ‘Close’. 5. Click ‘Install UDO LP’. - Page 10 UDO LP400 User Guide _____________________________________________________________________________________________________ 7. Click ‘Next’ and follow the step-by-step Setup 8. ‘Click’ accept the terms of the License Wizard to install the LP400 Series Software. Agreement and Click, ‘Next’. (Note: The default options which are set are those which are recommended.) 9.
- Page 11 UDO LP400 User Guide _____________________________________________________________________________________________________ Congratulations! Your UDO LP400 software is now installed and ready to use. “Check” Run UDO LP and “Finish” to open your software. 13. To activate your software click ‘Activate the 14. Enter your ‘Key Number’ and click ‘Next’. Package’;...
-
Page 12: Set-Up Procedure For Printing On Continuous Vinyl
UDO LP400 User Guide _____________________________________________________________________________________________________ Set-up Procedure for Printing on Continuous Vinyl 1. To start the UDO LP400 Program – Double-click on the ‘UDO LP400’ desktop icon. 2. To create a new label or retrieve an existing one, Select the ‘File’ menu; Select either ‘New’... -
Page 13: Lp400 Printer Properties
UDO LP400 User Guide _____________________________________________________________________________________________________ b. “Label Setup” Box (cont.) The default settings are set to print on a continuous vinyl label whose dimensions are H: 3.937” X W: 12” (Fig. 3). The height and width may be adjusted, as desired. The Width can be increased to a maximum of 43”. Adjust the Height setting accordingly if you are not using a 4”... -
Page 14: Advanced Setup
UDO LP400 User Guide _____________________________________________________________________________________________________ b. Advanced Setup. You may alter the margin between the last printed element on the label and the point at which the cutter blade is activated by removing the “checkmark” in the box next to ‘Stop on last element’. -
Page 15: Navigating The Toolbars
UDO LP400 User Guide _____________________________________________________________________________________________________ VII. Navigating the Toolbars A. The Toolbox Toolbar The Toolbox Toolbar contains all frequently used tools to facilitate the design and printing of labels. Toolbox icons enable you to select elements, invert images, and add text, pictures, shapes, bar codes, etc. -
Page 16: The Text Toolbar
UDO LP400 User Guide _____________________________________________________________________________________________________ • Picture The Picture tool allows graphics to be placed on labels. It can be used to add pictures of products, company logos, etc. • Rectangle The Rectangle tool allows you to design and position a rectangle or square. The upper left corner of the box is set by clicking the desired position;... -
Page 17: The Alignment Toolbar
UDO LP400 User Guide _____________________________________________________________________________________________________ • Font Name Shows the name of the font in use. Pull down menu allows you to change the font. • Font Types ptions for fonts installed on your computer and available printer fonts. Note: You can limit the display of fonts in the list. You can list all fonts on the system, only graphic fonts (TrueType, opentype, type1, bitmap Windows fonts) or only thermal printer resident fonts. - Page 18 UDO LP400 User Guide _____________________________________________________________________________________________________ Design / Alignment Toolbar • Left Align Aligns objects to the left. • Center Align Aligns objects to the center. • Right Align Aligns objects to the right. • Top Align Aligns objects to the top •...
-
Page 19: The Basics Of Designing A Label
This section will take you through the basic steps of how to insert an image onto a label. For more in-depth information, click the ‘Help’ menu at the top of the screen or contact NMC. 1. Click on the ‘Picture’ button (Fig. 1) in the toolbox toolbar to the left of the screen. -
Page 20: Inserting Text
This section will take you through the basic steps of how to insert text onto a label. For more in-depth information, click the ‘Help’ menu at the top of the screen or contact NMC. 1. Click on the ‘Text’ button (Fig. 2) located on the toolbox toolbar to the left of the screen (Note: The A will appear next to the cursor.) Move the cursor to... -
Page 21: Resizing & Positioning Objects
This section will take you through the basic steps of how to add a variable to a label. For more in-depth information, click the Help menu at the top of the screen or contact NMC. The variable wizard simplifies and speeds up the creation of the most common types of variables. -
Page 22: Inversing
This section will take you through the basic steps of how to add an inverse object to a label. For more in-depth information, click the ‘Help’ menu at the top of the screen or contact NMC. The Inverse tool creates a rectangle that produces the inverse image of all elements within the box. -
Page 23: Rotating Text & Symbols
This section will take you through the basic steps of how to rotate an object on a label. For more in-depth information, click the ‘Help’ menu at the top of the screen or contact NMC. Select the object. Click on the ‘Rotate’... - Page 24 UDO LP400 User Guide _____________________________________________________________________________________________________ Fig. 6 Double click on the text and go to the Layout tab (Fig. 7) Fig. 7 Increase the Start Angle so that the text is at the top of the screen (Fig. 8) Fig. 8 LP400 User Guide (11/07)
-
Page 25: Importing Pictures
This section will take you through the basic steps of how to import a picture to a label. For more in-depth information, click the ‘Help’ menu at the top of the screen or contact NMC. 1. Click on the ‘Picture’ tool in the Toolbox (Fig. 5). -
Page 26: Multi-Band Printing: Creating Large Signs & Labels
The label bands can then be joined together to form one large label or sign. The UDO LP400 Series Software is capable of printing from 2 to 5 vinyl strips of 4” widths; enabling you to produce signs up to 20” in height. -
Page 27: Common Applications
UDO LP400 User Guide _____________________________________________________________________________________________________ When you enable the multi-band option, some options in the dialog box will become unavailable as multi-band printing overrides them. The dimensions of the label are entered in millimeters (mm), centimeters (cm), inches (inch) or dots (dot) according to your previous selection. You can change the unit that dimensions are displayed in by clicking the ‘Unit’... - Page 28 For more in-depth information, click the ‘Help’ menu at the top of the screen or contact NMC. Designing this label will require you to incorporate both text and a symbol from the built- in clipart gallery into the label.
- Page 29 UDO LP400 User Guide _____________________________________________________________________________________________________ Fig. 2 5. The label should now appear as in Figure 3. Hold down the ‘Ctrl’ button and Click on the ‘right alignment’ tool from the Design/Alignment Toolbar. Hold down the ‘Ctrl’ button and Click on the ‘Vertical Center Alignment’ tool from the Design/Alignment Toolbar.
- Page 30 UDO LP400 User Guide _____________________________________________________________________________________________________ Text Increase Center Design / Bold Text Font Size Align Text Alignment Toolbar Selected Fig. 4 Text Box 6. Select the ‘Text’ tool (Fig. 4) from the toolbox toolbar located on the left side of the screen. Position the cursor on the label and click. (Note: The ‘A’ will appear next to the cursor.) Type in the text “Main Office”...
-
Page 31: Pipe Marker Sign
This section will take you through the steps of how to design and print a directional pipemarker label. For more in-depth information, click the ‘Help’ menu at the top of the screen or contact NMC. Designing this label will require you to incorporate both text and a symbol from the built- in clipart gallery into your label. - Page 32 UDO LP400 User Guide _____________________________________________________________________________________________________ Left Text Alignment Option Bottom Transformations Alignment Menu Rotate Object Fig. 6 7. Select the ‘Picture’ tool (Fig. 7 located on the toolbar to the left of your screen. Click the cursor in the label field where you want the image located. 8.
- Page 33 UDO LP400 User Guide _____________________________________________________________________________________________________ Center Alignment Insert Alignment Picture Fig. 7 12. Click ‘Select’ in the Toolbox on the left. Click and Drag over the objects to select them both. You can also click ‘Edit’ from the top menu then click Select and choose ‘Select All’...
- Page 34 UDO LP400 User Guide _____________________________________________________________________________________________________ Vertical Center Horizonal Space Equally Group Ungroup Fig. 8 Rotate 180° 19. With all the objects selected, hold down the ‘Ctrl’ button and Click the ‘Ungroup’ icon from the Design/Alignment Tool Bar. Click on the outside of the label to unselect all of the objects.
-
Page 35: Inverted Text
This section will take you through the steps of how to design a label using the Inverse feature. For more in-depth information, click the ‘Help’ menu at the top of the screen or contact NMC. 1. Open the ‘File’ menu and select ‘New’ to create a new label. - Page 36 UDO LP400 User Guide _____________________________________________________________________________________________________ 7. With the Inverse Box selected, hold down the ‘Ctrl’ button and Click the ‘Top Alignment’ icon. Click the ‘Center Alignment’ icon from the Design/Alignment Tool Bar. The label should appear as in Figure 11. Fig.
-
Page 37: Multi-Band Printing
Multi-band printing or tiling enables you to make signs and labels up to 20 inches in height and 43 inches in length. The UDO LP400 Series Software is capable of printing from 2 to 5 vinyl strips of 4” widths enabling you to produce signs up to 20” in height. - Page 38 UDO LP400 User Guide _____________________________________________________________________________________________________ 3. Click the ‘Multi-band Printing’ button (Fig. 14). In the Multi-band Printing dialogue box, click on the box beside ‘Enable Multi-band Printing’ to select this option. 4. Change the number of bands to the required quantity. In this example use 3. 5.
- Page 39 UDO LP400 User Guide _____________________________________________________________________________________________________ protection symbol’ (top row, 5 image from the left). Click ‘OK’. Resize the image by clicking and dragging on one of the handles around the image. 16. Click the ‘Text’ tool. Click in the label area. Type “DO NOT OPERATE THIS MACHINE WITHOUT EYE PROTECTION”.
- Page 40 UDO LP400 User Guide _____________________________________________________________________________________________________ 4. ‘Click’ on the Value tab and ‘select’ Fixed as your defined object (Fig. 17). (Use this box to insert the text you wish to print on your label.) Fig. 17 5. In the box which appears below ‘Fixed’ (Fig. 17), enter the text you wish to appear on your label.
- Page 41 UDO LP400 User Guide _____________________________________________________________________________________________________ 3. Setting up a variable 1. Click ‘Data’ in the menu bar at the top of the screen. Select ‘Variables’. A dialog box will open. Click the ‘New’ button. Another dialog box will open. 2. Click on the ‘Advanced’ button at the bottom left of the dialog box. (Note: If the Basic <<...
- Page 42 UDO LP400 User Guide _____________________________________________________________________________________________________ 1. Double Click on the inside of the barcode to open the ‘Barcode Dialog Box’ (Fig. 19). You can also right click and select ‘Bar Code Properties’ to open the ‘Barcode Dialogue Box’. 2. Click on the ‘Bar Code’ tab. Click on the ‘Define’ box. (Fig. 19). 3.
- Page 43 UDO LP400 User Guide _____________________________________________________________________________________________________ 1. Double Click on the inside of the barcode to open the ‘Barcode Dialog Box’ (Fig. 19). You can also right click and select ‘Bar Code Properties’ to open the ‘Barcode Dialogue Box’. 2. Click on the ‘Bar Code’ tab. Click on the ‘Define’ box. (Fig. 19). 3.
- Page 44 UDO LP400 User Guide _____________________________________________________________________________________________________ Fig. 20 To change the text beneath the barcode: 1. Double Click on the inside of the barcode to open the ‘Barcode Dialog Box’ (Fig. 19). You can also right click and select ‘Bar Code Properties’ to open the ‘Barcode Dialogue Box’.
-
Page 45: Troubleshooting
• Cutter failed or jam at the cutter Check the cutter and remove any • jams Hardware error • Call NMC at (800) 453.2727 for service The computer shows “Printer Time Out” error message Possible Problem Solution • • USB or power connection failed Check all cable connections. -
Page 46: Maintenance
UDO LP400 User Guide _____________________________________________________________________________________________________ Half of the label prints faded or only half of the label prints Possible Problem Solution • • Print head not clicked in firmly on Open and close the print head both sides making sure both sides click in place. -
Page 47: General Printer Specifications
UDO LP400 User Guide _____________________________________________________________________________________________________ General Printer Specifications Print Technology Thermal Transfer Resolution 203 DPI (dots per inch) 8 dots/mm Maximum Print Width 4.10 in. (104mm) Maximum Print Length 45 in. (1143mm) Printer Speed 1” – 4” per second, default set for optimum print quality at 1.5”/sec.
Need help?
Do you have a question about the UDO LP400 Series and is the answer not in the manual?
Questions and answers