
Summary of Contents for Genesis GHG1500A
- Page 1 Dual-Temp Heat Gun Pistolet thermique a deux temperatures Pistola de aire caliente dos niveles de temperatura Operator’s Manual Manuel d’utilisation Manual del Operario GHG1500A...
-
Page 2: Specifications
DUAL-TEMP HEAT GUN 1500 W Operator’s Manual Specifications: • Model: GHG1500A • Rated Voltage: 120V AC, 60HZ, 12.5 Amp • Output: 750/ 1500 Watts • Air Temperature: 572 / 1000 °F • Air Volume: 10/17 cu. ft. / min Includes: (2) Deflector nozzles, (1) reflector nozzle and (1) Air reduction nozzle WARNING: To reduce the risk of injury, user must read and understand this operator’s manual before operating this tool. Save this Manual for future reference. -
Page 3: Electrical Safety
WARNING: READ AND UNDERSTAND ALL WARNINGS, CAUTIONS AND OPERATING INSTRUCTIONS BEFORE USING THIS EQUIPMENT. Failure to follow all instructions listed below may result in electric shock, fire and/or serious personal injury. SAVE THESE INSTRUCTIONS WORK AREA SAFETY: Keep your work area clean and well lit •... - Page 4 • Use the correct power tool for the job. Don’t force the tool or attachment to do a job for which it is not designed. • Do not use tool if switch does not turn it on or off. Any tool that cannot be controlled with the switch is dangerous and must be repaired or replaced by an authorized service center • Turn power tool off, and disconnect the plug from the power source and/or battery pack from the power tool before making any adjustments, changing the accessories, or storing the tools Such preventive safety measures reduce the risk of an accidental start up which may cause personal injury • Store idle tool out of reach of children and other inex erienced persons. It is dangerous in the hand of untrained users. • Maintain power tools with care. Check for proper alignment and binding of moving parts, component breaks, and any other conditions that may affect the tool’s operation. A guard or any other part that is damaged must be properly repaired or replaced by an authorized service center to avoid risk of personal injury. • Use recommended accessories. Using accessories and attachments not recommended by the manufacturer or intended for use on this type tool may cause damage to the tool or result in personal injury to the user. Consult the operator’s manual for recommended accessories. Dual-Temp Heat Gun Operator’s Manual GHG1500A...
-
Page 5: Extension Cords
• Keep cutting tools sharp and clean. Properly maintained cutting tools with sharp cutting edges are less likely to bind and are easier to control • Feed the work piece in the correct direction and speed. Feed the work piece into a blade, cutter, or abrasive surface against the direction of the cutting tool’s direction of rotation only. Incorrectly feeding the work piece in the same direction may cause the work piece to be thrown out at high speed. • Never leave the tool running unattended, turn the power off. Do not leave the tool until it comes to a complete stop. • Never start the power tool when any rotating component is in contact with the work piece. WARNING: USE OF THIS TOOL CAN GENERATE AND DISBURSE DUST OR OTHER AIRBORNE PARTICLES, INCLUDING WOOD DUST, CRYSTALLINE SILICA DUST AND ASBESTOS. Direct particles away from face and body. Always operate tool in a well-ventilated area and provide for proper dust removal. - Page 6 Do not use near flammable liquids or in explosive atmospheres • containing fumes, gases, or dust. Flameless heat from the heat gun may ignite the dust or fumes. All materials or debris which may be ignited should be removed from the work area. Shield materials around the heated work area • to prevent property damage or fire. Always hold the heat gun by its handle. • Do not touch the nozzle or accessory tips, allow them to contact flammable material, or store the heat gun until the nozzle has cooled to room temperature. The metal nozzle may require 20 minutes or more to cool adequately before it can be touched. Contacting the heated nozzle or accessory tips can cause personal injury. While cooling, the heat gun should be placed in a clear area away from combustible materials while cooling to prevent flammable materials from igniting. Dual-Temp Heat Gun Operator’s Manual GHG1500A...
- Page 7 When not hand held, place the heat gun on a stable, level surface • using non-combustible support pads or support stand so the nozzle is directed upwards, away from the supporting surface. The cord should be positioned so that it won't contact the hot nozzle or cause the heat gun to fall over. Do not leave the heat gun unattended • while running or while cooling down. Do not cut off airflow from the heat gun • by placing nozzle too close to the work piece. Do not obstruct airflow through the intake vents. Restricting heat gun airflow may cause overheating. Store indoors in a dry, high location out of reach by children and •...
- Page 8 9. Clean up all removed paint and dust by wet mopping the floors . Use a wet cloth to clean all walls, sills and any other surface where paint scrapings or dust have accumulated. DO NOT SWEEP, DRY DUST OR VACUUM. Use a high phosphate detergent, trisodium phosphate (TSP), or a trisodium phosphate substitute to clean and mop the work area. 10. Properly dispose of paint scrapings. Following each work session put the paint chips, scrapings, and debris in a double plastic bag. Close it with tape or twist ties and dispose of properly. 11. Remove protective clothing and work shoes in the work area to avoid transferring dust to other parts of the building. Wash work clothes separately. Wipe shoes off with a wet rag that is then washed with the work clothes. Wash hair and body thoroughly with soap and water. SAVE THESE INSTRUCTIONS Dual-Temp Heat Gun Operator’s Manual GHG1500A...
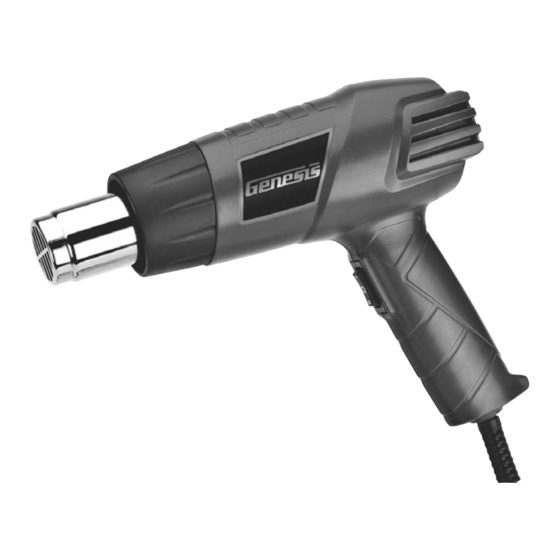
- Page 9 YOUR HEAT GUN FIG 1 1. Trigger Switch 2. Air Nozzle 3. Reflector Nozzle 4. Deflector Nozzle 5. Deflector Nozzle 6. Air Reduction Nozzle UNPACKING AND CONTENT IMPORTANT: Due to modern mass production techniques, it is unlikely the tool is faulty or that a part is missing. If you find anything wrong, do not operate the tool until the parts have been replaced or the fault has been rectified.
-
Page 10: Operation
To reduce the risk of burns and/or fire, keep the tool moving at all times over the material you are heating. This product is a dual temperature control heat gun and uses a 3 position rocker type switch. Moved to the center position, marked “ ”, the heat gun is turned OFF. Depress the lower switch portion completely, marked “ ”, for the “Low” temperature range. Depress the upper switch portion completely, marked “ ”, for the “High” temperature range. 1. Plug the heat gun into a properly rated outlet. 2. If using an accessory nozzle tip, install the desired accessory nozzle tip by sliding it onto the nose of the heat gun. 3. Depress completely the upper or lower portion of the rocker switch to obtain the desired heat range. It is suggested that you start in the lower heat range when beginning an operation and then move to the higher temperature range if needed. 4. To turn the heat gun off after use, move the switch to the center position, “ ”. 5. A llow the heat gun nozzle to cool by resting the gun on the rear air intake housing and the handle, with the gun's nozzle pointing upward. Dual-Temp Heat Gun Operator’s Manual GHG1500A... - Page 11 The correct amount of heat used for each application depends on the selected heat range, material being worked, the distance of the nozzle from the work surface and length of time that heat is applied to the work surface. We recommend that you experiment with a piece of scrap material before performing an operation. Carefully approach the work until you determine the proper combination of heat range, distance from the work surface and duration of heat application. Always maintain heat gun movement over the work surface using a gentle back and forth movement while applying heat unless you find that a concentrated application of heat best delivers the desired results for a particular operation. APPLICATIONS WARNING: Reduce the risk of heat damage and personal injury, shield combustible materials and areas adjacent to the work piece. Protect yourself from hot paint scrapings and dust. Stripping paint 1. F it the wide “deflector” accessory tip onto the heat gun nozzle. This tip will spread the heat over a wider surface area, speeding paint removal. The “deflector” tip will also help protect window glass from cracking due to thermal shock when removing paint near the glass.
- Page 12 Do not attempt soldering copper pipe and pipe fittings intended for use without first investing the required time to practice and master this plumbing skill. Only after successfully joining and then testing the joints for strength and leakage should you attempt performing this operation. 1. A ttach the soldering or the reflector accessory tip to the heat gun nozzle. 2. D eburr the pipe and fitting using a file of sandpaper. Then clean the inside of the fitting and the exterior portion of the pipe to be fitted using a wire brush, sandpaper, or steel wool. 3. C oat the clean exterior portion of pipe and the fitting's interior with flux. Then slide the fitting over the pipe with a twisting motion and ensure the fitting is aligned properly. 4. S lip the accessory nozzle around the joint to be soldered. Using the high temperature setting on the heat gun, heat the joint. 5. W hen the flux bubbles and the copper becomes slightly lighter in color, apply the solder wire to the perimeter of the joint and reposition the heat gun so excess solder does not drip into it. Remove the heat gun when the solder begins to evenly flow into and around the joint. Then wipe around the still hot joint with a damp rag to remove excess solder and flux. 6. I f the joint's fitting is connecting more than one piece of pipe, all the pipe ends going into the common fitting and fitting's internal surfaces should be properly prepared and connected together. Then all the joints should be soldered in a single operation. (When soldering a new connection into a fitting already containing a finished pipe joint, you risk melting the previously soldered joint and creating an eventual leak or failed joint.) Soldering copper pipe fittings is commonly referred to as “sweating”. The solder joins and seals the pipe to fitting via capillary action which draws, or “sweats”, the molten solder into the gap between the pipe and fitting surfaces, creating a strong and leak free seal. Dual-Temp Heat Gun Operator’s Manual GHG1500A...
-
Page 13: Maintenance
Defrosting frozen pipes Attach the reflector tip to the heat gun nozzle. Slip the accessory nozzle tip around the frozen pipe and move the heat gun back and forth, working inwards from the edge to the center until the part is defrosted or thawed. WARNING: Do not attempt to defrost PVC, CPVC, or other plastic pipes with a heat gun. WARNING: Water pipes are often difficult to distinguish from gas pipes! Before attempting to defrost metal pipe with a heat gun, confirm the pipe is a water line and not a gas pipe. -
Page 14: Two Year Warranty
ACCESSORIES INCLUDED IN THIS KIT ARE NOT COVERED BY THE 2 YEAR WARRANTY. TOLL-FREE HELP LINE 888-552-8665 For questions about this or any other GENESIS Product, please call Toll-Free: www.richpowerinc.com Or visit our web site: ©Richpower Industries, Inc. All Rights reserved Richpower Industries, Inc. 736 Hampton Road Williamston, SC 29697 Printed in China, on recycled paper Dual-Temp Heat Gun Pistolet thermique a deux temperatures Operator’s Manual GHG1500A Manuel d’utilisation GHG1500A... - Page 16 Richpower Industries, Inc. 736 Hampton Road Williamston, SC USA www.richpowerinc.com 2010.12 v01...
Need help?
Do you have a question about the GHG1500A and is the answer not in the manual?
Questions and answers