Table of Contents
Advertisement
Advertisement
Table of Contents

Summary of Contents for Conrad Skyter 3D HD
-
Page 2: Table Of Contents
Contents 1. Contents................................1 2. Important safety instructions ..........................2 3. General Information .............................. 3 4. Delivery contents ..............................3 5. Description ................................3 5.1. Front panel ..............................3 5.2. Rear panel ..............................3 5.3. Card reader ..............................4 5.4. CI interface ..............................4 5.5. -
Page 3: Important Safety Instructions
Important safety instructions This symbol indicates dangerous voltage inside the product that presents a risk of electric shock or personal injury. This symbol indicates important instructions accompanying the product. Please read this manual carefully before using this product. Before connecting the AC power cord to the outlet, make sure the voltage designation of the digital receiver corresponds to the local electrical supply. -
Page 4: General Information
General Information Skyter 3D HD receiver enables receiving television and radio programs in satellite DVB-S/S2 and terrestrial DVB-T standards. The device can be used together with an analogue or digital TV-set, audio amplifiers, home network routers and other home devices. Skyter 3D HD is able to receive “DVCrypt” system encoded channels. -
Page 5: Card Reader
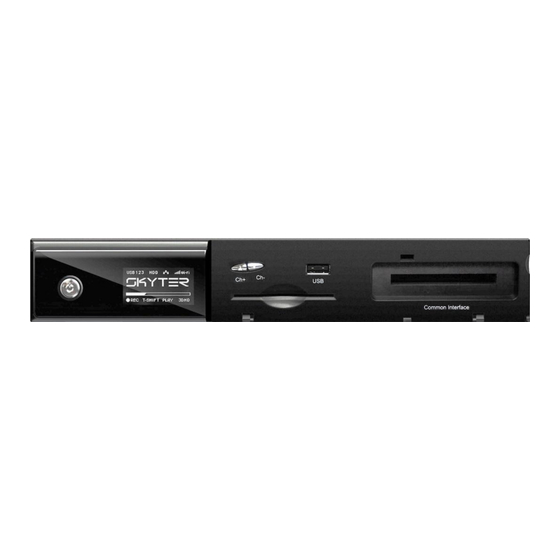
Power button 10. Power cable 5.3. Card reader A card reader is integrated into the receiver and enables to decode the channels encoded by the “DWCrypt” system. The channel cards are to be inserted into the card reader with the contact chip placed down. 5.4. -
Page 6: Remote Control
5.5. Remote control MUTE Press to turn the volume off STANDBY Press to switch the receiver on / off (standby mode) . Number buttons. Press to select TV channels, radio channels or menu options Freeze/Pause Press to stop / play the picture in time shift mode. ASPECT RATIO Press to change aspect ratio for 4:3 video. -
Page 7: Installation (Getting Started)
Fig. 4 Connecting to antennas, network and TV Skyter 3D HD is equipped with two independent DVB-S/S2 inputs LNB A and LNB B accordingly. Depending on your satellite dish installation, you can use single, dual/twin LNB & cable or Unicable (TM) configuration. In case you have twin LNB and cable installation or Unicable (TM), each tuner can select any satellite signal independently. - Page 8 Fig. 5 Satellite LNB configuration During satellite dish LNB and cables installation you can easily check the signal and the list of the channels available on the selected frequency by entering test transponder parameters into the Test transponder section in the Satellite LNB configuration window.
-
Page 9: Satellite Setup
Fig. 7 Satellite LNB configuration, programs quick scan 6.1.2. Satellite setup Before start the program search, add you dish system installation satellite, you plan to search programs MENU>Settings>System setting>Antenna setup>Satellite setup. Press green button to select a satellite from the list. -
Page 10: Terrestrial Antenna Setup
Two ways are possible for connecting a receiver to a TV-set - with HDMI or with SCART cable. HDMI is more preferable as it gives you a possibility to get HD quality on a TV screen. By default, Skyter 3D HD reads EDID table of the supported formats from the connected TV-set and install a TV mode accordingly. - Page 11 Fig. 12 Connecting to a TV-set and Multichannel Audio System If a user does any changes in MENU>Settings>System setting>TV out settings>HDMI video, he needs to press APPLY button to get the immediate effect. If AUTO EDID option is selected ON, a resolution and a frame rate selected are used by the receiver as the initial setting mode only.
-
Page 12: Connecting To The Network
If ON is selected, the system converts 4:3 video material in to 16:9 screen to keep to right geometry. If scale is selected, the system fits video material as is. 6.1.5. Connecting to the Network Skyter 3D HD is equipped with 10/100Mbit LAN and 150Mbit WLAN interfaces. In MENU>Settings>System settings>Network you can see the available network and connection. - Page 13 Fig. 15 Network list If a LAN cable is plugged into the network, you can see actual link speed. By selecting a corresponded network connection, you can connect to the selected WLAN Access Point (AP). Press OK to see or adjust network setting. The receiver requests AP for connection.
-
Page 14: Receiver Setting Up
Receiver setting up 7.1. Switching on Plug the receiver into a power outlet. After the advertising screensaver, the installation guide is displayed on the TV screen. Select menu, language, time zone and the receiver starts terrestrial channels auto scanning. You can press EXIT button to stop this dialog. - Page 15 Fig. 18 Satellite transponder MENU>Settings>Channel search>Satellite auto search you can select a satellite from the list of previously added ones and scan channels either on the selected transponder only or on all transponders available. Press blue button to check the list of channels available on the selected transponder. (no information is saved). You can also select network scan ON.
- Page 16 Fig. 20 Manual search For Terrestrial channels search the Terrestrial antenna is needed to be plugged in first. By Terrestrial search menu MENU>Settings>Chanel search>Terrestrial search you can select the programs manually (by channel frequency) or automatically (by all terrestrial band) search. Fig.
-
Page 17: Channel Editor
Fig. 22 Channels search When search is finished, press red button to save search results or changes, or press EXIT button to exit from the search window without saving search results or changes. In the latter case, pop up window “Waiting…”... -
Page 18: Favorite Manager
buttons to move from one channel to another and back. Press / buttons to jump every twelve channels. Press EXIT button to exit from the channel manager window. As soon as the programs search is finished, the channels are displayed in the sequence they are transmitted by a broadcaster. -
Page 19: Electronic Program Guide
Fig. 25 Favorite editor Favorite editor window shows the channel list and colored buttons duplicating the functions on the remote control. The background image is the channel played at the moment To select the desired channel, press buttons 0...9 on the remote control or press ... - Page 20 Fig. 26 Electronic program guide The background image of the channel watched at the moment and the channel list is displayed in the Electronic Program Guide (EPG) window. Programs schedule Information on the current channel is displayed on the right of the window, the channel list is on the left of the window.
-
Page 21: Media Player
7.7. Media player You can access the internal HDD or external USB storage using media player menu MENU>MEDIA PLAYER. Select this menu to display the list of the connected devices and the available UPNP/DLNA network servers. can press INFO button and see the disc information. Select the one you need using the cursor, press OK and you can browse files on this device. -
Page 22: Records
Fig. 29 Recordings schedule. 7.8.2. Records This menu allows to operate with the records done by the receiver. Press MENU>RECORDINGS>Records and press OK. Records window is open. The list includes all new records (scheduled and immediate). Program/title - channel name and program name of a recorded content criteria. Date/time- record start time and date criteria. -
Page 23: System Settings
Fig. 31 Recordings, records, info 7.9. System settings This main menu window allows you to change the receiver system settings by customizing it. To select sub menu in the System setting window, select the requested sub menu and press right button to enter it. Fig. -
Page 24: Record Options
Fig. 33 Language 7.9.2. Record options MENU>System settings>Record option you can change options for record functionality. Continuous time shift function – “yes” means the system starts to record video stream 5 seconds later after channel is on. Press left button to search recorded video. Press right button to return to real time. Time shift max file size –... -
Page 25: System Functions
program classified above this age by a broadcaster is restricted, and to lock the menu. To change the parent menu settings, enter the password. Default password is 0000. Change the default password when you enter the parent menu for the first time. Enter a new password consisting of 4 numbers, enter it again to confirm and press “apply”. -
Page 26: Receiver Control
In case the Internet is selected, the system boots and searches ntp server. If the server is inaccessible, the system synchronizes the date and the time from the first selected DVB channel. The system continues checking ntp server every 10 sec, and as soon as the server is accessed the system synchronizes the date and the time from the internet again. -
Page 27: Channel Switching
button, the last active channel is displayed, and if it is turned on by pressing one of 1...9 buttons, the selected channel is displayed. 8.1. Channel switching To turn on the desired channel enter the number of the channel assigned in the channel list pressing 0...9 buttons, or press ... -
Page 28: Volume Control
Press INFO to call the info bar, and double press EXIT button to close it. Double press INFO to see the detailed information on the program broadcasted. This information requires comprehensive description and is necessary for a broadcaster, when the problems of video or audio quality occur. That’s why this manual doesn’t include its detailed description. - Page 29 Fig. 39 Channel list optional view Right part of the window shows and follows the selected program information available. Press Info button and a pop- up window appears showing the extended program guide information. Press / keys or blue button to select active favorite channel list instead of all channels. New favorite list is selected as current after channel change is switched.
-
Page 30: Playback Window
Current channel is marked bold. Select it by cursor and press OK to open GUIDE pop up window to view current channel info. Press Guide to open Guide pop up window to view other channels info. Press OK to close pop up window. - Page 31 Color buttons in playback window have the same functions as in channel list window. Red button opens sleep timer pop up window. Fig. 42 Playback window, pop up TV/R TV/R button opens IP / DVB easy switch pop up window. Press OPT button to open system set up window.
-
Page 32: Technical Specifications
Technical Specifications Tuner & Demodulator DVB-T: Power supply: - 176-264VAC ±10 %; 50Hz internal - Frequency Range: 51 MHz - 858 MHz - Input Signal Level 45 dBμV – 75 dBμV - Power Consumption, - Demodulation 16/32/64/128/256 QAM max. 50 W DUAL Tuner &...
Need help?
Do you have a question about the Skyter 3D HD and is the answer not in the manual?
Questions and answers