Table of Contents
Advertisement
Advertisement
Table of Contents

Summary of Contents for MicroDigial Nabi
- Page 1 Nabi User Manual User Manual Ver 3.6 All Rights Reserved www.md-best.com...
- Page 2 Nabi User Manual All Rights Reserved www.md-best.com...
-
Page 3: Table Of Contents
Nabi User Manual Table of Contents Table of Contents 1. SYSTEM INTRODUCTION 1.1 System Package 1.2 Main Instrument 1.3 Specification 2. BASIC USE 2.1 Pedestal 2.2 Cuvette 2.3 Blank Setting 2.4 Keyboard 3. USER INTERFACE 3.1 Log In 3.2 Main Page 3.3 Submenu... - Page 4 Table of Contents Nabi User Manual Table of Contents 3.5 Protein 3.5.1 Standard Curve 3.5.2 Bradford, Lowry, BCA, Biuret, and Others 3.5.3 Direct UV 3.6 End Point and OD600 3.7 Kinetic 3.8 Spectrum 3.9 Search 3.9.1 Overlay in Search 3.9.2 Data Transfer 3.10 Account Settings...
-
Page 5: System Introduction
Nabi User Manual 1. System Introduction MicroDigital’s Nabi, UV/Vis Nano Spectrophotometer, measures both cuvette and microvolume sample with high accuracy, outstanding precision, and superb repeatability. CUVETTE & MICROSCALE MEASUREMENT Samples in a universal cuvette or microscale volume can be measured. -
Page 6: Main Instrument
1. System Introduction Nabi User Manual Package includes: • Main Instrument • Pedestal Cover • Cuvette Stick • Cuvettes • Power Cord • User Manual USB Port 2 USB Port 1 Upper Pedestal Head Cuvette Port Lower Pedestal LCD Touch Screen... -
Page 7: Specification
Nabi User Manual 1. System Introduction General Specification Light Source Xenon Flash Lamp Detector CCD (2,048 Pixels) ±1 nm Wavelength Accuracy Wavelength Range 200 nm - 1100 nm Spectral Resolution 0.3 nm W : 220mm, D : 280mm, H : 220mm Dimension (W : 8.6 inch, D : 11.0 inch, H : 8.6 inch) - Page 8 1. System Introduction Nabi User Manual Cuvette Specification Beam Height 8.5 mm 0.002 – 2.0 Abs. Absorbance Range Measurement Time 3 sec Maintenance • Due to fixed modules and immovable parts, internal maintenance is not needed. Clean the exterior with a clean and dry wipe when there is a spill or contamination.
-
Page 9: Basic Use
Nabi User Manual 2. Basic Use Power On Modes & Variable Setting Sample Insertion Result Confirmation Measurement Microvolume sample measurements include the use of the Pedestal. The Pedestal has upper and lower pedestals. Targeted microscale sample should be gently pipetted on the center top of the lower pedestal, and the Cuvette Stick should be inserted during the microscale measurement. -
Page 10: Cuvette
2. Basic Use Nabi User Manual Cuvette Measurements include the use of the Cuvette Port. The target sample should be prepared in a universal cuvette, and the cuvette should be gently inserted in the Cuvette Port for the measurement. The Pedestal Cover should be covered during the cuvette measurement. -
Page 11: Keyboard
Nabi User Manual 2. Basic Use English Letter Keyboard Number and Special Letter Keyboard There is an internal keyboard functionality for the touch screen; however, users may make use of their own keyboard and mouse by connecting them through the USB Ports located on the right side of the instrument. -
Page 12: User Interface
3. User Interface Nabi User Manual Log In Page When the instrument is turned on, the Log In page will appear as above. Users can enter their ID and Password, and touch the Log In button to log in, or can log in as a guest by touching the Guest button without entering the User ID and Password for quick measurement. -
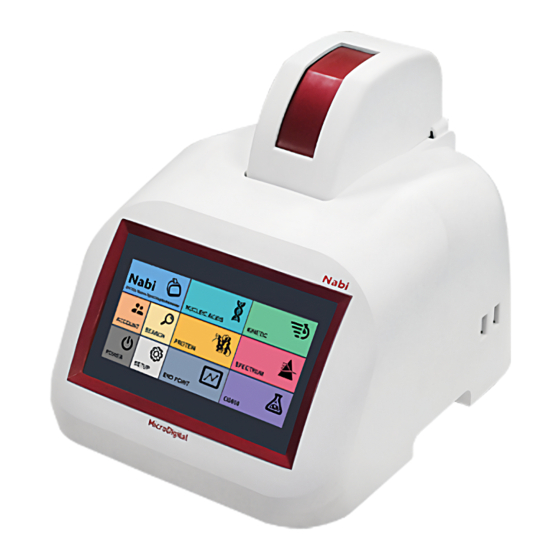
Page 13: Main Page
Nabi User Manual 3. User Interface Main Page When the user is logged in, Main Screen will appear as above. Users can access to any measurement page from this page. NUCLEIC ACIDS Opens Nucleic Acids Measurement page. (pg. 13) PROTEIN Opens Protein Menu. - Page 14 (.BMP) in a USB Flash Drive. USB Flash Drive must be plugged in one of the USB Ports on the side of the instrument during the process. The screenshot image files will be saved in the ‘Capture’ folder under the ‘Nabi’ folder. All Rights Reserved...
- Page 15 Nabi User Manual 3. User Interface Nucleic Acids Measurement Page Nucleic Acids Measurement page is to measure nucleic acids samples. There are various options for Nucleic Acids measurement: Double-stranded DNA, Single-stranded DNA, RNA, and Oligonucleotide. dsDNA Measures double-stranded DNA samples.
- Page 16 3. User Interface Nabi User Manual Procedure 1. Proceed to Nucleic Acids page by touching Nucleic Acids button in the Main page. 2. Touch and select the measurements among dsDNA, ssDNA, RNA, and Oligo . 3. Insert the title of the measurement.
- Page 17 Protein Menu allows user to choose and access to various measurement options: Bradford, Lowry, BCA, Biuret, Others, and Direct UV. To close the menus, simply retouch the Protein button or touch Nabi logo banner. BRADFORD Opens Bradford Measurement page. (pg. 17) LOWRY Opens Lowry Measurement page.
- Page 18 3. User Interface Nabi User Manual Bradford Standard Curve Page There is Standard Curve page in Bradford, Lowry, BCA, Biuret, and Others under the Protein Measurement. It is necessary for the Standard Curve to be set before performing the measurements. Standard Curve Panel can be opened by touching Standard Curve button.
-
Page 19: Standard Curve
Nabi User Manual 3. User Interface Procedure 1. Prepare, at least, 3 samples with different concentration to setup the Standard Curve. 2. Set the blank value. (Check pg. 8) 3. Insert the target sample in a cuvette. (Minimum Volume: 1mℓ) 4. - Page 20 3. User Interface Nabi User Manual Bradford Page Biuret Page BCA Page Lowry Page Others Page There are various options for protein samples measurements: Bradford, Lowry, BCA, Biuret, Direct UV, and Others with a wavelength option. In every Measurement page, there is a Standard Curve page to set the Standard Curve before the measurement.
-
Page 21: Direct Uv
Nabi User Manual 3. User Interface Direct UV Page Direct UV Measurement page is to perform Direct UV measurement on protein samples. Unlike other protein sample measurements, Standard Curve is not necessary. Title Title of the measurement. Conc. Shows the concentration of the sample. -
Page 22: End Point And Od600
3. User Interface Nabi User Manual End Point Page OD600 Page End Point and OD600 Measurement is to perform spectrometry measurement on Cell Culture samples and etc. Title Title of the measurement. Shows the wavelength of the current measurement. Wavelength... -
Page 23: Kinetic
Nabi User Manual 3. User Interface Kinetic Page Kinetic Measurement is to perform multiple spectrometry measurements on samples in accordance with users’ wavelength and time lengths. Title Title of the measurement. Wavelength of the measurement between 200 – 1,100 nm. -
Page 24: Spectrum
3. User Interface Nabi User Manual Spectrum Page Spectrum Measurement is to perform spectrometry measurements with specified range of wavelength. Wavelength (nm) Input for the range of Wavelength Title Input for the title of the measurement. Finds Abs. value for the specified wavelength. -
Page 25: Search
Nabi User Manual 3. User Interface Search Panel Search Panel is accessible from Main Screen, and any measurement pages. All of the saved data can be searched in Search Panel. There are various options for search. Users can select the dates, or choose the keywords of the title for the search. - Page 26 3. User Interface Nabi User Manual Search List Panel DNA/RNA Search List Panel Search List panel is accessible by touching Search or All button in the Search page. DNA/RNA panel has a row of checkboxes for multiple selection in order to perform overlay comparison between data.
-
Page 27: Data Transfer
Nabi User Manual 3. User Interface Detail Loads detailed information of the selected data. Loads a Change Title panel to change the title of the selected Change Title data. Delete Deletes the selected data. Transfers the displayed list to USB Flash Drive. - Page 28 Drive must be plugged in one of the USB Ports on the right side of the instrument. The transferred files will be saved in the Nabi folder. Please, refer to the diagram on pg. 28 for detailed location of the files. Nucleic Acids, Kinetic, Spectrum, and Direct UV will include Raw Data for each measurement in Raw Data folders.
- Page 29 Nabi User Manual 3. User Interface 4. Insert a name for the transferred file. 5. Find the files in the Nabi folder. Each file will be titled as the name inserted during the process. Nabi Top Folder ID#1 ID#2 …...
- Page 30 3. User Interface Nabi User Manual Account Panel Account panel is accessible from the Main page by touching the Account button. Users can swap current account, create new account, edit the selected account, or delete the selected account in the Account page. Master account cannot be deleted, and its password can be changed in the Setup page.
-
Page 31: Power Panel
Nabi User Manual 3. User Interface Power Panel Power Panel is accessible from the Main page by touching the Power button. Users can put the instrument in a sleep mode, or turn off the system in the Power Panel. IT IS VERY IMPORTANT to turn off the power by touching the OFF button in the User Interface after using the instrument, and, when it is completely shut down, turn off the Power Switch at the back of the instrument. -
Page 32: Setup
3. User Interface Nabi User Manual Setup Panel Setup page is accessible from the Main page by touching the Setup button. The users can set the time, update the interface, change Master Password, check System Information, and Calibrate the instrument. Setup is not recommended for users to access the page and change features without manufacturer’s supervision. - Page 33 This chapter demonstrates how the UI can be updated. 1. Download the update file. (Make sure to extract the file if it is provided in a .zip file) 2. Make a Nabi folder in a USB Flash Drive. 3. Transfer the file (Nabi.exe) to the folder.
- Page 34 3. User Interface Nabi User Manual The system uses standard path lengths to measure the sample’s optical density on the pedestal or through cuvette. In case of an OD value increase due to various issues, the OD values can be adjusted. It is not recommended for users to make such changes, but they are nonetheless available when such functionality is necessary.
- Page 35 Nabi User Manual 3. User Interface Users may change the display during Sleep Mode. There are 3 designs: The Eyes, The Instrument, and Blank. The eyes will protect you from bad spirits while it is on. The Eyes The Instrument Blank 1.
- Page 36 MicroDigital Co., Ltd. floor, CS Building, 15Pangyo-ro 228 beon-gil, BunDang-Gu, SungNam-Si, GyungGi-Do, 13487, Korea Tel : +82-31-701-2225 / Fax : +82-31-702-2225 info@md-best.com / www.MD-Best.com...
Need help?
Do you have a question about the Nabi and is the answer not in the manual?
Questions and answers
We turn off the spectrophotometer after completing our work it was working completely okay but next day we on it everything thing goes well but screen go out black shows nothing while the instrument was on
If the MicroDigital Nabi spectrophotometer screen goes black after turning it on, ensure that the power was turned off correctly using the OFF button in the User Interface before switching off the Power Switch at the back. Forcibly turning off the power using only the switch can cause Recovery Mode during reboot. To avoid this, always perform a proper software shutdown.
This answer is automatically generated