Table of Contents
Advertisement
Quick Links
Advertisement
Table of Contents

Summary of Contents for Hanover 9760301
- Page 1 INSTRUCTION MANUAL WINE COOLER / BEVERAGE COOLER Wine Cooler - Model 9760301 Beverage Cooler – Model 9760101 9760201 To ensure proper use of this appliance and your safety, please read the following instructions completely before operating this appliance. V20190515...
- Page 2 WARNING! • To prevent damage to the door gasket, make sure to have the door fully open when sliding shelves out. • The appliance must be positioned so that the plug is accessible at all times. • This item should be plugged into a power outlet directly. Do not plug into an extension cord or power strip. •...
-
Page 3: Important Safety Instructions
IMPORTANT SAFETY INSTRUCTIONS Follow these basic steps to reduce the risk of fire, WARNING electrical shock, or injury. • Save these instructions for future use. • DANGER WARNING: Risk of child entrapment. These appliances carry a risk of child entrapment and suffocation. Junked or abandoned appliances are still dangerous even if they are not in use. -
Page 4: Installation Instructions
INSTALLATION INSTRUCTIONS Before Using Your Wine Cooler/Beverage Cooler: • Remove the exterior and interior packing. • Before connecting the wine cooler/ to the power source, let it stand upright for beverage cooler approximately 2 hours. This will reduce the possibility of a malfunction in the cooling system from handling during transportation. -
Page 5: Installation Clearance Requirements
Installation clearance requirements When installing the beverage center under a counter, follow the recommended spacing dimensions. To ensure proper service access and ventilation, the product must have at least 2 inches clearance in the back, 3/8” at top and 3/8” at sides. The installation should allow the unit to be pulled forward for servicing if necessary. Do not install the wine cooler/beverage cooler near an oven, radiator, or other heat source. -
Page 6: Handle Installation
Handle installation • Open the door and carefully pull back the door gasket in the areas where the handle screws are placed. • Align the handle with the screws and tighten using a screwdriver until the handle is flush against the doorframe. -
Page 7: Unit Operation
Unit Operation Before plugging in the product for the first time, remove all packaging, let product stand upright for at least 2 hours and clean the cooler with a soft rag and the cleaning mixture. Wipe dry with soft clean cloth. Control Panel Beverage center has a temperature range of 34°F to 50°F. - Page 8 Shelf Installation or Removal To prevent damage to the doors or gasket seals, open the doors completely (past 90°) when removing the shelves. When removing any of these shelves out of the unit, you must lift (from the rear) and pull it towards you. To re-install, ensure the shelf is resting securely on the support brackets and push shelf inward until it locks into place.
-
Page 9: Cleaning Your Cooler
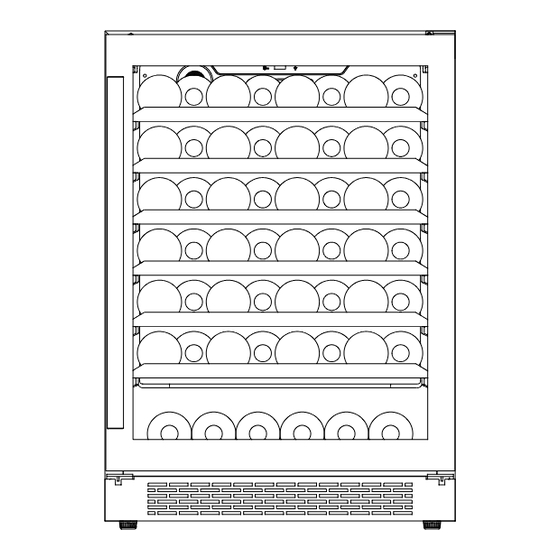
Wine Cooler Storage – 54 bottle maximum: Wine Shelf Top View Beverage Cooler Storage – 172 can maximum: Beverage Shelf Top View Cleaning your cooler Always unplug your unit before cleaning or servicing it. You may want to defrost the cooler at this time. If so, follow the instructions below. -
Page 10: Troubleshooting
Defrosting Note that depending on the refrigeration settings, the unit will automatically defrost under most ambient conditions. However, on colder settings, some frost may build up. Additionally, the more humid the ambient conditions, the more frost may build up. To minimize frost build up, keep the door closed as much as possible. If you experience frost build up, defrost the unit: •...
Need help?
Do you have a question about the 9760301 and is the answer not in the manual?
Questions and answers