
Summary of Contents for American Granby HARVARD
-
Page 1: Installation Guide
Reverse Osmosis Drinking Water System Installation Guide American Granby, Liverpool, NY Page 1 of 8... -
Page 2: Table Of Contents
-- Table Of Contents -- Introduction ……………………………………………………………………… 3 Parts Supplied …………………………………………………………………… 3 Equipment Required …………………………………………………………… 4 Before You Begin ………………………………………………………………… 4 Installation Instructions ………………………………………………………… 4 1. Install the Faucet ………………………………………………………… 2. Install the Feed Water Connector and Valve …………………………… 5 3. -
Page 3: Parts Supplied
Introduction Thank you for purchasing a Reverse Osmosis (RO) Drinking Water System. This system uses a combination of filtration technologies to reduce the contaminants in your water supply and give you clear sparkling drinking water. Purpose of this manual This installation guide provides full instructions on how to assemble the components of the RO Drinking Water System, and to install it into your kitchen (or other location). -
Page 4: Before You Begin
Equipment Required The following equipment is needed to install and run the RO drinking water system: Variable speed electric drill Phillips head and flat blade screwdrivers Assorted wood and metal drill bits Assorted wrenches Wide masking tape or duct tape ... -
Page 5: Install The Feed Water Connector And Valve
Attach the faucet to the plastic tubing 1. Place the compression nut onto the end of the plastic tubing, then place the barb end of the faucet inside the tubing. 2. Screw the compression nut on to the shaft of the faucet. Figure 2: Faucet installation Figure 3: Attach the faucet to the plastic tubing 2. -
Page 6: Install The Drain Clamp
3. Install the Drain Clamp The drain clamp will fit most standard drain pipes. Make sure you leave the appropriate air gap, if this is required. 1. Position the drain clamp onto the sink drain pipe above the water level in the drain trap, and position securely. Make sure you allow enough room for drilling. -
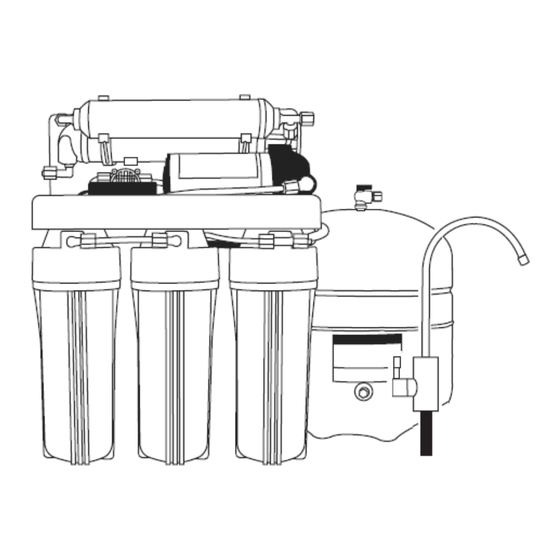
Page 7: Install The Ro Unit & Connect The Tubing
5. Install the RO Unit & Connect the Tubing Place the RO unit under the sink. You will need to drill holes for the mounting screws and then install the unit. 1. Connect the tubing from the faucet to the RO unit at the interface (A). 2. -
Page 8: Specifications
7. Start Up the System Once you have sanitized the system (see above) you can start it up for normal operation. 1. Make sure the ball valve (white with black handle) on the waste water drain line is in the fully closed position. The black handle should be in the “12 o’clock”...
Need help?
Do you have a question about the HARVARD and is the answer not in the manual?
Questions and answers