Advertisement
Table of Contents
- 1 Brief Introduction
- 2 Parameters
- 3 Working Modes
- 4 Normal Operation in Serial Port Mode
- 5 Firmware Upgrade Example with Frsky X9D
- 6 Setup and Binding in Serial Port Mode
- 7 Support Protocol List
- 8 Normal Operation in PPM Mode
- 9 Normal Use and Operation in PPM Mode
- 10 Bind Operation in PPM Mode
- 11 Default Protocols Table
- 12 Firmware Update
- 13 FCC Statement
- Download this manual
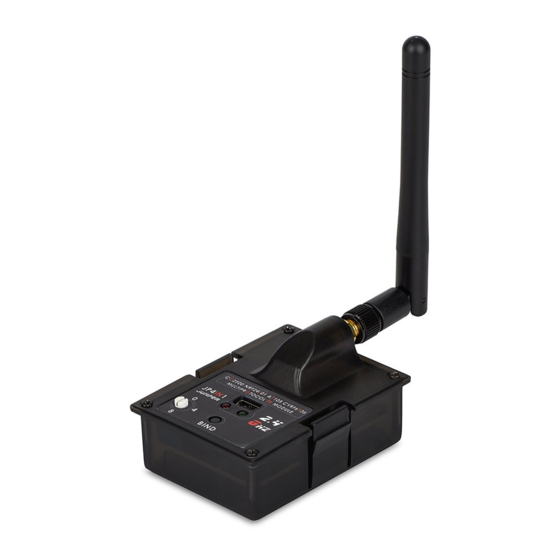
JUMPER JP4IN1 Multiprotocol Module
Brief Introduction:
The JP4IN1 integrates the CC2500,chips into one PCB. The JP4IN1 is an OpenTX original
accessory which can do serial digital signal communication with the Frsky series radios.
Recognizing PPM signal from radio output, then converted to the corresponding radio protocol
to achieve control of the fixed wing and drone aircraft. Supported protocols such as: Walkera
DEVO, Spectrum DSM2/DSMX, Flysky, Esky, Frsky, WLtoys, Hubsan, Hisky, Futaba SFHSS Assan
etc are built in..
The JP4IN1 module offers greater flexibility with the ability to control most protocals and
popular brands in the market today. It also gives the user the ability to use a real RC radio for
more precise control and a better flying experience than the small radios often included with
ready to fly products.
Note: due to the copyright of the protocol, JP4IN1 only provides hardware, please refer
following link to download the firmware:
https://github.com/pascallanger/DIY-Multiprotocol-TX-Module
How to install firmware with USB port? Need some clear and simple instructions.
Instructions at the link above are very complicated and needs USBAVR etc.
Advertisement
Table of Contents

Subscribe to Our Youtube Channel
Summary of Contents for Jumper JP4IN1
- Page 1 JUMPER JP4IN1 Multiprotocol Module Brief Introduction: The JP4IN1 integrates the CC2500,chips into one PCB. The JP4IN1 is an OpenTX original accessory which can do serial digital signal communication with the Frsky series radios. Recognizing PPM signal from radio output, then converted to the corresponding radio protocol to achieve control of the fixed wing and drone aircraft.
- Page 2 Two working modes: Serial Port mode & PPM mode. 1. Normal operation in Serial Port mode (Bi-directional digital signal communication between radio and JP4IN1.) Rotate the encoder knob to"0" to enter the serial port mode, all existing protocols can be used...
- Page 3 Once X9D finished upgrade: power off radio, insert JP4IN1 module, then power on again. (Note: please make sure JP4IN1 antenna is assembled before powering on radio). As shown in below Fig: Enter the “MOEL SET UP” menu, close Internal RF and open External RF, the red and green led both are on.
- Page 4 Support Protocol List Sub protocol or Protocol Supplementary Specification Option Flysky first generation FLYSKY protocol HUBSAN Hubsan FRSKYD Frsky D series protocol Hisky Hisky HISKY HK310 Hisky V2X2 DSM2 protocol, frame rate DSM2_22 22mS DSM2 protocol, frame rate DSM2_11 11mS DSMX protocol, frame rate DSMX_22...
- Page 5 PPM mode is used for PPM signal output, and the mounting slot of radio is compatible with JP4IN1 (F.E. JR). There are total 31 different protocols that correspond to the 16 positions of the encoder knob in the PPM mode (“0” position is reserved for serial mode). Check the list on the...
- Page 6 3. The JP4IN1 red light will be on when turn on the radio in the condition of completing bind before, the JP4IN1 works properly now, then power on your drone or fixed wing.
- Page 7 Firmware update, please refer to: https://github.com/pascallanger/DIY-Multiprotocol-TX-Module FCC Statement Any Changes or modifications not expressly approved by the party responsible for compliance could void the user’s authority to operate the equipment. This device complies with part 15 of the FCC Rules. Operation is subject to the following two conditions: (1) This device may not cause harmful interference, and (2) This device must accept any interference received, including interference that may cause undesired...
Need help?
Do you have a question about the JP4IN1 and is the answer not in the manual?
Questions and answers