Advertisement
Quick Links
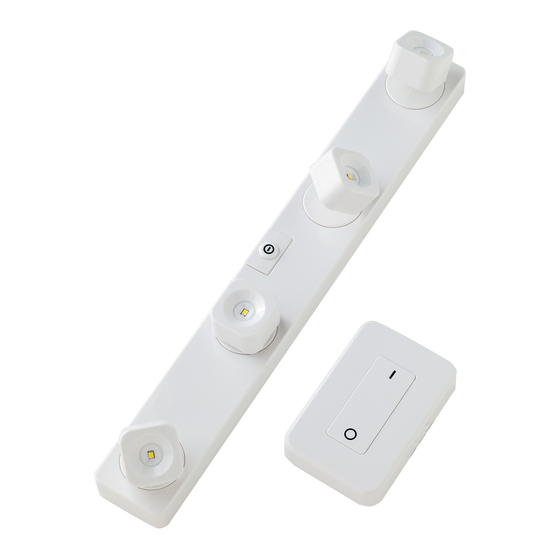
Wireless Remote Control FastTrack Light Set
Operating Instructions
Features & General Information
The LIGHT IT! Wireless Remote Control LED FastTrack Light Set has been designed to mimic the
operation of normal household lighting, but without the time and expense of wiring. Using 433MHz
Radio Frequency control (RF) and battery power, we have developed a supplementary lighting system
that installs in minutes and offers the utmost in convenience and performance. Unlike infrared
systems which require line of sight operation, radio signals penetrate most walls and barriers so that
up to 20 lights can be operated with a single touch of the switch. Lights can be located where they are
needed most and the switch can be permanently mounted to avoid damage or loss. And, to make the
system even more useful and simple to operate, our easy-to-use Group Code feature lets you install
and operate up to 8 groups of lights in a household without interference! Another great idea from
LIGHT IT!...the leader in wireless lighting solutions.
battery cover door
DIP switches
Battery Installation & Replacement
Light
1) Open the two battery cover doors and remove them.
2) Install 3 AA batteries in each compartment, making certain to match the polarity as shown on
the diagram in the battery compartment.
3) Do not mix battery types. Use only fresh batteries. Alkaline are recommended.
4) Check light operation to confirm that batteries are correctly installed.
5) Replace the battery covers.
Remote Control Switch
1) Remove the battery cover by depressing
the tab on the back of the switch as shown
in the diagram.
2) Install 2 AAA batteries making certain to
match the polarity as shown in the
diagram in the battery compartment.
3) Do not mix battery types. Use only
fresh batteries. Alkaline are recommended.
4) Check the switch operation to confirm
that batteries are correctly installed.
5) Replace the battery cover.
mounting bracket
push to remove
battery cover door
battery
compartment
Group Code/ DIP Switches
Each light and switch comes with 3 DIP switches that enable the user to operate 2 or more groups of
lights without interfering with each other. These switches come preset from the factory and will not
require adjustment unless:
1) You are adding lights to the group, or
2) You are operating 2 or more groups of lights within 60' of each other.
Setting the Group Code/Adding Lights to Your Group
We recommend that you start with the remote control switch and then adjust the lights to match the
setting on the switch. You may add any combination of up to 20 lights and switches as desired.
Remote Control Switch
1) Remove the mounting bracket.
2) Move the DIP switches gently back and
forth to one of 8 possible combinations
pictured on the switch.
3) Replace the mounting bracket.
Lights
1) Remove the battery cover.
2) Use a pointed object to gently move the DIP
switches to match the settings on the switch.
3) Check operation by pressing the remote control
switch on and off.
4) Replace the battery cover.
5) Repeat the process with all of the remaining
lights in the group.
Adding Lights & Switches
1) Simply follow the instructions above and arrange the 3 DIP switches to
match the code of the group to which you are adding lights.
2) We do not recommend groups in excess of 20 lights and switches
(total combined).
Battery Saver
To prevent unintended battery use, the Remote Control Switch comes
with 3 user-selectable settings: 30, 60 or 120 minutes. The Switch will
automatically shut off the lights should you forget. This feature cannot
be turned off. Only the time period can be selected.
The DIP switch positions
on the light should
match the DIP switch
positions on the remote
control switch
Battery saver
is located on
the right side
of the switch.
Advertisement

Summary of Contents for Fulcrum 30036-308
-
Page 1: Operating Instructions
Wireless Remote Control FastTrack Light Set Operating Instructions Features & General Information Group Code/ DIP Switches The LIGHT IT! Wireless Remote Control LED FastTrack Light Set has been designed to mimic the Each light and switch comes with 3 DIP switches that enable the user to operate 2 or more groups of operation of normal household lighting, but without the time and expense of wiring. - Page 2 Screw Mounting – Wood Surfaces: Mount the bracket using two screws. Drill a 1/16” pilot hole, insert the screw and gently tighten it until the mounting plate is secure. Do not over tighten. Speci cations – Model # 30036-308 Screw Mounting – Drywall: Mount the bracket using two screws and anchors. Drill 1/4” pilot holes, Operating Mode: 433MHz radio frequency control Switch Battery Standby Life: approx.
Need help?
Do you have a question about the 30036-308 and is the answer not in the manual?
Questions and answers