
Related Manuals for Qrotech OPA-102

Summary of Contents for Qrotech OPA-102
- Page 1 OPA-102/101 AUTOMOTIVE OPACITY SMOKE METER O P A - 1 0 2 / 1 0 1 OPERATING MANUAL OPERATION MANUAL - 1 -...
- Page 2 OPA-102/101 OPERATION MANUAL - 2 -...
- Page 3 This manual can be changed without notice in order to enhance technical capacity. Copyright ⓒ QROTECH CO., LTD. OPERATION MANUAL - 3 -...
-
Page 4: Table Of Contents
OPA-102/101 < Table of Contents > Section 1. QUALITY GUARANTEE REGULATION --------------------------------------- Section 2. SAFETY GUIDELINE --------------------------------------- Section 3. INTRODUCTION OF THE PRODUCT 3-1. Introduction ------------------------------------- 3-2. Outlook of the appearance 3-2-1. Front / Rear view --------------------------------- 3-2-2. Side view ------------------------------------- 3-3. -
Page 5: Section 1. Quality Guarantee Regulation
OPA-102/101 SECTION 1. QUALITY GUARANTEE REGULATION If the product is handled according to this manual but there occurs a failure with in the guaranteed period, it will be repaired free of charge by our company. However, the compensation from the secondary damage and the following cases may not be guaranteed and repaired without fee: (1) Out-of order or damage on the product due to user’s fault, careless... -
Page 6: Section 3. Introduction Of The Product
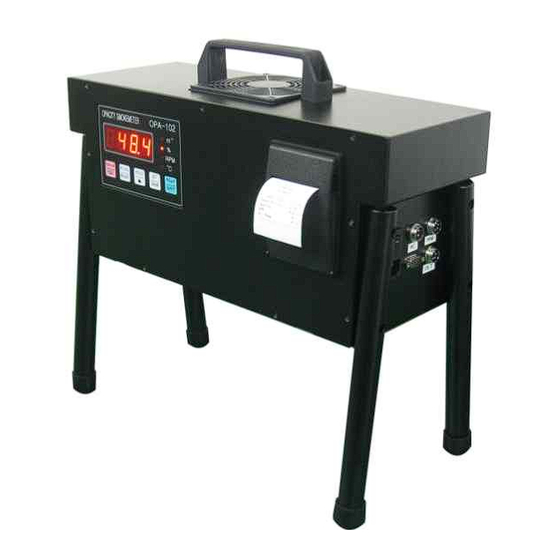
OPA-102/101 SECTION 3. INTRODUCTION OF THE PRODUCT 3-1 Introduction This opacity meter measures a diesel smoke density of automobile burning diesel as fuel to diagnose the condition of automobile and provide preventive maintenance in order to avoid air pollution. Outlook appearance 3-2-1. -
Page 7: Specification
OPA-102/101 Specification Model/ OPA-102 / Automotive Opacity Smoke Meter Product ° Smoke opacity ( %), k (m , RPM(option), (option) / Light absorption coefficient Measuring item/method Light extinction method (Partial-flow sampling type) Light source Green LED(565nm) Detector Photodiode Shell length &... -
Page 8: Measurement Unit
OPA-102/101 3-4 Composition 3-4-1. Measurement unit NAME Q’ty Measurement unit 3-4-2. Basic accessory NAME Q’ty Probe Probe hose Power cable RS232C cable PC software Manual Fuse 3-4-3. Option NAME Q’ty Built-in printer Printer paper RPM sensor Oil temp. sensor Handheld terminal... -
Page 9: Display And Outlook Of Function Key
OPA-102/101 Display and Function Key structure ① DISPLAY : Select display screen ② ACCEL : FREE ACCELERATION TEST (Inspection mode) ③ HOLD : Holding the displayed screen (Ref.8-3. Hold set-up) There are two kinds of hold mode, which are HOLD and PEAK HOLD. -
Page 10: Section 4. Mechanical Circuit
OPA-102/101 SECTION 4. MECHANICAL CIRCUIT 4-1 Principle of Measurement Attach light source at the end of the sample-shell where smoke pass through and attach detecting part at the other end of the sample-shell, and it detects the smoke density then converting it into figures and display. -
Page 11: Section 5. Installing Method
Connect all of cables to the correct port each other on the side of measurement unit. And connect the probe hose on the rear of the measurement unit. Move the ON/OFF switch to “ON” position. Then OPA-102 will be start. ◈ Handheld terminal The handheld terminal is operated together with the display of the measurement at the same time. -
Page 12: Section 6. Initial Display
OPA-102/101 SECTION 6. INITIAL DISPLAY 6-1 Warming up Switch the power [ON]. OPA-102 will perform the initialization process for about 10 seconds. Opacity Smokemeter Opacity Smokemeter OPA- The warming up will be performed for 3~6 minutes. Opacity Smokemeter WARM The initial calibration is automatically performed once the warming up is over. - Page 13 OPA-102/101 ü CAUTION ü During above procedures, keep the end of the probe at fresh air available place. If not placed at fresh and clean air, while adjusting 0-point it shows “Error” message. When this message appears, check if the end of the probe is placed at clean air available place or not.
-
Page 14: Section 7. Measurement
OPA-102/101 SECTION 7. MEASUREMENT 7-1. Display Pressing [DISPLAY] key, it will advances [Smoke(%) → K(m → RPM → ℃] in sequence. The LED of the measuring item will be on. ○ ● ○ ○ ℃ OPERATION MANUAL - 14 -... -
Page 15: Free Acceleration Test (Normal Mode)
OPA-102/101 7-2. Free(Snap) acceleration test (Normal mode) ★ For normal mode of free snap acceleration test, set HOLD mode in the setting menu to PEAK HOLD mode. (1) After reaching peak revolution speed by burst acceleration of engine of the testing vehicle in neutral gear (idling status), idle the engine for 2 seconds and maintain the idling status for 5~6 seconds. -
Page 16: Free Acceleration Test (Inspection Mode)
OPA-102/101 7-3. Free(Snap) acceleration test (Inspection mode) (1) After reaching peak revolution speed by burst acceleration of engine of the testing vehicle in neutral gear (idling status), idle the engine for 2 seconds and maintain the idling status for 5~6 seconds. Repeat this process three times. - Page 17 OPA-102/101 (6) Put one foot on the accelerator pedal and burst accelerate the engine to the maximum revolution speed and take gas samples. Time for the acceleration is within than 4 seconds. (7) After finishing the first test, press [SET] KEY to move to the second test.
- Page 18 OPA-102/101 (11) This shows it’s ready for the third test and when you press [SET] KEY once more, you will see one flashing LED and at the buzzer sound, the test will start. (From this time on, the peak point of exhaust emissions will be renewed.) When you use [DISPLAY KEY, you will see “K (m...
-
Page 19: Rpm Measurement (Option)
OPA-102/101 (14) If the gap between the maximum and the minimum of exhaust emissions density tested three times is larger than 5% or the final test result is over the acceptable limits for exhaust emissions, an additional test will be done once more automatically and up to maximum 5 times. -
Page 20: Section 8. Set-Up
OPA-102/101 SECTION 8. SET-UP Pressing [SET] key, it moves to SET-UP mode. Pressing [SET] key, it moves to [ CAL → YEAR → DATE → TIME → HOLD → PRT → CYL → VERSION → TEST → BT-R(handheld terminal reset) ] in sequence. -
Page 21: Hold Set-Up
OPA-102/101 When setting up is completed, save and move to “Time set-up” by pressing [SAVE] key. When the “time set-up” is completed by pressing [SAVE] key, it is finished. 8-3. Hold set-up At Set-up mode, by using [SET] key, move to Hold mode set-up screen. -
Page 22: Printing Density Set-Up
OPA-102/101 8-4. Printing density set-up At Set-up mode, by using [SET] key, move to printing density set-up screen. Pressing [SELECT] key, current set-up value is blinking. ▼ By pressing [▲, ] key, it moves to [ 05 → 25 ] in sequence. -
Page 23: Section 9. Maintenance And Management
OPA-102/101 SECTION 9. MAINTENANCE and MANAGEMENT 9-1. Lens cleaning For the proper maintenance and management of the equipment, it is necessary to regularly clean the lens by cleansing polluted area of the lens. 9-2. Error codes With the end of probe placed at unclean area, adjusting the span, or some problem with the equipment, adjusting error is displayed. - Page 24 OPA-102/101 OPERATION MANUAL - 24 -...
- Page 25 OPA-102/101 Techno-park 201-906 Yakdae-dong, Wonmi-gu, Bucheon city, Gyunggi-do, 420-733 Korea TEL:(82)32-621-2451/2 FAX:(82)32-621-2450 http://www.QROTECH.COM OPERATION MANUAL - 25 -...
Need help?
Do you have a question about the OPA-102 and is the answer not in the manual?
Questions and answers