
Related Manuals for Buildbotics 4-Axis CNC Controller

Summary of Contents for Buildbotics 4-Axis CNC Controller
- Page 1 Buildbotics 4-Axis CNC Controller Getting Started Contents ➔ Letter from the founders ➔ Disclaimer ➔ What’s Included ➔ Quick Start Guide ➔ Gamepad description ➔ Running a test program ➔ Upgrade to latest software ➔ Your Bill of Materials...
- Page 2 To our valued customers: Thank you for choosing the Buildbotics 4-Axis CNC Controller. It is our sincere hope that it meets and exceeds your expectations in every way. The Buildbotics Controller is fully Open-Source. You’ll find all hardware and software design information for the Buildbotics CNC Controller on GitHub at: github.com/buildbotics/...
- Page 3 Buildbotics LLC products and parts are to be inspected by the user before each use for evidence of damage, defect, or wear. Any deviation by the user from the manufacturer’s specifications concerning use, maintenance, repair, alterations and modifications constitutes willful negligence.
- Page 4 What’s included: The following items should be included with your purchase: You may have also purchased some add-on options. Please check for those options on the bill of materials (included at the end of this document) to verify that they were included as well.
- Page 5 Quick Start Guide Overview Buildbotics CNC Controllers that were purchased after July 1st, 2018 do not require an external computer for control, but rather allow users to connect a monitor, a USB keyboard, and a USB mouse to configure and operate the controller. The ability to configure and operate the Buildbotics CNC Controller from another computer via an Ethernet or Wifi local area network is still provided.
- Page 6 AWG wire nuts work fine). You may want to solder final connections. Monitor Cable DC power supply that supplies between 12 and 36 Volts and a Buildbotics premade power supply cable. USB Keyboard Alternatively use a power adapter with a matching plug.
- Page 7 Connect the monitor Connect one end of the monitor cable to the port on the back of the Buildbotics Controller and the other end to the monitor. Plug the monitor into its power source (e.g. AC wall outlet) and turn it on.
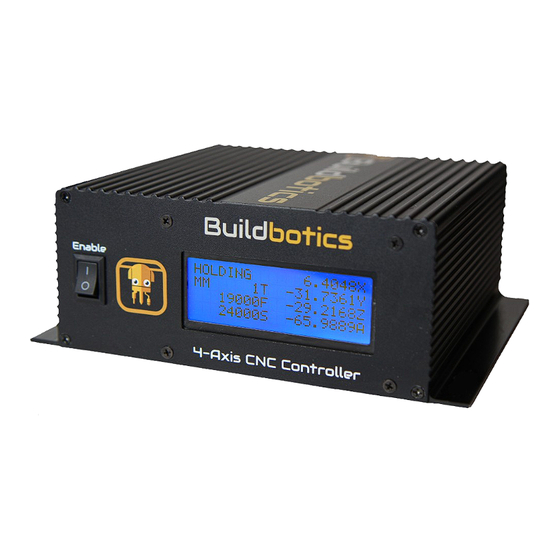
- Page 8 Plug in the power supply and turn on the “Enable” switch. The controller LCD screen will illuminate. The Buildbotics logo will appear on the monitor while the controller is booting. When the controller has fully booted, the Control Screen will appear.
- Page 9 Refer to the remainder of the manual for more complete and concise descriptions. Things you need Buildbotics CNC Controller DC power supply that supplies between 12 and 36 Volts and a Buildbotics premade power Stepper motors (NEMA 23 or smaller) supply cable. Buildbotics premade motor cables Alternatively use a power adapter with a matching plug.
- Page 10 Ethernet local area network Connections Connect motors Refer to the motor manual or datasheet to identify the A+, A-, B+, and B- coil wires. Attach the motors to the Buildbotics premade cables using the following table. Motor wire Premade cable wire color Black...
- Page 11 compatible connector (e.g. Meanwell GST280A-C6P), just plug it directly into the power connector. Turn on the “Enable” switch Plug in the power supply and turn on the “Enable” switch. The controller LCD screen will illuminate. When “Ready” appears in the upper left corner, it is ready to operate. Jog motors (if gamepad attached) Use the joysticks on the gamepad to move the motors.
- Page 12 A gamepad can be used to control movement on the X, Y, Z, and A axes, and to scroll through screens on the controller. The gamepad attaches to the Buildbotics CNC Controller via any of the four USB ports on the back panel. Once attached, the gamepad can be used to move the CNC head in any direction at various speeds.
- Page 13 The following table describes the actions that can be achieved using the gamepad. Movement Buttons Comments Simultaneous X X/Y stick Causes the CNC head will move in the and Y direction that the X/Y stick is moved. movement X movement X/Y stick Restricts movement to X-axis only only...
- Page 14 "Auto" tab, will be executed when the “Play” button is clicked. Software Upgrade Go to the ADMIN->General page to update to the latest software. After clicking “Upgrade”, you’ll be prompted for the password. The default password is ‘buildbotics’.
- Page 15 Next Steps For more information, get the User Manual from: docs.buildbotics.com...
Need help?
Do you have a question about the 4-Axis CNC Controller and is the answer not in the manual?
Questions and answers