
Subscribe to Our Youtube Channel
Summary of Contents for Batavia Auto Scan FDS-5200
- Page 1 BEDIENUNGSANLEITUNG INSTRUCTION MANUAL GEBRUIKSAANWIJZING Auto Scan FDS-5200 OBD 2 7047699 Artikel-Nummer Item-No WARRANTY...
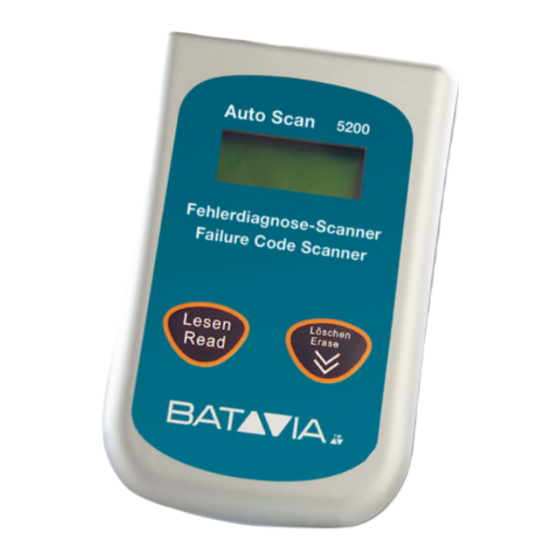
- Page 3 Übersicht Overview Overzicht deutsch LCD Anzeige Zeigt die Testergebnisse an. Die Anzeige verfügt über Hintergrundbeleuchtung und die Ergebnisse werden mit 8 Stellen auf jeder Zeile angezeigt. Lesen Taste • Blättert durch die Diagnosefehler-Codes und • Kehrt zum Hauptmenü zurück Löschen Taste •...
-
Page 4: Table Of Contents
Inhalt Content Inhoud deutsch Sicherheitshinweise Produkteigenschaften Vor der ersten Benutzung Anzeige im Display Fehlercodes auslesen Fehlercodes löschen I/M Readiness Funktion Fahrzeug-Idendifizierungsnummer sehen Neuscannen Technische Daten Entsorgung EG-Konformitätserklärung english Safety Notes Product Features Before first Use What shows in the display Reading the diagnostic trouble codes Erasing Codes I/M Readiness Status... -
Page 5: Sicherheitshinweise
Sicherheitshinweise Bitte machen Sie sich vor der Inbetriebnahme mit dem Gerät vertraut und bewahren Sie diese Bedie- nungsanleitung gut auf. Diese Bedienungsanleitung enthält wichtige Hinweise zur Inbetriebnahme und Handhabung. Legen Sie die Anleitung dem Produkt bei, wenn Sie es an Dritte weitergeben! Bitte beachten Sie die Sicherheitshinweise! Diese sollen Ihnen den sachgemäßen Umgang erleichtern und Ihnen helfen, Missverständnissen und Schäden vorzubeugen. -
Page 6: Vor Der Ersten Benutzung
spezifische Codes • Überwacht den Emissionen-Anzeigenstatus von OBD • Liest die VIN (Fahrzeug-Idendifizierungsnummer) von Fahrzeugen aus, ab Baujahr 2002, die Mode 9 unterstützen • Löscht den Status der Fehlfunktions-Warnleuchte (MIL) • Verfügt über eine einfach zu lesende, blendfreie 2 Zeilen LC-Anzeige mit Hintergrundbeleuchtung •... -
Page 7: Fehlercodes Auslesen
FEHLERCODES AUSLESEN Achtung: Verbinden Sie das Gerät nicht während der Motor läuft bzw. die Zündung an ist. Schalten Sie die Zündung aus. MOBOSCAN Verbinden Sie das Gerät mit dem OBD II Anschlussstecker im Fahrzeug. 8400 Warten Sie nun kurz bis das Gerät betriebsbereit ist. Schalten Sie die Zündung an aber nicht den Motor starten. -
Page 8: Fehlercodes Löschen
FEHLERCODES LÖSCHEN Zum Löschen der Fehlercodes, wählen Sie [2.ERASE] im Hauptmenü: MENU: ERASE? Im Display erscheint [ERASE? YES NO] und verlangt eine Bestätigung. 2.ERASE YES NO Beachten Sie, dass die Taste Löschen eine weitere Funktion hat, das Weiterblättern. Wenn Sie die Fehlercodes nicht löschen wollen, drücken Sie die Taste Löschen, um das Menü zu verlas- sen. -
Page 9: Neuscannen
Catalyst Monitoring – Katalysator-Überwachung EVAP Evaporative System Monitoring – Verdampfungs-Emmisions-System-Überwachung HO2S O2 Sensor Heater Monitoring – Überwachung der vor- und nachgeschalteten (HO2S) Lambdasonden 2AIR Secondary Air Monitoring – Sekundärluftsystem-Überwachung Heated Catalyst Monitoring – Beheizte Katalysator-Überwachung A/C System Monitoring – Überwachung der Klimaanlage Drücken Sie die Taste Lesen, um zu Hauptmenü... -
Page 10: Safety Notes
Safety Notes Before first use please familiarize yourself with the proper usage of the device. Keep these operating in- structions for future reference. This operating instruction contains important details for handling the device. Please pass it on along with the unit if it is handed over to a third party! Please read the safety instructions most carefully! These instructions will make it easier for you to handle the device appropriately and help prevent misunderstandings and possible damages. -
Page 11: Before First Use
• Current-independent unit • No need for an additional laptop computer to operate • Small in size and conveniently fits in your palm • Safely communicates with the on-board computer • No batteries needed-powered via OBD II cable Operation BEFORE FIRST USE Remove the trouble code reader from the packaging and dispose off packaging material. -
Page 12: Erasing Codes
SCAN SCAN SCAN SCAN SCAN SCAN KWP 2000 ISO9141 EKWP2000 Wait for the main menu to come up. Select [1.DTC] from the main menu by pressing the MENU 1.DTC Read button. If there are no Diagnostic Trouble Codes retrieved, the display shows: If there are any Diagnostic Trouble Codes, then the total number of the FAULT:02 Fault Codes followed by that of the Pending Codes will be reported on the... -
Page 13: I/M Readiness Status
I/M READINESS STATUS The I/M Readiness function is used to check the operations of the Emission System on OBD II compliant vehicles. An I/M Readiness Status result of [NO] does not necessarily indicate that the vehicle being tested will fail the state I/M inspection. Possible Messages All monitoring programs supported on the vehicle have completed their diagnostic testing and the MIL light is not on... -
Page 14: Rescanning Data
RESCANNING DATA The RESCAN function allows you to retrieve the most current data stored in the ECM or MENU: to re-link to the vehicle if communication is disconnected. Select [5.RESCAN] from the 5.RESCA main menu by pressing the Read button. Press either the Erase or Read button to return to the main menu. -
Page 15: Veiligheidsinstructies
Veiligheidsinstructies Voordat u het apparaat voor de eerste maal gebruikt verzoeken wij u de gebruiksaanwijzing voor dit ap- paraat goed te bestuderen. Bewaar deze gebruiksaanwijzing voor toekomstige raadplegingen. Deze gebruiksaanwijzing bevat belangrijke gegevens over het gebruik van dit apparaat. Hou de ge- bruiksaanwijzing bij het apparaat voor het geval dat u het overhandigd aan derden. -
Page 16: Voor Het Eerste Gebruik
• Leest de VIN (voertuig identificatienummer) van voertuigen vanaf bouwjaar 2000, die mode 9 on- dersteunt • Wist de stand van het waarschuwingslampje dat een storing aangeeft (MIL) • Beschikt over een makkelijk leesbaar, uit twee regels bestaand, niet afgeschermd LC-display met achtergrondbelichting •... -
Page 17: Foutencodes Wissen
FOUTCODES INTERPRETEREN Let op! Sluit het apparaat niet aan terwijl de motor draait, respectievelijk. het contact aan staat. Schakel het contact uit. MOBOSCAN Steek de stekker van de BAT scan in het OBD II contact van het voertuig. 8400 Wacht een ogenblik totdat het apparaat gebruiksklaar is. Zet het contact aan maar niet de motor starten! Als ERROR op het display verschijnt, zet het contact dan uit en wacht 10 seconden. -
Page 18: I/M Readiness Functie
FOUTCODES WISSEN Voor het wissen van de foutcodes kies [2.Erase] in het hoofdmenu. Op het MENU: ERASE? display verschijnt [ERASE? YES NO] en vraagt om bevestiging. 2.ERASE YES NO Denk eraan, dat de toets wissen nog een andere functie heeft, nl. doorbladeren. Als u de foutcodes niet wilt wissen, druk dan op de toets wissen om het menu te verlaten. -
Page 19: Opnieuw Scannen
O2 Sensors Monitoring – Controle van de lambdasonde Catalyst Monitoring – Controle catalysator EVAP Evaporative System Monitoring – Controle verdampings-emissie-systeem HO2S O2 Sensor Heater Monitoring – Controle van de voor- en later ingeschakelde (HO2S) lamb- dasonden 2AIR Secondary Air Monitoring – Controle secundair luchtsysteem Heated Catalyst Monitoring –... -
Page 20: Ce-Verklaring
We, the Batavia GmbH, Blankenstein 230-1b, NL-7943PG Meppel, declare by our own responsibility that the product Auto Scan FDS-5200 – OBD II, Item-No 7047699 is according to the basic requirements, which are defined in the Euro- pean Directives 2004/108/EC Electromagnetic Compatibility (EMC) and their amendments. For the evaluation of con- formity, the following harmonized standards were consulted: 2004/108/EC –... - Page 21 Notizen Notes Notities...
- Page 22 Conservez le bon d’achat original. Cette garantie couvre tous les défauts de matériau et de main d’oeuvre constatés sur ce produit BATAVIA pendant une période de deux ans à compter de la date d’achat. Les défauts de fonctionnement et autres résultant d’abus ou de mauvais emploi, de négligence, de modifications ou réparations non autorisées sont exclus de la garantie.
Need help?
Do you have a question about the Auto Scan FDS-5200 and is the answer not in the manual?
Questions and answers