
Subscribe to Our Youtube Channel
Related Manuals for Fast Ballistic High Cut

Summary of Contents for Fast Ballistic High Cut
- Page 1 HELMET OPERATOR’S MANUAL © OPS-CORE 2016 06-05-160 REV. B FOR FAST BALLISTIC AND CARBON HELMETS...
- Page 2 HELMET VERSIONS FAST HELMETS This manual is specific to the following helmet models: FAST Ballistic High Cut, FAST Ballistic Maritime and FAST Carbon. FAST Ballistic High Cut Helmet is used for reference drawings throughout this Operator’s Manual. If there are any procedure discrepancies due to other helmet versions they will be specifically noted.
- Page 3 HELMET COMPONENTS SIZING GUIDE PRO SETUP CHINSTRAP OPERATION 9-15 ACCESSORY INTEGRATION COUNTERWEIGHT & HELMET COVER SKELETON SHROUD FAST SIDE RAILS (ARCs) EXTERIOR VELCRO ® SIDE COVERS & GUNSIGHT MANDIBLE COMMs HEADSET 16-22 MAINTENANCE SCHEDULE REPLACEMENT KITS REPLACEMENT FITBAND COMFORT PADS REPLACEMENT FITBAND &...
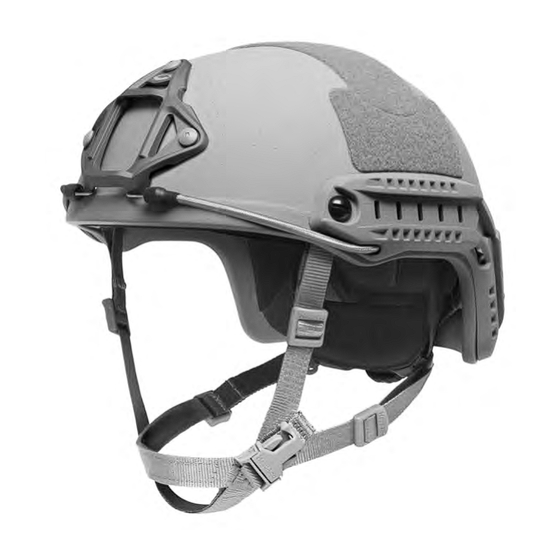
- Page 4 HELMET COMPONENTS Ballistic Screws Skeleton Shroud & T-Nuts Exterior Velcro Helmet Shell Bungee FAST Side Rail (ARC) Integrated Retention System (LED Version Available) Note: LED = Left Eye Dominant Front EPP Pad Comfort Pad Top EPP Pad Side EPP Pad...
-
Page 5: Sizing Guide
SIZING GUIDE FAST helmets have been designed from the ground up to fit the largest group of users in helmet sizes that most closely match their heads. However, there is still a small percentage of users that will not fit our standard sizing configurations. Please use the sizing guide below to determine your helmet size and your chinstrap size. - Page 6 PRO SETUP FAST Helmets were designed for professionals who expect the most from their equipment. Just like fine-tuning the suspension on a racecar or sighting in a fire-arm, the helmet must be set up properly before use to function correctly. If you do not follow these instructions, your helmet will not function in accordance with stated performance.
- Page 7 “PRE-LOAD” THE FITBAND • You can set the shape of the fitband to match the shape of your head for long term comfort. • Push or pull the rear fitband liner tabs (used for height adjustment in step 3 ) to adjust the fitband tension from a round to more oval shape.
-
Page 8: Chinstrap Operation
CHINSTRAP OPERATION Put the helmet on and fasten the Chinstrap Buckle. Turn the Occ-Dial Adjustment Knob to tighten the fitband until it is comfortably snug. Occ-Dial Adjustment Knob With both hands, pull the two Rear Head-Loc Sliders on the lower webbing ®... -
Page 9: Accessory Integration
Rear Exterior Velcro FAST Side Rail (ARC) RECOMMENDED CONFIGURATIONS There are numerous accessories that can be attached to your FAST Helmet to be used in a variety of situations. Below are some recommended configurations. NIGHT OPERATIONS AIRBORNE OPERATIONS IFF Strobe... - Page 10 Remove screws and T-nuts at back of FAST Side Rails. Align the anchor of Counterweight to the holes on the rear of the FAST Side Rail. The Rear Exterior Velcro will hold Counterweight in place. Use your fingers to loosely attach a screw to the Counterweight and FAST Helmet.
- Page 11 SKELETON SHROUD The Skeleton Shroud provides a front mounting option for video cameras, visors, illuminators, and night vision goggles (NVG’s). ATTACH NVG MOUNTING ARM Insert and anchor the top of the NVG Mounting Arm underneath the top of the bracket as shown. While pressing the arm’s release trigger, push down to snap and lock the arm in place.
- Page 12 FAST SIDE RAILS (ARCs) 4-Position FAST Side Rails (ARCs) are mounted to the sides of the helmet to allow for quick yet secure donning or doffing of various headborne accessories. ARC ADAPTERS The three adapters shown on this FAST Side Rail are...
- Page 13 Apply hooked Velcro to the bottom of a device. Place device on top of the looped Velcro that is already attached to the FAST Helmet. Cover top of device with additional hook Velcro to secure it into place. Simply remove the device by pulling it away from the looped Velcro.
- Page 14 Slide the Front Shoe of the Side Cover into the front of the top FAST Side Rail (ARC) as shown. LOCK SIDE COVERS IN PLACE Snap the back of the Side Cover into the rear FAST Side Rail (ARC) and turn the Cam-Loc Handle downward to lock into place.
- Page 15 COMMs HEADSET The liner system is compatible with a variety of COMMs headsets and hearing protection devices. Instructions for use with headband style COMMs is below. RELOCATE TOP PADS Position the top pads in the helmet so there is enough space for the headband of the headset to sit in between them.
-
Page 16: Maintenance Schedule
Check that the chinstrap screws are tight using a flathead screwdriver. • Clean the Velcro for dust and dirt by using air pressure. • Visually check the Skeleton Shroud or VAS Shroud and FAST Side Rails for signs of breakage. • Visually check the Fitband for signs of breakage. •... -
Page 17: Replacement Kits
REPLACEMENT KITS Exterior Velcro Skeleton Repaint Helmet Shell Shroud Kit Front EPP Pad Pad Kit Bungees Kit FAST Side Rails (ARCs) Fitband Chinstrap & Hardware Fitband Comfort Pads... - Page 18 REPLACEMENT FITBAND COMFORT PADS REMOVE OLD COMFORT PADS Simply peel off all old comfort pads from the fitband. A fitband with all comfort pads removed should look like the image below. COMFORT PAD INSTALLATION Attach the new comfort pads based on the instructions that came with the “Replacement Fitband Comfort Pads Installation Instructions”...
- Page 19 REPLACEMENT FITBAND & EPP PADS REPLACEMENT FRONT EPP PAD KIT: The Front EPP Pad is inserted into the helmet shell before the Fitband. It is held into the helmet shell by Velcro patches. Front EPP Pad Location REPLACEMENT FITBAND: The replacement Fitband kit attaches to the Front EPP Pad.
- Page 20 Once in place it needs to be pressed down Side firmly. Please allow up to 24 hours for adhesive to reach Exterior maximum bonding strength. Velcro KITS INCLUDE THE FOLLOWING REPLACEMENT PARTS: Rear Exterior Velcro FAST High Cut Kit A Kit B FAST Carbon FAST Maritime...
-
Page 21: Bumper Installation
REPLACEMENT SHROUD Before replacing Skeleton Shroud or VAS Shroud, the helmet’s Fitband and Front EPP Pad must be removed. Replacement kit includes ( 1 ) Skeleton Shroud, ( 3 ) Screws and ( 3 ) T-nuts. Align the Skeleton Shroud or VAS Shroud with the existing 3-hole pattern on the front of your helmet. - Page 22 REPLACEMENT FAST SIDE RAILS Align the new FAST Side Rails with the existing Chinstrap Holes on your FAST helmet. Loosely assemble the FAST Side Rails, Helmet Chinstrap Anchors, and new hardware by following the diagram below. For the rear assembly be sure to include the Rear Fitband Tab as shown. Repeat for opposite side of helmet.
- Page 23 HELMET PART NUMBERS Note: LED = Left Eye Dominant FAST BALLISTIC HIGH CUT HELMET FAST BALLISTIC HIGH CUT L/XL (NO SHROUD) 69-99-141 69-99-151 69-99-181 69-99-121 GREEN 69-99-142 69-99-152 69-99-182 69-99-122 BLACK 69-99-123 69-99-143 69-99-153 69-99-183 MULTICAM 69-99-159 69-99-189 69-99-129 69-99-149...
- Page 24 REPLACEMENT EXTERIOR VELCRO L/XL 60-96-141 60-96-151 60-96-181 60-96-121 GREEN 60-96-142 60-96-152 60-96-182 60-96-122 BLACK 60-96-123 60-96-143 60-96-153 60-96-183 REPLACEMENT FAST SIDE RAILS (ARCs) L/XL W/ BUNGEE 29-99-121 29-99-141 29-99-151 29-99-181 GREEN 29-99-122 29-99-142 29-99-152 29-99-182 29-99-153 29-99-183 BLACK 29-99-123 29-99-143...
-
Page 25: Replacement / Accessories
29-98-251 29-98-221 29-98-241 GREEN 29-98-222 29-98-242 29-98-252 29-98-243 29-98-253 BLACK 29-98-223 FAST BALLISTIC & CARBON REPLACEMENT PARTS REPLACEMENT FRONT EPP PAD PART # 60-98-123 60-98-143 L/XL 60-98-153 60-98-183 REPLACEMENT EPP PAD KIT PART # PART # S/M & M/L (8 pads total, no front pad) - Page 26 COUNTERWEIGHT KIT PART # 39-99-101 MULTICAM 39-99-109 FLEECE CHINCUP/ EXTENDER COVER PART # BLACK 19-99-203 MESH HELMET COVER FOR FAST HIGH CUT PART # MESH HELMET COVER FOR FAST MARITIME PART # S/M MULTICAM 41-98-229 S/M MULTICAM 41-98-129 M/L MULTICAM...
-
Page 27: Safety Checklist
WARRANTY The FAST helmet shell is warranted for (5) years from date of purchase against material defects and/or faulty workmanship. All other liner components including the Worm-Dial, head-band, pads, and chinstrap retention system are warranted for (1) year from date of purchase against material defects and/or faulty workmanship. -
Page 28: Operator Notes
OPERATOR NOTES MADE IN USA...
Need help?
Do you have a question about the Ballistic High Cut and is the answer not in the manual?
Questions and answers