
Summary of Contents for APSX APSX-PIM
- Page 1 APSX-PIM USER MANUAL Full-Automatic Electric Desktop Plastic Injection Machine APSX-PIM User Manual V1.5...
- Page 2 A D V A N C E D P R O D U C T I O N S Y S T E M S APSX, LLC. APSX, LLC. 11144 Luschek Dr Blue Ash, OH 45241 www.apsx.com • info@apsx.com...
- Page 3 This document contains information which is the exclusive property of APSX LLC. Except for any rights expressly granted by contract, no further publication or commercial use may be made of this document, in whole or in part, without the prior written permission of APSX LLC.
- Page 4 Spare Parts All spare parts for APSX-PIM can be ordered online at www.apsx.com. Unauthorized Modifications Under no circumstances should any changes or modifications be made to the electrical circuits, mechanical structures, or the safety devices to the machine and guarding on the mold without the prior, written permission of APSX LLC.
-
Page 5: Table Of Contents
Injection Section ................12 Injection Valve Section ..............12 Clamping Section ................12 User Interface Section ..............12 Moving the APSX-PIM to Another Location ......13 APSX-PIM Injection Molding Process ........14 Preparing the Machine ..............14 Powering the Machine..............14 System ON .................. - Page 6 KEY FEATURES OF APSX-PIM ........... 34 TECHNICAL OVERVIEW ............. 34 DESIGN ELEMENTS ..............35 SUPPORT ................37 SPARE PARTS ................37 LIMITED WARRANTY ..............37 TRANSFERABILITY ..............38 TOOLS AND ACCESSORIES ..........39 Kill-A-Watt ..................39 15/16” Wrench ................39 7/16”, ½”, ¾”...
-
Page 7: Injection Molding Process
For example the PP which is a frequently used plastic has physical, mechanical, impact and thermal properties listed. Specific gravity, mass flow rate, tensile strength, izod impact and deflection temperature under load are some of the properties that make a difference when processing for injection molding. APSX, LLC. – www.APSX.com... -
Page 8: Some Terms For Injection Molding
Clamping Force: The force applied to the mold to keep it closed, in opposition to the fluid pressure of the compressed molding material within the mold cavity and the runner system. Clamping Plate: A plate fitted to a mold and used to fasten the mold to a platen. APSX, LLC. – www.APSX.com... - Page 9 Cure: The process of changing properties of polymer into a more stable and usable condition. This is accomplished by the use of heat, radiation, or reaction with chemical additives. APSX, LLC. 2017 – www.APSX.com...
- Page 10 Family mold: A mold that produces non-identical parts simultaneously from multiple cavities. Fill pressure: the pressure required to fill the cavity. Fill Time (also known as Injection): Time required to fill the cavity or mold. APSX, LLC. 2017 – www.APSX.com...
- Page 11 Melt Flow Rate: A measure of the molten viscosity of a polymer determined by the weight of polymer extruded through an orifice under specified conditions of pressure and temperature. Particular conditions are dependent upon the type of polymer being tested. APSX, LLC. 2017 – www.APSX.com...
- Page 12 Purging: In extrusion or injection molding, the cleaning of one color or type of material from the machine by forcing it out with the new color or material to be used in subsequent production, or with another compatible purging material. APSX, LLC. 2017 – www.APSX.com...
- Page 13 Warpage: Distortion caused by nonuniform internal stresses. Weld Line: Where melted material flows together during molding to form a visible line or lines on a finished part that may cause weakening or breaking of the component. APSX, LLC. 2017 – www.APSX.com...
-
Page 14: Safety Precautions
A P S X - P I M D E S K T O P I N J E C T I O N M A C H I N E Safety Precautions APSX-PIM is a small and low pressure machine. However, the following safety precautions should be taken before and during the machines use. -
Page 15: Physical Hazards
The maximum temperature set is set below the ignition point of the material being processed. Only original APSX parts should be used for replacement. Regularly inspect all assemblies and screws connecting different sections and parts. APSX, LLC. 2017 –... - Page 16 The WARNING safety alert indicates a potentially hazardous situation that if not avoided, could result in death or serious injury. The CAUTION safety alert indicates a potentially hazardous situation that, if not avoided, could result in property damage. APSX, LLC. 2017 – www.APSX.com...
-
Page 17: Apsx-Pim Injection Molding Machine
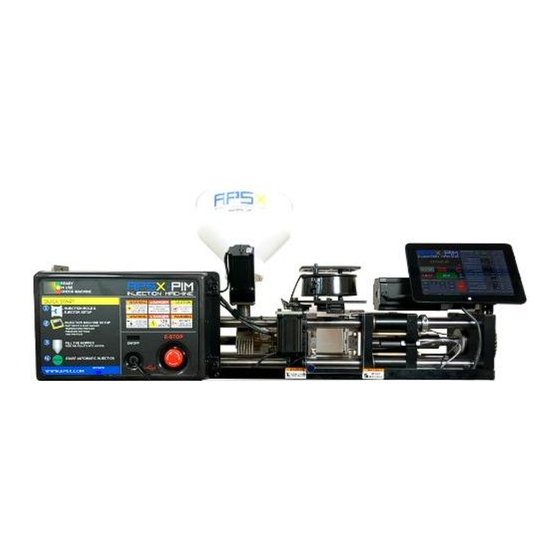
A P S X - P I M D E S K T O P I N J E C T I O N M A C H I N E APSX-PIM Injection Molding Machine APSX-PIM is a fully automatic electric desktop injection molding machine. It runs with 115VAC power with no water or hydraulic connection required. It can generate 5 tons of clamp force and can inject 30 cu-cm of plastic at a time up to 315 C degrees. -
Page 18: Plasticizing Section
PC. It allows the user to set the operational and material related parameters on screen within the pre-set ranges. The 115VAC power input from a regular wall outlet is also included in this section. APSX, LLC. 2017 – www.APSX.com... -
Page 19: Moving The Apsx-Pim To Another Location
A P S X - P I M D E S K T O P I N J E C T I O N M A C H I N E Moving the APSX-PIM to Another Location Please be aware of the following precautions when moving the APSX-PIM to another location or carrying it out from the shipping crate. -
Page 20: Apsx-Pim Injection Molding Process
A P S X - P I M D E S K T O P I N J E C T I O N M A C H I N E APSX-PIM Injection Molding Process Preparing the Machine The user must check if the machine hopper and hopper feeder pipes are cleaned and there are no obstructions from the previous injection session. - Page 21 A P S X - P I M D E S K T O P I N J E C T I O N M A C H I N E Move the ejector rod back out of the moving mold platen at Block 3 to create enough space for the mold piece to slide down as shown below. APSX, LLC. 2017 – www.APSX.com...
- Page 22 While holding the mold by hand as shown below, lower it slowly until the top edges of Block 3 and the mold are aligned properly. Tighten the mold clamps on the moving platen with bolts and release your hands. APSX, LLC. 2017 – www.APSX.com...
- Page 23 (Block 4) and moving platens (Block 3). Watch that the clamps are not caught between the mold and the block 4. Then tighten the mold clamp screws on the fixed platen side of the mold. APSX, LLC. 2017 – www.APSX.com...
- Page 24 A P S X - P I M D E S K T O P I N J E C T I O N M A C H I N E Open the mold manually by pushing on the Home Clamp button on touch screen manual controls to allow you enough space to complete the tightening the mold clamps. APSX, LLC. 2017 – www.APSX.com...
- Page 25 A P S X - P I M D E S K T O P I N J E C T I O N M A C H I N E Connect the mold temperature sensor by using the screw on the mold. APSX, LLC. 2017 – www.APSX.com...
- Page 26 Place the mold fan assembly back to its place by tightening the two nuts located on the fixed platen (Block 4). Securely close the front and back doors on the mold fan assembly as shown below. APSX, LLC. 2017 – www.APSX.com...
- Page 27 Block 1 and Block 2 by sliding it according to the ejector rod location while referencing the mold geometry. The ejector rod should touch to the ejector plate and complete the ejection process when the block gets into the clamp switch range. APSX, LLC. 2017 – www.APSX.com...
-
Page 28: Apsx-Pim Magnets, Switches And Sensors
A P S X - P I M D E S K T O P I N J E C T I O N M A C H I N E APSX-PIM MAGNETS, SWITCHES AND SENSORS: Perform the final test of the ejection system on MANUAL CONTROL mode and fine tune it after each try. -
Page 29: Apsx-Pim Cycle
A P S X - P I M D E S K T O P I N J E C T I O N M A C H I N E APSX-PIM CYCLE: The machine performs the injection molding functions of plasticizing, clamping, injection and ejection accordingly and completes the job as set by the user. These automatic steps are for one single injection cycle. APSX, LLC. 2017 – www.APSX.com... -
Page 30: Settings
The user sets the desired injection temperature, shot size, timings and other operational parameters on tablet PC screen. The user screen shows the actual and target settings for each parameter. APSX-PIM User Screen APSX, LLC. 2017 – www.APSX.com... - Page 31 HOMING: Clamp (Block 2 &3) and injection sides (Block 5&6) travel to their home locations for the next injection cycle. SYSTEM Button – The button to turn ON or OFF the APSX-PIM system components such as motors and sensors. HEAT Button – The button to turn ON or OFF the heat on the barrel.
- Page 32 A P S X - P I M D E S K T O P I N J E C T I O N M A C H I N E Temperature Display – The current temperature of plastic in the barrel RUN Button – The button to start or stop the APSX-PIM injection cycle Cycle Timer – The timer that shows each cycle time in seconds Part Counter –...
- Page 33 Clamp Time – The time set to move the clamp at its fastest speed towards the mold before slowing down for clamping. Please start low to not bang the clamp on the mold. APSX, LLC. 2017 – www.APSX.com...
- Page 34 Fill Amount – The switch over volume that the machine uses to decrease the pressure from high pressure (injection pressure) to low pressure (holding pressure). APSX recommends this number to be set at 90% of the total part volume. For example, if your total part volume including the sprue is 10cu-cm then set fill amount to 9cu-cm.
- Page 35 In general, the standard APSX-PIM injection cycle should be used. These control buttons can also be used for testing movements of the machine components.
-
Page 36: Filling The Hopper
Repeat the purging process 3-5 times with manual controls until all the old material is removed from barrel. Load the hopper with purging material and run the hopper until the barrel is full APSX, LLC. 2017 – www.APSX.com... -
Page 37: Start Run
The user must empty the hopper. Plastic pellets can be vacuumed from the hoper feeder pipe for the next injection session. A flat edge tool can be used to clean excess hardened plastic that may have stuck to the machine or molds. APSX, LLC. 2017 – www.APSX.com... -
Page 38: Troubleshooting Guide
A P S X - P I M D E S K T O P I N J E C T I O N M A C H I N E Troubleshooting Guide Please follow the troubleshooting matrix below in the numerical order of recommended actions. APSX, LLC. 2017 – www.APSX.com... - Page 39 PROTECTIVE EQUIPTMENT AT ALL TIMES WHEN RUNNING. WE DO NOT SUGGEST USING THE TABLET PC FOR OTHER APPLICATIONS OTHER THEN APSX-PIM SOFTWARE. IDEALLY, IT SHOULD BE DEDICATED ONLY FOR APSX-PIM USE. NOT FOLLOWING THIS SUGGESTION VOIDS THE WARRANTY. APSX, LLC. 2017 –...
-
Page 40: Machine Specs
With the APSX-PIM, we set out from the beginning to create a new type of desktop injection machine – a design that combines all the attractive features of a desktop injection machine with the performance and precision of a large size fully automatic injection machine. -
Page 41: Design Elements
APSX-PIM features a gearbox and ballscrew combo system for its clamping mechanism. This isn't an arbitrary design, but can be a flagship for clamping systems by other injection machines in the future. This means the APSX-PIM can be used in combination with other gearboxes with different gear ratios to adjust the clamping force and clamping speed, expanding tooling choices beyond the default specifications. - Page 42 APSX-PIM Design Considerations: Small Size without the Compromise - a real injection machine without the typical compromises of desktop injection presses. The APSX-PIM can be moved into nearly any workbench and requires a basic 120 Volt wall outlet to operate, but has the ability to make parts with much higher quality than a rough draft prototype plastic part.
-
Page 43: Support
Spare parts are in stock at our Cincinnati location. All critical part orders are shipped on the same day. The machine is designed with simplicity in mind, so it is nearly maintenance free. Keep in mind APSX-PIM has no water lines, no pressured air, minimal lubrication and no routine cleaning requirements. You... -
Page 44: Transferability
Should you have a problem with your machine, please consult your user manual first. If this does not resolve the problem, contact APSX through our website at www.apsx.com. -
Page 45: Tools And Accessories
The LCD screen shows all meter readings: Volts, Current, Watts, Frequency and Power. Press the Watt/VA key once. Watts will be displayed as the active power. Connect the Kill-A-Watt to 120V power and then to APSX-PIM power cord. The LCD display should show the following readings for each condition below:... -
Page 46: 7/16", ½", ¾" Wrenches
Blocks 2, 3, 5 and 6. (Use a thin even coating on metal shafts) -Apply synthetic grease or generic chain lube to lubricate spring, clamp and valve motor chains. -Apply synthetic grease to ballscrews on Blocks 6 and 2. APSX, LLC. 2017 – www.APSX.com...
Need help?
Do you have a question about the APSX-PIM and is the answer not in the manual?
Questions and answers