Advertisement
Quick Links
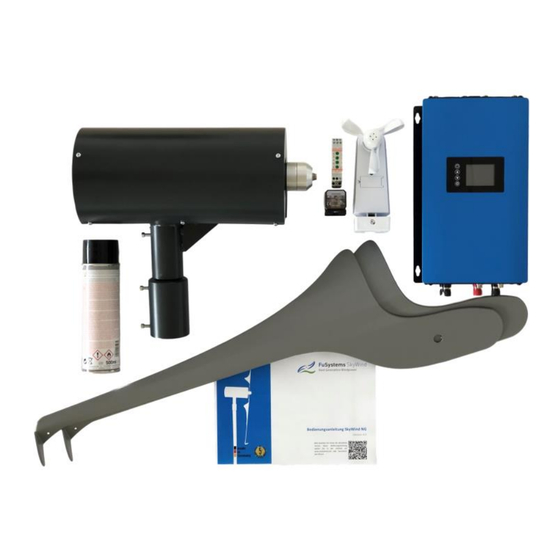
SkyWind NG
Efficient Wind Power
The installation must be done by trained professionals only! The installer must be qualified and accredited for
work on AC electrical installations. Expert knowledge and documentation is mandatory.
Installation Handbook For Professionals
SkyWind NG Micro Wind Turbine, Rev. 2.0
Advertisement

Subscribe to Our Youtube Channel
Summary of Contents for FuSystems SkyWind NG
- Page 1 Efficient Wind Power The installation must be done by trained professionals only! The installer must be qualified and accredited for work on AC electrical installations. Expert knowledge and documentation is mandatory. Installation Handbook For Professionals SkyWind NG Micro Wind Turbine, Rev. 2.0...
- Page 2 1. First Check You will need an original SkyWind NG turbine including the automatic storm control from FuSystems SkyWind GmbH. If you are not sure wether your parts are original or not stop the installation and contact FuSystems SkyWind. ...
- Page 3 2. Site & Customer SkyWind NG turbines must be installed above obstacles that might disrupt a free and continuous airflow. Remember the following rule: BASIC RULE: When your head is at the height of the turbines nacelle you must not look into any trees, houses or other obstacles! You should see the horizon in any direction! ...
- Page 4 3. Visual Check Place the turbine as shown in the picture. Do not place the turbine on the back. This would lead to the metal deforming once the cover is removed. Check the turbine for any potential visual damages. ...
- Page 5 If these are too loose the turbines operation might be louder than expected. Never use any other screws than those delivered with the turbine! In case of loss of screws please contact FuSystems SkyWind. Page 5 | SkyWind Installation Handbook...
- Page 6 7. Mounting Preparation Attach a fitting ring terminal to the end of your DC cable to ensure easy and quick connection to the inverter later on. If you use more than a single cable make sure that the connection is safe and durable (e.g. MC connectors). Mark the + and the - pole clearly and unmistakably! ...
- Page 7 Wiring Diagram 9. Automatic Storm Control max. 35 m Every SkyWind NG turbine must be equip- ped with an effective storm protection system. For safety reasons this system needs to be redundant. The alongside wiring layout must be in- stalled by a professional electrician with greatest care.
- Page 8 10. DC Installation Of The Inverter Connect the inverter to the turbine using the far right red + and black - connectors la- beled with „DC INPUT“ (yellow marking). Make sure that the polarity is correct! Mount the dumpload close to the inverter, but not below it. In case of too much power the resistor might become very hot.
- Page 9 12. a) Set Up Details A new inverter must be set-up: Navigate to the main menu by pressing the ‚Home‘-button on the side of the display. Use the ‚arrow‘-buttons to navigate to the ‚Gear‘-symbol on your display and enter the menu by pushing the ‚Gear‘-button on the side of the display.
- Page 10 13. Finalizing The Electrical Installation Check the whole electrical installation and write down your wiring diagram. Document all settings of your storm control system and of your inverter by taking pic- tures. Without photographic documentation your warranty is void. ...
- Page 11 15. Installing The Blade Activate the manual turbine stop or make sure that the storm control is without power. This way the turbine will not start up immediatly after installation of the rotor blade. Install the patented SkyWind rotor blade as the last part of the installation. The blade is made of one piece and ships balanced for best possible performance.
- Page 12 This document represents the interpretation of the original document „Bedienungsanleitung, Version 4.0“ which may be found online at http://myskywind.com/SkyWind/Infothek-Flyer-Broschuren-Vide/Bedienungsanleitung-SkyWind-4.0.pdf and was made to the best knowledge of the interpreter. Only the original document is legally binding. FuSystems SkyWind GmbH | Bayernstraße 3, 30855 Langenhagen, Germany | www.fusystems.com...
Need help?
Do you have a question about the SkyWind NG and is the answer not in the manual?
Questions and answers