Table of Contents
Advertisement
Available languages
Available languages
Advertisement
Chapters
Table of Contents

Related Manuals for Victure AC800


Summary of Contents for Victure AC800
- Page 3 Language English Deutsch Français Italiano Español 日本語...
-
Page 5: Table Of Contents
Content Foreword Product Introduction Installation Guide Waterproof Case Open&Close Dust-proof Cover Replacement Battery Charging and Installation SD Card Insertion and Formatting Mode Operation Instructions Settings Table Wifi Connecting Computer Connecting TV Connecting Specifications Warranty... -
Page 6: Foreword
Foreword Thank you for your purchase of Victure AC800 and welcome to Victure’s world of photography. The AC800 Series action camera adopted 6-layers optical lens to record 4K / 24fps FHD videos and shoot maxim 20MP high quality pictures. With Gyroscope or Anti-shake function ON, the AC800 can reduce the impact of shake on the screen significantly. -
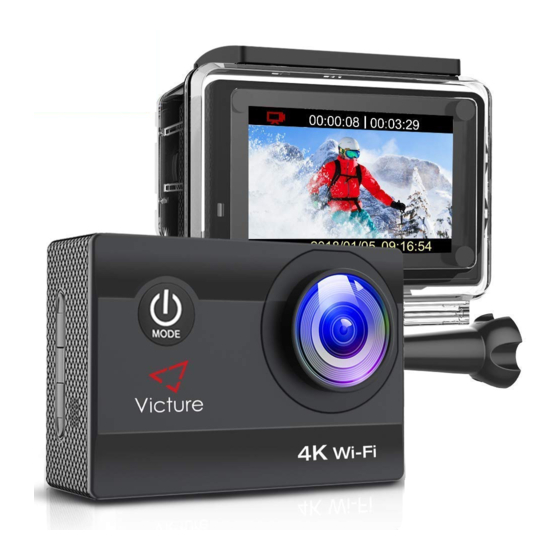
Page 7: Product Introduction
Product Introduction Power/MODE Button Lens Up/Wi-Fi Speaker Down/Audio Recording Switch Working Indicator (Flashes BLUE during working) MICRO USB MICRO SD MICRO HDMI Charging Indicator LCD Screen (Flashes RED during charging) Wifi Indicator (Flashes ORANGE when wifi is ON) OK Button Battery cover... -
Page 8: Installation Guide
Installation Guide Waterproof Case Open&Close Waterproof Case Open: ① ② ③ 1. To open the waterproof case, 2. Pull up the buckle of water- firstly take the switch on the top proof case; to right as indicated by the arrow. 3. -
Page 9: Dust-Proof Cover Replacement
Tips: 1. Please tear the protective films on the waterproof case lens before shoot/record; 2. To achieve better waterproof performance, the voice record within waterproof case will be weakened. Dust-proof Cover Replacement: Step 1 Step 2 Step 3 1. To replace the dust proof case, first please find the slot of the waterproof case as circled place showed in step 1. -
Page 10: Battery Charging And Installation
Battery Charging and Installation The battery and the camera are packaged separately, so please make sure that the battery is charged with power, inserted into the camera before getting the camera started. Battery Charging: The battery charging steps are as below: 1. -
Page 11: Sd Card Insertion And Formatting
② ① 2. Install the battery cover after the battery has been inserted. Please note the extended part of the battery cover should be inserted to the left of the battery compartment first as below picture shown. Then press the right half of the battery cover down into the battery compartment. - Page 12 Tips: Please use your fingernails to push the SD card since the slot is a little bit deep. Formatting: Considering the compatibility of the SD card, it should be formatted before using. Formatting steps are as below: 1. Short press the “MODE” button to start up the camera. Press the “MODE"...
-
Page 13: Mode Operation Instructions
Mode Operation Instructions The AC800 series has four kinds of mode: Video Mode, Photo Mode, Playback Mode, Settings Mode. Below are the function instructions of each button under these modes. Turn ON/OFF Short press「Power/MODE Button」: Turn on the camera; Extended press「Power/MODE button」: Turn off the camera. - Page 14 Non-playback time 「Up Button」: Page up 「Down button」: Page down 「Power/MODE Button」(Short Press): Mode switch(Video→Photo→ Playback→Settings) Settings Mode 「Up Button」: Page up 「Down button」: Page down 「OK Button」: Confirm 「Power/MODE Button」(Short Press): Mode switch(Video→Photo→ Playback→Settings)
-
Page 15: Settings Table
Settings Table Camera Settings Page Explanation Table ※V=Video Mode; P=Settings which effective under photo mode Setting Value P Explanation Video 4K/2K/1080P/ ○ To set the video’s resolution. Resolution 720P/480P/240P Off/3 Minutes/ The file will be record by Loop 5 Minute/ ○... - Page 16 Date stamp on the videos or ○ ○ Date Stamp Off/On pictures. The angle of the camera’s 170°/140°/ Angle ○ lens is adjustable. 110°/70° The camera will adjust the white balance automatically Diving Mode Off/On ○ ○ when record/shoot under water.
- Page 17 To counteract the hand- Anti-Shaking Off/On ○ shake/vibration‘s influence to taking pictures. Delete Current Delete To delete the files. File/Delete All Lock Current File/ To prevent files overwriting Unlock Current File/ Protect caused by loop recording Lock All the Files/ under car mode.
- Page 18 ※When you confirm OK, Format SD card the memory card will be formatted shortly. Default To restore the camera into Settings Settings default settings Model: The display of the model of Hardware Victure AC800 the product and the hardware information Version: 1.0 version.
-
Page 19: Wifi Connecting
Wifi Connecting Download the App Download the ‘OKCAM’ app from the App Store(iOS)/ Google Play(An- droid). Wifi Connecting After the download step finished,you can use your phone to control the camera through App, view the video or pictures on your phone, and download the recordings from the camera. -
Page 20: Computer Connecting
Computer Connecting There are two options when you use the included micro-USB cable to connect to a computer: Mass Storage and PC Camera. Press Up/Down button to switch between these two modes. Mass Storage: Access to the files which stored in camera’ s micro SD card to copy or view them on a computer. -
Page 21: Tv Connecting
TV Connecting With HDMI output, you can display the movies and images recorded by this camera on large screens of TV, projector, etc. 1. Turn off the camera. 2. Connect the camera and TV with a commercially available Micro HDMI cable (NOT INCLUDED). -
Page 22: Specifications
Specifications Model AC800 Chip NT96660 Sensor SONY IMX078 Screen 2” LCD Lens 170° Wide angle lens(Adjustable) Video Compression Format H.264 Video Format Image Format Wifi Connection Android / iOS supported Class 10 Micro SD card, maxim SD Card supports 64 GB. -
Page 23: Warranty
Warranty All Victure products come with a limited warranty of 12 months from the date of purchase. And we have professional customer service team for your support as soon as we can. If you have any questions or confusions about our product or the warranty, please feel free to contact us via: support@govicture.com. - Page 24 Inhalt Vorwort Produktvorstellung Inbetriebnahme Wasserdichtes Gehäuse öffnen & schließen Ersatz des staubdichten Gehäuses Aufladen und Batterieinbetriebnahme SD Karte einsetzen und formatieren Bedienungsanleitung Einstellungen Tabelle Verbinden mit einem Drahtlosnetzwerk (WIFI) Verbinden mit einem Computer TV Verbindung Technische Daten Garantie...
-
Page 25: Vorwort
Vorwort Danke für ihren Kauf der Victure AC800 Actionkamera und willkommen in Victure’s Welt der Fotografie. Die AC800 Actionkamera hat 6-lagige optische Linsen um 4K / 24fps FHD Videos aufzunehmen, und schießt Fotos mit maximal 20 Megapixel in höchster Qualität. Mit eingeschaltetem Gyroskop und Anti-Shake verfügt die AC800 über eine signifikante... -
Page 26: Produktvorstellung
Produktvorstellung Power/MODE Schalter Linse Auf/Wi-Fi Lautsprecher Ab/ Audio Aufnahme Taste Indikator LED (Blinkt BLAU während der Aufzeichnung) MICRO USB Mikrofon MICRO SD Kartenslot HDMI Ladeindikator LCD Display (Blinkt ROT während des Ladevorgangs) Wifi Indikator (Blinkt ORANGE wenn WIFI aktiv) OK Taste Batterie Abdeckung... -
Page 27: Inbetriebnahme
Inbetriebnahme Wasserdichtes Gehäuse öffnen & schließen Wasserdichtes Gehäuse öffnen: ① ② ③ 1.Um das wasserdichte Gehäuse 2.Drücken Sie die Schnalle zu öffnen, schieben sie zuerst den nach oben; Schalter oben nach rechts (siehe 3.Öffnen Sie die hintere Pfeil). Abdeckung. Wasserdichtes Gehäuse schließen: ②... -
Page 28: Ersatz Des Staubdichten Gehäuses
Hinweise: 1.Bitte entfernen Sie die Schutzfolien vom wasserdichten Gehäuse, bevor sie mit der Aufnahme beginnen. 2.Durch die Dichtheit des Gehäuses wird die Qualität der Tonaufnahme verringert. Ersatz des staubdichten Gehäuses Schritt 1 Schritt 2 Schritt 3 1.Um die staubdichte Hülle zu ersetzen, finden Sie zuerst den Schlitz der wasserdichten Hülle, wie in Schritt 1 gezeigt. -
Page 29: Aufladen Und Batterieinbetriebnahme
Aufladen und Batterieinbetriebnahme Die Kamera und die Batterie wird seperat verpackt geliefert. Bitte laden Sie die Batterie vor dem ersten Gebrauch ganz auf, und legen sie erst dann in die Kamera ein. Aufladen: Hier die Schritte zum Aufladen: 1.Entnehmen Sie das USB Ladegerät ihrem Zubehör (siehe Bild). 2.Sie können zum Laden einen USB Trafo oder ihren Computer verbinden . -
Page 30: Sd Karte Einsetzen Und Formatieren
② ① 2.Nach dem Einsetzen der Batterie setzten Sie bitte die Batterieabdeck- ung ein. Achten Sie bitte darauf, den vorstehenden Teil der Abdeckung links einzusetzen (siehe Abbildung). Anschließend drücken sie die rechte Seite der Batterieabdeckung in das Batteriefach. Hinweise: Achten Sie dabei bitte auf die richtige Polung und darauf, dass die Batterieabdeckung richtig eingesetzt ist. - Page 31 Hinweise: Halten Sie Ihren Daumen vor den Kartenschlitz, damit die Karte nicht herausfällt. Formatieren: Eine neue SD Karte muss vor dem ersten Gebrauch formatiert werden. Folgende Schritte sind nötig: 1.Drücken Sie kurz die “MODE” Taste um die Kamera einzuschalten; Drücken Sie die "MODE" Taste drei mal um in die Einstellungen zu gelangen;...
-
Page 32: Bedienungsanleitung
Bedienungsanleitung Die AC800 Serie hat vier Betriebsmodi: Video Modus, Foto Modus, Playback Modus und den Settings Modus (Einstellungen). Hier finden Sie alle Tastenfunktionen für jeden Modus beschrieben. Ein- / Ausschalten Drücken Sie kurz die 「Power/MODE Taste」um die Kamera einzuschalten; Ein langer Druck auf die「Power/MODE Taste」schaltet die Kamera aus. - Page 33 Außerhalb der Wiedergabe 「UP Taste」: Seite vorwärts 「Down Taste」: Seite rückwärts 「Power/MODE Taste」(kurz drücken): Cut Over Modus (Video→Photo→ Playback→Settings) Einstellungen (Settings) Modus 「UP Taste」: Seite vorwärts 「Down Taste」: Seite rückwärts 「OK Taste」: Bestätigen 「Power/MODE Taste」(kurz drücken): Cut Over Modus (Video→Photo→ Playback→Settings)
-
Page 34: Einstellungen Tabelle
Einstellungen Beispieltabelle für Kameraeinstellungen ※V=Video Modus; P=Einstellungen für den Fotomodus Einstellung Wert P Erklärung Video 4K/2K/1080P/ Legen Sie die Auflösung des ○ Auflösung 720P/480P/240P Videos fest. Aus / 3 Minuten / Loop- Die Datei wird in eingestellten 5 minuten / ○... - Page 35 Datumsanz- Zeitstempel im Video oder auf Ein/Aus ○ ○ eige Fotos ein- oder ausschalten. Aufnahmewinkel der Kamera 170°/140°/ ○ winkel einstellen. 110°/70° Die Kamera stellt auomatisch ○ ○ Tauchmodus Ein/Aus den Weissabgleich für Unte- rwasseraufnahmen ein. Die Kamera stellt sich für Nachtszene Ein/Aus ○...
- Page 36 Lösche aktuelle Löschen Dateien löschen. Datei/Lösche alle Aktuelle Datei sperren/Entsperren aktuelle Datei/ Schreibschutz für Dateien im Datei-Schutz Sperren alle Loop oder Car Modus. Dateien/Entsperren alle Dateien Mit der “UP” Taste schalten WIFI Ein/Aus sie WIFI aus oder ein. Namen des WIFI einstellen. OK Taste bestätigt (Bewegung), WIFI SSID Auf/Ab Taste Tasten um die...
- Page 37 Europa: 50Hz/ Frequenz 50 Hz/60 Hz ○ ○ Nordamerika: 60Hz Ost Japan:50Hz/ West Japan:60Hz Formatieren SD Karte SD Karte formatieren. Standardein- Kamera auf Werkseinstellungen Settings stellungen setzen. Model: Hardwarein- Anzeigen des Models und der Victure AC800 formationen Hardwareversion. Version: 1.0...
-
Page 38: Verbinden Mit Einem Drahtlosnetzwerk (Wifi)
Verbinden mit einem Drahtlosnetzwerk (WIFI) Die App downloaden Laden Sie die App ‘OKCAM’ aus dem App Store (iOS) oder von Google Play(Android) auf ihr Mobiltelefon herunter. Wifi verbinden Nachdem sie die OKCAM App heruntergeladen haben, können sie sich über ein Drahtlosnetzwerk mit ihrem Telefon verbinden. Nachdem Sie ihr Telefon mit der Kamera verbunden haben, können sie ihr Telefon zur Bedienung der Kamera verwenden, Videos und Bilder auf Ihrem Telefon ansehen, und die Aufnahmen auf Ihr Telefon herunterladen. -
Page 39: Verbinden Mit Einem Computer
Verbinden mit einem Computer Sie können die Kamera in zwei verschiedenen Modi mit dem Computer über das beiliegende Micro USB Kabel verbinden : als Speicherlaufwerk oder als PC Kamera. Mit den Up / DOWN Tasten schalten sie zwischen diesen Modi hin und her. Das Laden des Akkus funktioniert in beiden Modi, ist aber effizienter wenn die Kamera abgeschaltet ist (Langer Druck auf die MODE Taste). -
Page 40: Tv Verbindung
TV Verbindung Mit dem HDMI-Ausgang können Sie die von dieser Kamera aufgenomme- nen Filme und Bilder auf großen Bildschirmen, wie Fernsehern, Projektoren usw. wiedergeben. 1. Schalten Sie die Kamera aus. 2. Verbinden Sie Kamera mit dem Fernseher durch ein handelsübliches Micro-HDMI-Kabel (NICHT INKLUSIVE). -
Page 41: Technische Daten
Technische Daten Modell AC800 Chip NT96660 Fühler SONY IMX078 Bildschirmgrösse 2” LCD 170°/140°/110°/70° HD Fish-Eye Optik Optik Video kompressions format H.264 Video Format Foto Format Drahtlosverbindung Android / iOS unterstützt Class 10 Micro SD Karte, unterstützt SD Karte maximal 64 GB. -
Page 42: Garantie
Garantie Alle Victure Produkte haben eine eingeschränkte 12 monatige Garantie ab Kaufdatum. Unser professionelles Support Team bemüht sich, ihre Anfragen in kürzester Zeit zu bearbeiten. Falls Sie Fragen zu Produkt oder Garantie haben, kontaktieren Sie uns bitte via support@govicture.com. Wir werden uns bemühen, Ihr Problem so... - Page 43 Catalogue Avant-propos Introduction de produit Guide d'installation Boîtier étanche ouvert et ferme Remplacement de porte de rechange Installation et Chargement de la batterie Installation et Formatage de la carte SD Mode d'opération instructions Paramètres Liste Connexion Wifi Connexion à l’ordinateur Connexion TV Spécifications Garantie...
-
Page 44: Avant-Propos
Merci pour votre soutien de Victure AC800. Bienvenue dans Victure monde de la photographie. Caméra sport de la série AC800 a adopté l'objectif optique à 6 couches pour enregistrer des vidéos FHD 4K / 24fps et tirer des images de qualité... -
Page 45: Introduction De Produit
Introduction de produit Démarrage/MODE Objectif Haut/Wi-Fi Haut-parleur Bas/Audio enregistrement Indicateur de fonction (Clignote BLEU pendant le fonctionnement) MICRO USB MICRO SD HDMI Indicateur de charge Écran LCD (Clignote ROUGE en charge) Indicateur de Wifi (Clignote ORANGE lorsque le Wi-Fi est activé) OK Bouton Couvercle de la batterie... -
Page 46: Guide D'installation
Guide d'installation Boîtier étanche ouvert et ferme Boîtier étanche ouvert : ① ② ③ 1. Pour ouvrir le boîtier étanche, 2. Tirez la boucle du boîtier passez d'abord l'interrupteur étanche ; vers la droite, comme indiqué 3. Ouvrez le couvercle arrière par la flèche. -
Page 47: Remplacement De Porte De Rechange
Remarque : 1. Déchirez les films de protection sur la lentille du boîtier étanche avant l'enregistrement ; 2. L'enregistrement vocal dans le boîtier étanche sera affaibli pour obtenir de meilleurs résultats étanches. Remplacement de porte de rechange : Étape 1 Étape 2 Étape 3 1. -
Page 48: Installation Et Chargement De La Batterie
Installation et Chargement de la batterie Comme la batterie et la caméra sont emballées séparément, chargez d'abord la batterie, puis insérez-la dans la caméra avant de la démarrer. Charge de puissance : Les étapes de charge sont comme ci-dessous : 1. -
Page 49: Installation Et Formatage De La Carte Sd
② ① 2. Réinstallez le couvercle après avoir inséré la batterie. Veuillez noter que la partie étendue du couvercle doit d'abord être insérée à gauche du compartiment de la batterie, puis y enfoncez la partie droite du couvercle. Remarque : S'il vous plaît noter la direction de la batterie et le couvercle de la batterie. - Page 50 Remarque : S'il vous plaît utilisez vos ongles pour pousser la carte SD, car la fente est un peu profonde. Formatage de carte SD : Compte tenu de la compatibilité de la carte SD, elle doit être formatée avant de l'utiliser. Les étapes de formatage sont les suivantes : 1.
-
Page 51: Mode D'opération Instructions
Mode d'opération instructions La série AC800 dispose de quatre modes : Mode Vidéo, Mode Photo, Mode Lecture, Mode Paramètres. Vous trouverez ci-dessous les instructions de chaque bouton sous chaque mode. Démarrage/Arrêté Appuyez brièvement sur le bouton「Power / MODE」: Allumez la caméra ;... - Page 52 Non-lecture 「Bouton Haut」: Précédent 「Bouton Bas」: Suivant 「Bouton Alimentation / MODE」(appui court) : Mode commuté (Vidéo → Photo → Lecture → Paramètres) Mode Paramètres 「Bouton Haut」: Précédent 「Bouton Bas」: Suivant 「Bouton OK」: Confirmer 「Bouton Alimentation / MODE」 (appui court) : Mode commuté (Vidéo → Photo →...
-
Page 53: Paramètres Liste
Paramètres Liste Page explication des paramètres de la caméra ※V=Mode vidéo ; P=Mode photo Paramètres Option P Explication Résolution 4K/2K/1080P/ Pour définir la résolution de la ○ vidéo 720P/480P/240P vidéo Off / 3 Minutes / Le fichier sera enregistré par Vidéo 5 Minutes/ ○... - Page 54 Filigrane sur les vidéos ou les Filigrane Désactivé / Activé ○ ○ photos. 170°/140°/ L'angle de l'objectif de la Angle ○ 110°/70° caméra est réglable. La caméra ajustera automat- Mode de iquement la balance des blancs Désactivé / Activé ○ ○...
- Page 55 Contrecarrer l'influence du ○ Stabilisation Désactivé / Activé tremblement de main / vibration en prenant des photos. Supprimer celui-ci Supprimer Supprimer les fichiers. /Supprimer tout Vérouiller celui-ci / Pour éviter l'écrasement des Déverrouiller celui- fichiers causé par l'enregistr- Protection ci / Vérouiller tout / ement en boucle en mode Déverrouiller tout voiture.
- Page 56 Carte SD Formater la carte SD. Regl. par Restaurer les paramètres par Réglage défaut défaut de la caméra. Modèle : Informations L'affichage du modèle du pr- Victure AC800 sur le matériel oduit et la version du matériel. Version : 1.0...
-
Page 57: Connexion Wifi
Connexion Wifi Télécharger l'application Téléchargez l'application OKCAM dans l'App Store (iOS 1.0.8 ou supérieur) ou Google Play (iOS 1.0.8 ou supérieur). Connexion Wifi Avoir terminé le téléchargement , vous pouvez utiliser votre téléphone pour contrôler la caméra via l'application, afficher la vidéo ou les images sur votre téléphone et télécharger les enregistrements. -
Page 58: Connexion À L'ordinateur
Connexion à l’ordinateur Lorsque vous utilisez le câble micro-USB fourni pour le connecter à l'ordinateur, Il dispose deux options : Stockage de masse et Caméra PC. Stockage de masse : Accès aux fichiers stockés dans la carte micro SD de la caméra pour les copier ou les afficher sur un ordinateur, qui est également réalisable avec un lecteur de carte SD. -
Page 59: Connexion Tv
Connexion TV Avec la sortie HDMI, vous pouvez afficher les films et les images enregis- trés sur de grands écrans de télévision, projecteur, etc. 1. Éteignez la caméra ; 2. Connectez la caméra et le téléviseur avec un câble Micro HDMI disponible dans le commerce (NON INCLUS) ;... -
Page 60: Spécifications
Spécifications Modèle AC800 Puce NT96660 Capteur SONY IMX078 Taille de l'écran 2” LCD Lens 170° grand angle (réglable) Format de compression vidéo H.264 Format vidéo Format photo Connexion wifi Android / iOS Carte Micro SD Class 10, Carte SD maxime 64 Go. -
Page 61: Garantie
Garantie À partir de l'achat, vous jouissez d'une garantie de 12 mois pour ce produit de Victure . Si vous avez des questions ou des conseils à propos de ce produit, veuillez nous contacter par e-mail : support@govicture.com Nous vous remercions de votre confiance et votre soutien ! - Page 62 Catalogo Prefazione Introduzione al Prodotto Guida all’istallazione Apertura Custodia Impermeabile Sostituzione Cover Anti-polvere Ricarica della Batteria e Installazione Inserimento e Formattazione Scheda SD Istruzioni Modalità d’uso Tavola dei Settaggi Connessione Wifi Connessione al Computer Connessione alla TV Specifiche Tecniche Garanzia...
-
Page 63: Prefazione
Il nostro team di supporto fornirà la soluzione migliore al tuo problema non appena possibile. Notate inoltre che tutti gli articoli acquistati da Victure sono coperti da 1 anno di garanzia dalla data di acquisto. Ti ringraziamo infinitamente per aver scelto la nostra fotocamera. Ti auguriamo tutto il meglio. -
Page 64: Introduzione Al Prodotto
Introduzione al Prodotto Accensione/ Tasto MODE Lente Su/Wi-Fi Altoparlante Giù/Switch Registrazione Audio Indicatore di funzionamento (Lampeggia Blu durante il funzionamento) MICRO USB Microfono MICRO SD HDMI Schermo LCD Indicatore di carica (Lampeggia Rosso solo durante la ricarica) Indicatore WiFi (Lampeggia Arancione quando il Wifi è acceso) Tasto OK Copri Batteria... -
Page 65: Guida Allistallazione
Guida allistallazione Apertura e chiusura custodia impermeabile Apertura custodia impermeabile: ① ② ③ 1. Per aprire la custodia, prima 2. Sollevare la fibbia della spostare il tasto in alto verso custodia impermeabile; destra, come indicato dalla 3. Aprire lo sportello posteriore. freccia. -
Page 66: Sostituzione Cover Anti-Polvere
Consigli: 1. Togli la pellicola protettiva sulla lente della custodia prima di fare fotografie/registrar video; 2. La registrazione dei suoni può essere attenuata per raggiungere risultati migliori sott’acqua. Sostituzione dello Sportello Anti-polvere: Passo 1 Passo 2 Passo 3 1. Per cambiare la cover anti-polvere, per prima cosa cerca lo slot della custodia, così... -
Page 67: Ricarica Della Batteria E Installazione
Ricarica della Batteria e Installazione Visto che la batteria e la fotocamera sono confezionate separatamente, ricarica prima la batteria, poi inseriscila nella fotocamera prima di accendere la fotocamera. Ricarica della Batteria: Il processo di ricarica è il seguente: 1. Cerca il caricabatterie USB tra gli accessori della fotocamera. 2. -
Page 68: Inserimento E Formattazione Scheda Sd
② ① 2. Inserisci lo sportello dopo che hai inserito la batteria. Fai attenzione che la parte sporgente dello sportellino sia inserita nell’alloggiamento a sinistra come mostrato dalla fotografia. Premi poi la parte destra dello sportellino nello scompartimento. Consigli: Fai attenzione che il polo postivo e quello negative della batteria siano allineati con quelli dello scompartimento della batteria. - Page 69 Consigli: Usa il tuo pollice per bloccare la scheda SD al momento dell’uscita. Formattare la scheda SD: Una scheda Sd nuova deve essere formattata prima dell’uso. Per formattarla segui le istruzioni: 1. Premi il tasto “MODE” per accendere la fotocamera. Quindi premi il tasto "MODE"...
-
Page 70: Istruzioni Modalità D'uso
Istruzioni per la Modalità d’uso La serie AC800 ha 4 modalità d’uso: Video, Foto, Riproduzione, Settaggi. In basso ci sono le istruzioni per ogni tasto in ogni modalità d’uso. Accensione ON/OFF Pressione breve tasto「Accensione/MODE」quando la fotocamere è spenta: Accende la fotocamera;... - Page 71 Durante la non riprodzione 「Tasto OK 」: Pagina us 「Tasto GIÙ」: Pagina giù 「Tasto Power/MODE」(pressione breve ): Cambia modalità (Video→Foto →Riproduzione→Settaggi) Modalità Settaggi 「Tasto SU」: Pagina su 「Tasto GIÙ」: Pagina giù 「Tasto OK」: Conferma 「Tasto accensione/MODE」(Pressione breve): Cambia modalità (Video→ Foto→Riproduzione→Settaggi)
-
Page 72: Tavola Dei Settaggi
Tavola dei Settaggi Tavola dei settaggi della fotocamera ※V=Modalità Video; P=Settaggi nella modalità Foto Settaggi Valori P Spiegazione Risoluzione 4K/2K/1080P/ ○ Per settare la risoluzione video Video 720P/480P/240P Off//3 Minuti/ Registrazione Il file sarà registrato a seconda 5 Minuti/ ○ in Loop del tempo che avrai impostato 10 Minuti... - Page 73 Data impressa sulle foto o sui Timbro ora Off/On ○ ○ video 170°/140°/ L’angolazione della lente può Angolo ○ 110°/70° essere regolata La fotocamera regolerà il Modalità bilanciamento del bianco Off/On ○ ○ Subacquea automaticamente quando registri/scatti foto sottacqua La luminosità dello schermo Scena si regolerà...
- Page 74 Attenua l’effetto del tremolio ○ Stabilizzatore Off/On della mano e delle vibrazioni durante lo scatto delle foto. Cancellare questo Cancellare Cancella I files file/Cancellare tutto Bloccare questo file/ Previene la sovrascrittura Sbloccare questo file/ Protezione causata dalla registrazione Bloccare tutti i file/ continua nella modalità...
- Page 75 ※Quando si conferma OK, la Formattazione Scheda SD scheda di memoria verrà formattata in una sola volta Impostazioni Riporta la fotocamera alle Impostazioni predefinite impostazioni di fabbrica Modello: Informazioni Mostra il modello del prodotto Victure AC800 sull'hardware e la versione hardware Versione: 1.0...
-
Page 76: Connessione Wifi
Connessione Wifi Scaricare l’ App Scarica l’App ‘OKCAM’ dall’ App Store o dal Google Play. Connessione Wifi Dopo aver scarica l’App OKCAM, puoi connetterti in modalità WIfi attraverso l’Applicazione. Dopo aver connesso il tuo telefono alla fotocam- era, puoi usarlo per controllare la cam, vedere le foto o I video e scaricare le registrazioni direttamente sul tuo telefono.I passaggi per connettere il telefono alla fotocamera sono I seguenti: 1.Premi brevemente il tasto MODE per accendere la fotocamera;... -
Page 77: Connessione Al Computer
Connessione al Computer Ci sono due opzioni quando si utilizza il cavo micro-USB incluso per connettersi ad un computer: Archiviazione di massa e PC Camera. Premere il pulsante Su / Giù per alternare queste due modalità. Archiviazione di massa: Puoi accedere ai file memorizzati nella scheda micro SD della fotocamera per copiarli o visualizzarli sul computer. -
Page 78: Connessione Alla Tv
Connessione alla TV Con l'uscita HDMI puoi visualizzare i video e le immagini registrate con questa fotocamera sullo schermo della TV, con un proiettore, ecc... 1) Spegni la fotocamera 2) Connetti la fotocamera e la tv con un cavo mini HDMI (non incluso) 3) Accendi la fotocamera e avvia la modalità... -
Page 79: Specifiche Tecniche
Specifiche Tecniche Modello AC800 Chip NT96660 Sensore SONY IMX078 Dimensioni Schermo 2” LCD Lente 170° grandangolo (regolabile) Formato di Compressione Video H.264 Formato Video Formato Immagini Connessione WiFi Android / iOS supportati Classe 10 Micro SD card, Scheda SD supportati massimo 64 GB... -
Page 80: Garanzia
Garanzia Tutti i prodotti Victure sono coperti da 12 di garanzia a partire dalla data di acquisto. Il nostro team di Customer Service si prenderà cura e fornirà assistenza professionale senza ritardo alcuno. Se avete qualsiasi domanda aul nostro prodotto o sulla garanzia, contattateci liberamente al: support@govicture.com. - Page 81 Contenido Introducción Información del producto Guía de instalación Apertura de la carcasa sumergible Reemplazo de la tapa trasera Instalación de la batería y carga Instalación de la SD y su formateo Instrucciones de funcionamiento Tabla de ajustes Conexión WIFI Conexión al PC Conexión a la TV Especificaciones Garantía...
-
Page 82: Introducción
Presentación Gracias por comprar Victure AC800 y bienvenido al mundo de la fotografía de Victure. La serie AC800 posee 6 lentes para grabar videos FHD de 4K / 24fps y grabar imágenes de máxima calidad de 20MP. A nosotros nos importa tanto la calidad del producto como la satisfacción de los clientes. -
Page 83: Información Del Producto
Información del producto On/Off Modo Lente Subir/WI-FI Altavoz Abajo/Grabación de audio Indicador de grabado (Parpadeo azul durante el trabajo) Micro USB Micrófono MICRO SD HDMI Pantalla LCD Indicador de carga (Parpadeo rojo (Cargando)) Indicador WIFI (Parpadeo Naranja (ON)) Botón OK Protector de la batería... -
Page 84: Guía De Instalación
Guía de instalación Apertura y cerrado de la carcasa sumergible Apertura de la carcasa: ① ② ③ 1. Para abrir la carcasa impermeable, 2. Estire de la parte frontal hacia primero deslice la pestaña ubicada la trasera de la pieza negra. en la parte superior a la derecha, 3. -
Page 85: Reemplazo De La Tapa Trasera
Consejos: 1. Se recomienda quitar los plásticos protectores de la lente, así como de la tapa posterior para una mayor calidad me imagen. 2. Para un mayor funcionamiento, el micrófono dejará de funcionar con la carcasa. Reemplazo de la tapa de la carcasa: Paso 1 Paso 2 Paso 3... -
Page 86: Instalación De La Batería Y Carga
Carga e instalación de la batería La batería suministra energía a la cámara, pero la batería tiene poca energía cuando la recibe, así que asegúrese de que la batería esté cargada antes de ser utilizarla por primera vez. Bateria cargando: Los pasos de carga de energía son los siguientes: 1. -
Page 87: Instalación De La Sd Y Su Formateo
② ① 2. Instale la tapa de la batería después de haberla insertado. Tenga en cuenta que la parte extendida de la tapa de la batería debe insertarse a la izquierda del compartimiento de la batería primero como se muestra en la imagen siguiente. - Page 88 Consejos: Utilice sus uñas para empujar la tarjeta SD ya que la ranura es un poco profunda. Formateo de la SD: 1. Presione brevemente el botón "MODE" para iniciar la cámara;Presione el botón "MODE" tres veces para ingresar al modo de configuración; 2.
-
Page 89: Instrucciones De Funcionamiento
Instrucciones de modo de operación: La serie AC800 tiene cuatro tipos de modos: Modo de video, Modo de foto, Modo de reproducción, Modo de configuración. A continuación se encuentran las instrucciones de función de cada botón debajo de cada modo. - Page 90 Non-playback time 「Botón arriba」: Página arriba 「Botón Abajo」: Página abajo 「Botón de encendido / MODE」(Pulsación corta): Modo de corte (Video → Foto → Reproducción → Configuración) Modo de configuración 「Botón UP」: Repetición de página 「Botón Abajo」: Página abajo 「Botón OK」: Confirmar 「Botón de encendido / MODE」...
-
Page 91: Tabla De Ajustes
Tabla de ajustes Tabla de explicación de la página de configuración de la cámara ※ V = Modo de video; P = Configuración que efectiva bajo el modo de fotografía Ajuste Valor P Explicación Resolución 4K/2K/1080P/ Para establecer la resolución ○... - Page 92 Decide si hay un registro de audio en el video. Grabación de ○ Off/On ※ Use el botón de bajar para audio encender / apagar el audio durante la grabación. Sello de la Marca de fecha en los videos Off/On ○...
- Page 93 Sensibilidad Auto/100/200/400 ○ ○ Ajusta la sensibilidad a la luz. +2.0/+1.7/+1.3/ Para ajustar el valor de Ajusta la +1.0/+0.7/+0.3/ exposición sensibilidad ○ ○ 0/-0.3/-0.7/-1.0/ ※ + (Brillo) / - (Oscuridad) a la luz… -1.3/-1.7/-2.0 ajuste. Contrarrestar la influencia del Anti-temblor Off/On ○...
- Page 94 La cámara emitirá una señal Indicaciones de inicio de video / parada de Off/On ○ de voz video cuando realice sus operaciones. La visualización de los ○ ○ Off/On parámetros del menú de funciones en la pantalla. Conéctese al cargador del automóvil, la cámara comenzará...
- Page 95 SD card bien, la tarjeta de memoria se formateará brevemente. Configuración Restaure la cámara en la Configuraciones por defecto configuración predeterminada Model: La pantalla del modelo del Información Victure AC800 producto y la versión de de hardware Version: 1.0 hardware.
-
Page 96: Conexión Wifi
Conexión Por WIFI Descarga la APP: Descargue la aplicación 'OKCAM' de App Store (iOS) o Google Play (Android). Conexión Wifi Después de descargar la aplicación OKCAM, puede conectar Wifi a través de la aplicación. Después de conectar su teléfono a la cámara, puede usar su teléfono móvil para controlarlo, ver el video o las imágenes de su teléfono y descargar las grabaciones de la cámara a su teléfono. -
Page 97: Conexión Al Pc
Conexión al ordenador Hay dos opciones cuando utiliza el cable micro-USB incluido para conectar a una computadora: Almacenamiento masivo y Cámara para PC. Presione el botón Arriba / Abajo para cambiar entre estos dos modos. Almacenamiento masivo: Acceda a los archivos que se almacenan en la tarjeta micro SD de la cámara para copiarlos o verlos en una computadora. -
Page 98: Conexión A La Tv
Conexión de TV Con salida HDMI, puede visualizar las películas e imágenes grabadas por esta cámara en pantallas grandes de TV, proyector, etc. 1. Apague la cámara. 2. Conecte la cámara y el televisor con un cable Micro HDMI disponible comercialmente (NO INCLUIDO). -
Page 99: Especificaciones
Especificaciones Modelo AC800 Chip NT96660 Sensor SONY IMX078 Screen 2” LCD Pantalla 170° Wide angle lens(Adjustable) Formato de compresión de video H.264 Formato de video Formato de imagen Conexión Por WIFI Android / iOS supported Class 10 Micro SD card, Tarjeta SD maxim supports 64 GB. -
Page 100: Garantía
Garantía Todos los productos de Victure vienen con una garantía limitada de 12 meses a partir de la fecha de compra. Y contamos con un equipo de servicio al cliente profesional para su apoyo sin demora. Si tiene alguna pregunta sobre nuestro producto o la garantía, no dude en ponerse en contacto con nosotros a través de: support@govicture.com.
Need help?
Do you have a question about the AC800 and is the answer not in the manual?
Questions and answers