Table of Contents
Advertisement
Quick Links
introduction:
Safety Precautions....................................................................2
Important User Information .......................................................5
Specifications ............................................................................6
setup:
Towing the Showmobile ............................................................8
Selecting a Location..................................................................9
Disconnecting the Towing Vehicle.............................................9
Opening the End Panels.........................................................10
Leveling the Showmobile ........................................................11
Connecting Auxiliary Power ....................................................14
Opening the Roof/Canopy ......................................................15
Lowering and Leveling the Hydraulic Stage............................16
Raising the Roof/Canopy ........................................................17
Attaching Additional Stage Units .............................................18
Attaching Stairways.................................................................20
Attaching Wenger Accessories ...............................................20
Attaching Auxiliary Equipment ................................................21
Positioning the End Panels.....................................................22
©Wenger Corporation 2015
wenger corporation, 555 Park Drive, P.O. Box 448, Owatonna, Minnesota 55060-0448
Questions? Call.....USA: (800) 4WENGER (493-6437) • Worldwide: +1(507) 455-4100 • www.wengercorp.com
shutdown
in its Performance Position .....................................................23
Closing the Showmobile for Travel .........................................24
Please take a few minutes to read this
manual and to familiarize yourself with
Showmobile's operating features.
If you need additional information,
contact the Wenger Corporation using
the information below.
Printed in USA 03/15
Owner's Manual
showmobile
:
................................................................27
.........................................30
................................................33
...........................................34
...................................................36
Part #089F049-02
®
Advertisement
Table of Contents

Subscribe to Our Youtube Channel
Summary of Contents for Wenger Showmobile
-
Page 1: Table Of Contents
Attaching Auxiliary Equipment ..........21 Positioning the End Panels.............22 ©Wenger Corporation 2015 Printed in USA 03/15 Part #089F049-02 wenger corporation, 555 Park Drive, P.O. Box 448, Owatonna, Minnesota 55060-0448 Questions? Call..USA: (800) 4WENGER (493-6437) • Worldwide: +1(507) 455-4100 • www.wengercorp.com... -
Page 2: Safety Precautions
Use only authorized and trained personnel to set up If the standard auxiliary power cord cannot be used, and take down the Showmobile. Insist that those Wenger recommends that a licensed electrician who handle the unit be familiar with this manual. - Page 3 • Never raise the roof/canopy without first extending the four stabilizing jacks and leveling the Showmobile unit. • Never raise, lower, or adjust the roof/canopy or stage while people are inside the Showmobile or under the roof/canopy or stage • Never leave the stage down or the roof/canopy open when the Showmobile is unattended •...
- Page 4 • Check all lights–tail, stop, and turn signal • Check the brake electrical operation • Make sure the hitch jack and the four Showmobile jack stands are fully retracted • Make sure the Roof/canopy are in the lowered position OWING •...
-
Page 5: Important User Information
Wenger Corporation. Wenger Corporation does not assume any responsibility for any errors that may appear in this manual. In no event will Wenger Corporation be liable for technical or editorial omissions made herein, nor for direct, indirect, special, incidental, or consequential damages resulting from the use or defect of this manual. -
Page 6: Specifications
SPECIFICATIONS dimensions closed for transport: Length ............... . .33'-8" Height . - Page 7 SPECIFICATIONS CONTINUED typical stage configurations 32’ 28’ Main Stage 16’ 14’-6” Hydraulic Stage 40’ 32’ 28’ Main Stage 14’-6” 18’-6” Hydraulic Stage 20’ 40’ 32’ 28’ Main Stage 14’-6” 24’ 18’-6” Hydraulic Stage 20’ 22’-6” 40’ 2’x8’ Versalite 4’x8’ Versalite...
-
Page 8: Towing The Showmobile
Showmobile will be level front-to- rear (as measured on a level surface) when towed. Hitch Jack 3. Use the hitch jack to raise the front of the Showmobile. Back the towing vehicle under the hitch, and secure the hitch to the towing vehicle. -
Page 9: Selecting A Location
SELECTING A LOCATION important: Read all precautions on page 2 before you begin. Select a firm level area on which to place the Showmobile for use. Face the road side toward the center of the audience location. Check for any possible obstructions (trees, power or light poles, overhanging wires, etc.) which might be in the way of the roof/canopy when raised. -
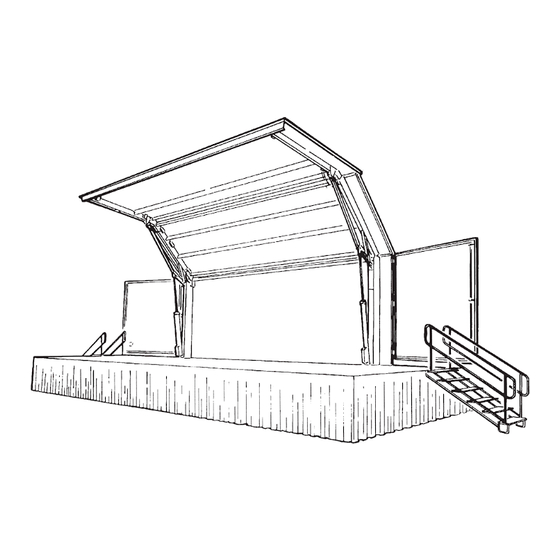
Page 10: Opening The End Panels
3. Swing the front end panel open until it is against the back wall, and latch it onto the stud on the curb side of the Showmobile. This keeps the end panel out of the way while you lower the hydraulic stage, raise the roof/canopy, End Panel Latch and install any auxiliary equipment. -
Page 11: Leveling The Showmobile
There are two lockable storage compartments on the curb side of the Showmobile, for tools, electrical cords, sill plates, etc. 2. The Showmobile includes four jacks which are used to level and stabilize the unit. Refer to the... - Page 12 4. Move one of the upper four switches to the raise corner position. When that stabilizing jack is in contact with the ground and the corner of the Showmobile starts to raise, set the switch back to its neutral (center) position. Repeat this process on the other three corners.
- Page 13 Showmobile. • If you ever need to completely disable the hydraulic system on the Showmobile, press the red lockout button on top of the remote control. To activate the remote control, turn the transmit- ter switch off and then on.
-
Page 14: Connecting Auxiliary Power
(shown) for the power connection to the Showmobile. The receptacle for this auxiliary power is located on the curb side of the Showmobile, just to the rear of the control compartment. A 50-ft cord with matching plug is provided with the standard 110-volt electrical system;... -
Page 15: Opening The Roof/Canopy
The Showmobile must be level with all jacks contacting the ground before opening the canopy. 1. manual leveling model. Remove the remote control from the control compartment, and plug it into the receptacle on the front of the Showmobile. -
Page 16: Lowering And Leveling The Hydraulic Stage
The Showmobile must be level with all jacks contacting the ground before opening the canopy. After raising the roof/canopy, lower and level the hydraulic stage: note: On a Showmobile with the hydraulic leveling option, there is... -
Page 17: Raising The Roof/Canopy
RAISING THE ROOF CANOPY note: The Showmobile must be level with all jacks contacting the ground before opening the canopy. 1. To raise the roof/canopy, set the roof/canopy switch on the remote control at raise. After the canopy is fully raised, lower the canopy to the desired performance height. -
Page 18: Attaching Additional Stage Units
Refer to the illustrations on page 18 for additional clarification. 1. Insert three gravity connectors into the extrusion on the edge of the Showmobile where the 8' side of the first stage unit will be attached. Position the connectors so that one will be centered on the 8' side of the additional unit, and the others will be about 6"... - Page 19 ATTACHING ADDITIONAL STAGE UNITS CONTINUED For wider stage wings MAIN STAGE HYDRAULIC STAGE For a stage extension MAIN STAGE HYDRAULIC STAGE Sample connections of optional stage units shown. Additional units can be added to the sides or front (or both). Gravity Connector Star Connector Butterfly Clip...
-
Page 20: Attaching Stairways
(tighten to secure stairway) ATTACHING WENGER ACCESSORIES A full line of Versalite railings, drapery closures, audience seating platforms, and other stair units are available. Attach drapery closures using the Velcro provided. -
Page 21: Attaching Auxiliary Equipment
For faster takedown and setup, leave the cans attached to the light bars when transporting the Showmobile. Be certain that they clear the stage when the unit is retracted. note: 500-watt fixtures are recommended. Do not overheat the roof or canopy panels. -
Page 22: Positioning The End Panels
3. Position the end panel where desired. It can be set at three different positions (45°, 68°, and 90° to the end of the Showmobile) by placing the center stay pin in the appropriate hole. Do not close the end panels while the roof/canopy is raised from the travel position. -
Page 23: Closing The Roof/Canopy With The Stage In Its Performance Position
2. Raise the end flaps. 3. Close the front and rear end panels to the travel position and lock them. If the Showmobile is left outside overnight, for long periods of time, or during inclement weather, cover exposed stage extensions. -
Page 24: Closing The Showmobile For Travel
Showmobile. secure the eQuipment inside the unit Secure all equipment inside the Showmobile so that it will not shift during transport. Shifting could cause damage and create a dangerous distribution of cargo weight. Tie-downs are located along the stage floor inside the Showmobile. - Page 25 3. Turn the key to off and unplug the remote control module from the front end of the Showmobile. Store it in a safe place (such as the control compartment).
- Page 26 1. Check all lights to be sure each switch and light is functioning properly: clearance and marker lights; tail lights; directional lights; license plate light; and brake lights. 2. Move the Showmobile at no more than 5 mph while you check the brakes by manually applying the trailer brakes.
-
Page 27: Maintenance
All moving parts of the Showmobile should be lubricated about twice a year. In seasonal climates, these occasions will normally be in the spring when the Showmobile is first put into use, and again when it is stored for the winter. - Page 28 10 miles after changing a tire and periodically thereafter.) note: The four corner jacks can also be used to raise the Showmobile so the tires can be changed. Block under the 4x12” frame tubing within 12” of the ends before removing the wheel.
- Page 29 Periodically clean the channels along the edge of the stage units, so that connectors will slide in easily. paint The paint used on the Showmobile is the same as used on other mobile equipment. It may be washed with clear water or, if necessary, with mild soap. Waxing once a year is recommended.
-
Page 30: Electrical Schematic
ELECTRICAL SCHEMATIC 110 volt (standard) - Page 31 ELECTRICAL SCHEMATIC CONTINUED 110/220 volt (220-volt upgrade)
- Page 32 ELECTRICAL SCHEMATIC CONTINUED location oF electrical outlet boXes 110V Units (Standard) 110/220V Units (220V Upgrade) 2 = Duplex Receptacle 4 = Quadplex Receptacle Both models also have a duplex receptacle inside the front road side corner. circuit breaKers in electrical load center 110V Units (Standard) 110/220V Units (220V Upgrade) RECPT NOS.
-
Page 33: 12V Wiring Diagram
ELECTRICAL SCHEMATIC CONTINUED 12-volt wiring diagram... -
Page 34: Hydraulic Schematic
HYDRAULIC SCHEMATIC manual leveling model... - Page 35 HYDRAULIC SCHEMATIC CONTINUED hydraulic leveling model...
-
Page 36: Troubleshooting
TROUBLESHOOTING Wireless Remote Control (Transmitter & Receiver)
Need help?
Do you have a question about the Showmobile and is the answer not in the manual?
Questions and answers