
Summary of Contents for VivoLink VLHDMICTL1-MME
- Page 1 User Manual VLHDMICTL1-MME 18G In-line HDMI Controller with Auto Display Control All Rights Reserved Version: VLHDMICTL1-MME_2019V1.1...
- Page 2 18G In-line HDMI Controller with Auto Display Control Preface Read this user manual carefully before using the product. Pictures shown in this manual are for reference only. Different models and specifications are subject to real product. This manual is only for operation instruction, please contact the local distributor for maintenance assistance.
- Page 3 18G In-line HDMI Controller with Auto Display Control SAFETY PRECAUTIONS To ensure the best performance from the product, please read all instructions carefully before using the device. Save this manual for further reference. Unpack the equipment carefully and save the original box and packing material for ...
-
Page 4: Table Of Contents
18G In-line HDMI Controller with Auto Display Control Table of Contents 1. Product Introduction ....................1 1.1 Features ......................1 1.2 Package List ...................... 1 2. Technical Specification ....................2 3. Panel Description ......................3 3.1 Front Panel ......................3 3.2 Rear Panel ...................... -
Page 5: Product Introduction
18G In-line HDMI Controller with Auto Display Control 1. Product Introduction Thanks for choosing the VLHDMICTL1-MME 18G In-line HDMI Controller, which is designed for automatic system control and HDMI signal extension in small meeting rooms and huddle spaces. The controller supports three system trigger methods, IR signal, video signal (5V or TMDS). -
Page 6: Technical Specification
18G In-line HDMI Controller with Auto Display Control 2. Technical Specification Video Input Input (1) HDMI IN Input Connector (1) Female type-A HDMI Input Video Resolution Up to 4Kx2K@60Hz 4:4:4 8bit Video Output Output (1) HDMI OUT/CEC Output Connector (1) Female type-A HDMI Output Video Resolution Up to 4Kx2K@60Hz 4:4:4 8bit Control... -
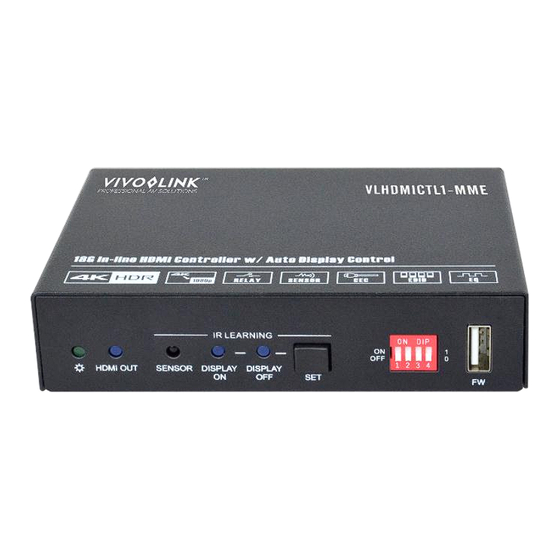
Page 7: Panel Description
18G In-line HDMI Controller with Auto Display Control 3. Panel Description 3.1 Front Panel IR LEARNING 1 2 3 4 HDMI OUT SENSOR DISPLAY DISPLAY ① POWER LED: The LED illuminates green when power is applied. ② HDMI OUT LED: The LED illuminates blue when there is HDMI signal output. ③... -
Page 8: Rear Panel
18G In-line HDMI Controller with Auto Display Control 3.2 Rear Panel NO C NC DC 5V HDMI IN HDMI OUT / CEC 12V Sig NO C NC ① HDMI IN: Type-A female HDMI input port to connect HDMI source device. ②... -
Page 9: System Connection
18G In-line HDMI Controller with Auto Display Control 4. System Connection 4.1 Usage Precaution Make sure all components and accessories are included before installation. System should be installed in a clean environment with proper temperature and humidity. All of the power switches, plugs, sockets, and power cords should be insulated and ... -
Page 10: Dip Switch Operation
18G In-line HDMI Controller with Auto Display Control 5. DIP Switch Operation 5.1 EDID Management The Extended Display Identification Data (EDID) is used by the source device to match its video resolution with the connected display. By default, the source device obtains its EDID from the first connected display. - Page 11 18G In-line HDMI Controller with Auto Display Control Note: 2CH: Supports LPCM 2CH. Multi-CH: Supports LPCM 8CH, Dolby TrueHD, DTS-HD , Dolby Digital5.1, DTS 5.1, Dolby Digital Plus. User-defined EDID Setting Except directly invoking the built-in EDID, the specific EDID can be customized by following the below operation process.
-
Page 12: Hdcp Mode
18G In-line HDMI Controller with Auto Display Control 5.2 HDCP Mode Put switch 4 on “ON” position to select HDCP Active mode, or to “OFF” for HDCP Passive mode. Switch Status Mode HDCP Passive OFF (0) Automatically follows the HDCP version of source device. (Default) ... -
Page 13: System Control Setting
18G In-line HDMI Controller with Auto Display Control 6. System Control Setting SYSTEM ON When the controller detects video signal (TMDS, 5V) or IR signal, the system will start and automatically perform the below actions at the same time. ... -
Page 14: Rs232 Command Setting
18G In-line HDMI Controller with Auto Display Control 6.1 RS232 Command Setting The trigger methods of SYSTEM ON or SYSTEM OFF, and CEC, RS232, IR, Relay control actions can be set by RS232 commands. 6.1.1 RS232 Control Software Installation: Copy the control software file to the PC which is connected to the controller. -
Page 15: Trigger Method Setting
18G In-line HDMI Controller with Auto Display Control Please set the parameters of COM number, bound rate, data bit, stop bit and the parity bit correctly, then the RS232 commands can be sent in Command Sending Area. Baud rate: 9600; Data bit: 8;... -
Page 16: Cec Control Setting
18G In-line HDMI Controller with Auto Display Control the system will off after the setting time. 300S! Set the HDMI video signal trigger 5VORTMDS0. condition. Description 5VORTMDS[X]. Detects 5V signal. DETECT INPUT SOURCE USE Detects TMDS signal. Report the trigger method of SYSTEM DETECT VIDEO TRIGGER IN GSYSONMETH. - Page 17 18G In-line HDMI Controller with Auto Display Control 4800 9600 19200 Send the ASCII command 38400 “123abc” to the third-party whose 57600 baud rate is 9600. 115200 RS232ON/-3:30 31 32 When detects triggering signal, automatically send HEX command XXX Send the HEX command “30 31 RS232ON/-[X]:XXX to the third-party device (e.g.
-
Page 18: Ir Control Setting
18G In-line HDMI Controller with Auto Display Control RS232 OFF to XX (default 2s, range of SET RS232 OFF SEND DELAY 1S to 10s). TIME 2S! Report the sending interval time between DELAY TIME BETWEEN RS232 GRS232DLY. RS232 ON and RS232 USER. ON AND RS232 USER 3S! Report the sending number of RS232 GRS232PCS. -
Page 19: Relay Control Setting
18G In-line HDMI Controller with Auto Display Control Report the two times sending interval GIROFFINT. IR OFF SEND DELAY TIME 2S! time of IR OFF. 6.1.6 Relay Control Setting Command Function Feedback Example RELAY1COT:010. Set the Relay 1 delay time to XXX RELAY1COT:[XXX]. -
Page 20: System Command
18G In-line HDMI Controller with Auto Display Control 6.1.7 System Command Command Function Feedback Example RST. Factory reset. Factory Default! Enable 4K to1080P down-scaling OPEN DOWN SCALER SCALERON. function. FUNCTION! Disable 4K to1080P down-scaling SCALEROFF. Close Down Scaler Function! function. DOWN SCALER FUNCTION IS GDOWNSCALER. -
Page 21: Panel Drawing
18G In-line HDMI Controller with Auto Display Control 7. Panel Drawing 120.0mm NO C NC DC 5V HDMI IN HDMI OUT / CEC 12V Sig NO C NC IR LEARNING 1 2 3 4 HDMI OUT SENSOR DISPLAY DISPLAY... -
Page 22: Troubleshooting & Maintenance
18G In-line HDMI Controller with Auto Display Control 8. Troubleshooting & Maintenance Problems Potential Causes Solutions Colour losing or no video signal output in HDMI display. The connecting cables may not Check whether the cables are be connected correctly or it may connected correctly and in No signal output in this switcher be broken. -
Page 23: Customer Service
18G In-line HDMI Controller with Auto Display Control 9. Customer Service The return of a product to our Customer Service implies the full agreement of the terms and conditions hereinafter. There terms and conditions may be changed without prior notice. 1) Warranty The limited warranty period of the product is fixed three years.
Need help?
Do you have a question about the VLHDMICTL1-MME and is the answer not in the manual?
Questions and answers