Table of Contents
Advertisement
Quick Links
Hampton Outdoor Vinyl
Shower Kit (3' x 3' Enclosure)
A
A S S E M B L Y G U I D E
B
A C C E S S O R I E S R E Q U I R E D F O R I N S T A L L A T I O N
• (A) Zippity Post Extension for In-Ground Installation
(Sold as 4-Packs)
• (B) Zippity Galvanized Steel Surface Mount for Concrete or Wood Surface
(Sold as 2-Packs)
Zippity
www.zippity-outdoor.com
DO-IT-YOURSELF
FRIENDLY PRODUCTS
Ver 3.1/081112
Advertisement
Table of Contents

Summary of Contents for Zippity Hampton Outdoor Vinyl Shower Kit
- Page 1 A C C E S S O R I E S R E Q U I R E D F O R I N S T A L L A T I O N • (A) Zippity Post Extension for In-Ground Installation (Sold as 4-Packs) • (B) Zippity Galvanized Steel Surface Mount for Concrete or Wood Surface (Sold as 2-Packs) Zippity www.zippity-outdoor.com...
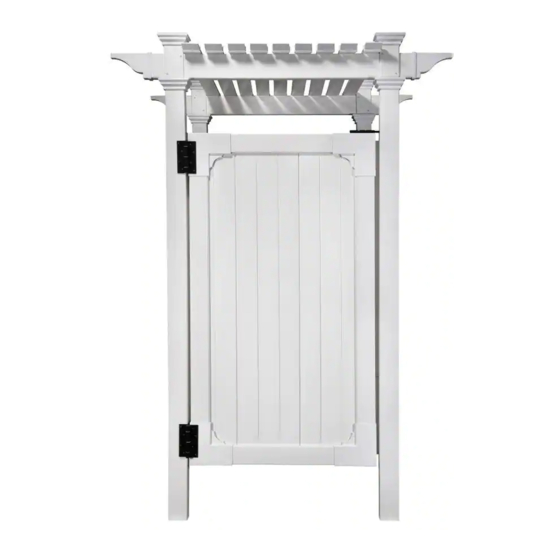
- Page 2 61 5/8 in 46 5/8 in 1/2 in 1/2 in 88 3/4 in 80 in 60 in 70 in 10 in 35 1/8 in 35 1/8 in 41 7/8 in 39 1/8 in Side View Front View Hampton Outdoor Vinyl Shower Kit...
- Page 3 Zippity You should also check to verify local building codes, ordinances, neighbour- hood covenants, or height restrictions regarding this type of structure. DO-IT-YOURSELF FRIENDLY PRODUCTS Hampton Outdoor Vinyl Shower Kit...
-
Page 4: Table Of Contents
16. Gate Corner Brackets (4) 7. Decorative End Caps (4) 17. Gate Horizontal Rails (2) 8. Post Trim Caps (4) 18. Gate Vertical Rails (2) 9. Shade Slats (9) 19. Gate Brace (1) 10. Rail Brackets (12) Hampton Outdoor Vinyl Shower Kit... -
Page 5: Table Of Contents
16. Gate Corner Brackets (4) 17. Gate Horizontal Rails (2)1 1/2” x 3 1/2” x 33 5/8” 18. Gate Vertical Rails (2)1 1/2” x 3 1/2” x 53” Not to Scale 19. Gate Brace (1) Hampton Outdoor Vinyl Shower Kit... -
Page 6: Post
K. Latch (with hardware) (1) Extra Materials You will Need (Not Included - Sold separately from www.zippity-outdoor.com or retailer of our products) If Mounting Shower on Wood Deck or Concrete Surface L. Zippity Galvanized Steel Surface Mount (Sold as 2 Packs) (purchase from www.zippity-outdoor.com or a retailer of our products) - Page 7 Mounting on Wood Deck or Concrete Surface? This shower can be installed on a pre-existing wood or concrete surface using our Zippity Galvanized Steel Surface Mount (sold separately as 2 Packs). Mounting into the Ground with Concrete Footing? This shower can also be installed into the ground using our...
- Page 8 2 8 i n Post Extension will be secured to the post in the next step. Note: The remainder of this instruction will be illustrated using the Surface Mount. Installation with Post Extension will be very similar. Hampton Outdoor Vinyl Shower Kit...
- Page 9 3 screws. Repeat steps 1 and 2 for the three other posts. Install two additional brackets and u-channels (for future installation of back wall) on posts B and D as illustrated. Zippity DO-IT-YOURSELF FRIENDLY PRODUCTS Hampton Outdoor Vinyl Shower Kit...
- Page 10 Secure the bottom rail into brackets with 2 screws in each bracket as illustrated. Tip: Please angle the screw either slightly down or up to avoid conflict with internal rail rib. Post B Post A Screw Head End View Hampton Outdoor Vinyl Shower Kit...
- Page 11 Secure the top rail to the top brackets with 2 screws in each as illustrated. Repeat steps to assemble the other wall panel. Tip: If necessary, Use liquid soap to allow tighter fitting materials to slip together easier. Hampton Outdoor Vinyl Shower Kit...
-
Page 12: Rail
Insert End privacy board in a similar fashion as the first privacy board. Slide the middle privacy board in vertically from the top down into place as illustrated. Zippity DO-IT-YOURSELF FRIENDLY PRODUCTS Hampton Outdoor Vinyl Shower Kit... - Page 13 S T E P F O U R Install the top rail over the boards as illustrated. Secure both top and bottom rails to all brackets. Zippity DO-IT-YOURSELF FRIENDLY PRODUCTS Hampton Outdoor Vinyl Shower Kit...
- Page 14 Slide one of the beams thru the routed holes in the front two posts. Orientate as illustrated. Slide the second beam thru the routed holes in the back posts. Orientate as illustrated. Note: Holes on the top of beam to be facing up. Zippity DO-IT-YOURSELF FRIENDLY PRODUCTS Hampton Outdoor Vinyl Shower Kit...
- Page 15 Pressure fit the post caps onto the post as shown. Apply a small amount of vinyl glue to the inside of the end caps and attach to the end of the beams as shown. Zippity DO-IT-YOURSELF FRIENDLY PRODUCTS Hampton Outdoor Vinyl Shower Kit...
- Page 16 Rear Wall 35 1/8 in STEP EIGHT 89.1 cm Square and Secure Post using Surface Mounts Visually square the unit into the space where you intend to 48 3/8 in 33 1/8 in permanently install 122.7 cm 84.0 cm Measure and mark out the locaton of the posts. Diagonal distances must be the same to ensure square installation.
-
Page 17: Wall Horizontal
Place one of the privacy strips against the inside post of the gate opening as shown. Center the height between the side wall horizontals. Zippity DO-IT-YOURSELF Fasten the privacy strip in place using 6 screws thru the FRIENDLY PRODUCTS pre-drilled holes. Repeat for the opposite side. Hampton Outdoor Vinyl Shower Kit... - Page 18 I n s e r t F u l l y u n t i l r a i l b o illustrated t t o m s o u t 1 s t 2 n d Hampton Outdoor Vinyl Shower Kit...
- Page 19 Insert middle vertical panel between the two panels as illustrated. Install top rail and brackets down over boards and vertical rails as illustrated Secure brackets to verticals and horizontals with screws as illustrated Zippity DO-IT-YOURSELF FRIENDLY PRODUCTS Leave screws off for future installation of gate hinge.
- Page 20 Align holes and secure with fasteners Ensure the gate is square as illustrated. Tip: Measure corner to corner of gate and ensure measurements are the same. Screw bracing into place on the gate as illustrated. Equal Measurements Align Holes Hampton Outdoor Vinyl Shower Kit...
- Page 21 Gate Assembly (Continued) Secure hinges to gate as illustrated Secure latch to top of gate as illustrated Use temporary spacers or blocks as illustrated to support gate during installation of hinges to post Zippity DO-IT-YOURSELF Hampton Outdoor Vinyl Shower Kit FRIENDLY PRODUCTS...
- Page 22 S T E P E L E V E N Attach Gate to the Unit Secure hinges to post as illustrated Hampton Outdoor Vinyl Shower Kit...
- Page 23 STEP TWELVE Drill Latch Hole Zippity DO-IT-YOURSELF FRIENDLY PRODUCTS Slide out the latch bolt, and identify the location to drill a single 5/16” receiving hole as illustrated. Mark Hampton Outdoor Vinyl Shower Kit...
- Page 24 Secure the shade slats to the beam as illustrated. Secure the remaining shade slats in the same way. Align Screw with Hole Congratulations! You did it! Zippity DO-IT-YOURSELF FRIENDLY PRODUCTS 10616 Bailey Road, Unit H, Cornelius NC 28031 www.zippity-outdoor.com Toll Free Phone: 1 877 234 6196 Fax: 704 631 4685...
Need help?
Do you have a question about the Hampton Outdoor Vinyl Shower Kit and is the answer not in the manual?
Questions and answers