Motorola GP338 User Manual
Hide thumbs
Also See for GP338:
- User manual (40 pages) ,
- Instruction booklet (4 pages) ,
- Detailed service manual (272 pages)
Table of Contents
Advertisement
Advertisement
Table of Contents

Related Manuals for Motorola GP338


Summary of Contents for Motorola GP338
- Page 1 GP338 Portable Radio User Guide 6804110J55 www.segalnovin.com...
- Page 2 Furthermore, the purchase of Motorola products shall not be deemed to grant either directly or by implication, estoppel, or otherwise, any license under the copyrights, patents, or patent applications of Motorola, except for the normal non-exclusive, royalty free license to use that arises by operation of law in the sale of a product.
- Page 3 Menu Navigation GP338 Quick Reference Card (refer to the Menu Navigation Chart on the reverse side of this page) ) to enter Menu Mode. + or ? to scroll through the list. ) to select Menu items. Continue to use + or ? to scroll through sub-list, and ) to select sub-menu items, if necessary.
- Page 4 Menu Navigation Chart Menu Radio System Rptr/ Program Audio/ Phone Zone Utilities Call Scan Talkarnd Lists Tones Select Repeater Zone On/Off Mode/ Selective Radio Alert Vol RadioCall Talkarnd Scan List Squelch Call List Check Mode Normal/ Tight Tone Dis- Power Select ID Phone List Call Alert...
-
Page 5: Table Of Contents
www.segalnovin.com Contents Attaching the Belt Clip ....14 CONTENTS Removing the Belt Clip ....14 Turning the Radio On or Off . - Page 6 www.segalnovin.com Contents Using the Menu ..... 24 Utilities ......37 Using the Scan key.
-
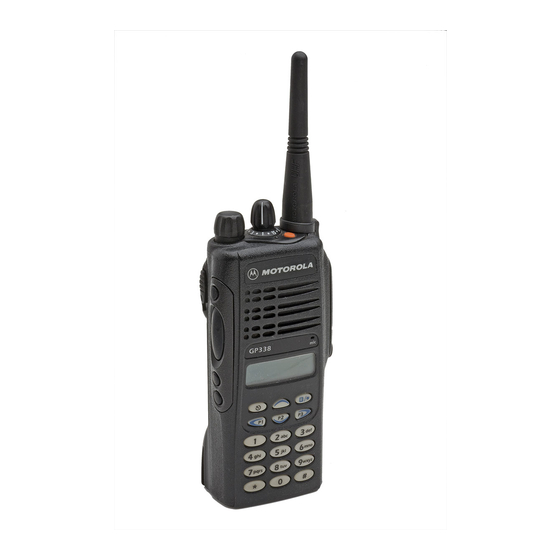
Page 7: Radio Overview
www.segalnovin.com Radio Overview RADIO OVERVIEW PARTS OF THE RADIO Channel Selector Knob On/Off/Volume Knob Top Button (programmable) Side Button 1 (programmable) LED Indicator Dust Cover covering the Microphone Push-to-Talk Accessories (PTT) Button Port LCD Screen Side Button 2 Menu Keys (programmable) Keypad Side Button 3... -
Page 8: On/Off/Volume Knob
www.segalnovin.com Radio Overview On/Off/Volume Knob ¥ Top button, ¥ three side buttons, and Used to turn the radio on or off, and to adjust the ¥ three front buttons (when the radio is NOT in radioÕs volume. Menu Mode) Channel Selector Knob <... - Page 9 www.segalnovin.com Radio Overview Button Short Press Long Press Press and Hold To cancel your radioÕs Emergency Emergency To initiate an Emergency Alarm. Ñ status. Monitor/Per- To continually monitor the selected To monitor the selected manent Moni- Ñ channel. channel for any activity. To sound a tone for Volume Set Ñ...
- Page 10 www.segalnovin.com Radio Overview Button Short Press Long Press Press and Hold To toggle the activation/deactiva- To toggle the activation/deactiva- tion of your radioÕs option board (if tion of your radioÕs option board (if Option Board Ñ one is installed). one is installed). Phone Ñ...
-
Page 11: Keypad Keys (For Keypad Radios Only)
www.segalnovin.com Radio Overview Up Key Keypad Keys (for keypad radios only) Used for scrolling when in Menu Mode. Down Key Used for scrolling when in Menu Mode. This key can also be programmed as a programmable key. Right Key These keys are used when dialing a phone Moves the cursor right or inserts a space when number, making a radio call, and when entering editing. - Page 12 www.segalnovin.com Radio Overview Number of Times Key is Pressed < > & Blank Õ Ó Space English...
-
Page 13: Lcd Screen
www.segalnovin.com Radio Overview LCD SCREEN Symbol Name and Description Used to display channel, menu as well as other Phone Indicator iconic information. Indicates that you are performing a Phone operation. Scan Indicator Indicates that you have activated the Scan feature. Also during Scan, indicates that there is some activity on a non-priority channel. - Page 14 www.segalnovin.com Radio Overview Symbol Name and Description Symbol Name and Description Call Received Indicator Signal Strength Indicator Indicates that you are receiving a Shows the signal strength. Five Selective Call/Call Alert. bars indicates the strongest signal. Monitor Indicator Option Board Indicator Indicates that you are monitoring the selected channel.
-
Page 15: Indicator Tones
www.segalnovin.com Radio Overview INDICATOR TONES High pitched tone Low pitched tone Positive Negative Programmable Indicator Indicator Buttons Tone Tone Self Test Pass Tone Start Scan Stop Scan Scan operation operation Radio trans- Radio trans- Self Test Fail Tone Tx Power mits at low mits at high power... -
Page 16: Improved Audio Features
www.segalnovin.com Radio Overview IMPROVED AUDIO FEATURES Low Level Expansion (LLE) The LLE feature of your radio improves voice quality by reducing unwanted background noise when receiving a message. It is compatible with most major types of audio processing systems available today. Companding Companding is a feature that allows further improvement of voice quality. -
Page 17: Getting Started
NOT appear, this indicates that the * Remove the battery from charger and use a pencil eraser to battery may not be a genuine Motorola product. clean the four metal contacts on the bottom of the battery. Place the battery back into the charger. If the LED indicator continues to ßash red, replace the battery. -
Page 18: Accessory Information
www.segalnovin.com Getting Started ACCESSORY INFORMATION Attaching the Battery Removing the Battery battery latches slots 1. Fit the extensions at the bottom of the battery 1. Turn off the radio, if it is turned on. into the slots at the bottom of the radioÕs body. 2. -
Page 19: Attaching The Antenna
www.segalnovin.com Getting Started Attaching the Antenna Removing the Antenna removing attaching 1. Align the threaded end of the antenna with the Turn the antenna counter-clockwise until you radioÕs antenna connector. can remove it. 2. Turn the antenna clockwise to fasten it. English... -
Page 20: Attaching The Belt Clip
www.segalnovin.com Getting Started Attaching the Belt Clip Removing the Belt Clip belt clip tab 1. Align the grooves of the belt clip with those of 1. Use a key to press the belt clip tab away from the battery. the battery. 2. -
Page 21: Turning The Radio On Or Off
www.segalnovin.com Getting Started TURNING THE RADIO ON OR OFF ADJUSTING THE RADIOÕS VOLUME 1. Press and hold the Volume Set key; you will hear a continuous tone. 2. Turn the On-Off/Volume Control knob and adjust the volume level. 3. Release the Volume Set key. SELECTING A RADIO CHANNEL Your radio offers 128 channels (8 zones of 16 channels each) for easy access to required... -
Page 22: Receiving A Call
www.segalnovin.com Getting Started RECEIVING A CALL 1. Turn your radio on. 2. Adjust its volume level. 3. Switch to the desired channel. 4. If at any time a call comes through, you will hear the call at the volume level you have set. English... -
Page 23: Radio Calls
www.segalnovin.com Radio Calls RADIO CALLS Press PTT button and talk with your mouth 2.5-5 cm (1-2 inches) from microphone. Release PTT to listen. SELECTIVE CALL When Þnished with the call: Making a Selective Call to return to: S S S S e e e e l l l l e e e e c c c c t t t t i i i i v v v v e e e e C C C C a a a a l l l l l l l l You can make a selective call, provided the Hold ( to exit Menu Mode. -
Page 24: Radio Check
www.segalnovin.com Radio Calls NOTE: ¥ Your radio will only display the last Call to return to: C C C C a a a a l l l l l l l l A A A A l l l l e e e e r r r r t t t t Alert received. -
Page 25: Emergency Alarms
www.segalnovin.com Radio Calls radio or center (predeÞned by your dealer) in + or ? to select from Radio Call List. emergency situations. When activated, the radio or (keypad radios only) goes into an Emergency state, which can be Enter ID number of radio you are calling. programmed to Press PTT button to make radio call. -
Page 26: Radio Call List
www.segalnovin.com Radio Calls RADIO CALL LIST to save your changes. 12. When Þnished with your edits: The K icon will light up on the LCD screen when you edit the radio call list. to return to: P P P P r r r r o o o o g g g g r r r r a a a a m m m m L L L L i i i i s s s s t t t t s s s s NOTE: The radio will not receive any calls when you are editing the radio call list. -
Page 27: Talkaround
www.segalnovin.com Radio Calls TALKAROUND SQUELCH If a particular channel receives many unwanted In your communications network, you may be calls coming from radios that do not belong to using a repeater to cover a larger area than what your communications group and are some is possible with your radio. -
Page 28: Power Level
www.segalnovin.com Radio Calls POWER LEVEL to enter Menu Mode. You can transmit your calls at different transmit power levels. A higher level means you can until: U U U U t t t t i i i i l l l l i i i i t t t t i i i i e e e e s s s s reach a radio that is farther away. -
Page 29: Name Tone Tagging
www.segalnovin.com Radio Calls Name Tone Tagging Call Tone Tagging To tag a name: To tag a call: to enter Menu Mode. to enter Menu Mode. until: until: A A A A u u u u d d d d i i i i o o o o / / / / T T T T o o o o n n n n e e e e s s s s A A A A u u u u d d d d i i i i o o o o / / / / T T T T o o o o n n n n e e e e s s s s to select: to select:... -
Page 30: Scan
www.segalnovin.com Scan NOTE: If you enter Menu Mode when the radio is SCAN scanning, the radio will stop scanning and resume when you exit Menu Mode. You can monitor several channels in order to receive any call that is transmitted on any of Using the Menu these channels. -
Page 31: Talkback
www.segalnovin.com Scan TALKBACK ADDING A DELETED NUISANCE CHANNEL BACK TO THE SCAN If the programmable Talkback option is set, you LIST can respond to any calls received during the scan operation by pressing the PTT before the programmed hang-time ends. Check with your dealer for details. -
Page 32: Editing The Scan List
www.segalnovin.com Scan EDITING THE SCAN LIST to select: S S S S c c c c a a a a n n n n L L L L i i i i s s s s t t t t You can choose the channels (up to a maximum of 16) that you wish to scan and list them in a until:... -
Page 33: Prioritization Of A Scan List Member
www.segalnovin.com Scan PRIORITIZATION OF A SCAN LIST If you prioritize Channel 2 as Priority #1, the scan operation would change to MEMBER You may want your radio to check particular channels more frequently for calls. You can do this by prioritizing those channels. Your radio allows you to prioritize two channels. -
Page 34: Setting The Priority Of A Scan List Member
www.segalnovin.com Scan NOTE: Even though your radio has switched to a until you see the channel you non-priority channel, your radio will still check for want to prioritize. activity on the priority channels. If some activity to prioritize that channel. is detected there, the radio will switch to that pri- ority channel. -
Page 35: Phone
www.segalnovin.com Phone Entering the Phone Mode PHONE Before you can make a phone call, you must You can use your radio to connect to a phone enter the radioÕs Phone mode. line to make a phone call. 1. Press the Phone button. To do this, your radio must send an access code To enter the Phone mode via the menu: to a station that connects it to a phone line. -
Page 36: Sending The Phone Number
www.segalnovin.com Phone Sending a Stored Phone Number You can access the stored phone numbers by Method Steps to Take ¥ recalling the last number dialed, Manual Dial the access code from the keypad. ¥ using the phone list, or Press and release the PTT; the radio Automatic automatically sends the prepro- ¥... -
Page 37: The Phone Conversation
www.segalnovin.com Phone Method Steps to Take Method Steps to Take Enter the phone number by using the 1. Press and release the pro- Live Dial keypad; the radio sends out the numbers grammed Speed Dial button. as the keys are pressed. 2. -
Page 38: Ending The Phone Call
www.segalnovin.com Phone PHONE LIST Ending the Phone Call Just as the radio needs to send the access code Your radio can store a list of frequently accessed when starting a phone call, the radio needs to phone numbers. The K icon will light up on the send the deaccess code to end the phone call. -
Page 39: Deleting An Entry
www.segalnovin.com Phone Use the keypad to enter the name. See Key- until: P P P P h h h h o o o o n n n n e e e e L L L L i i i i s s s s t t t t pad Keys (for keypad radios only) on page 5. - Page 40 www.segalnovin.com Phone to select: P P P P h h h h o o o o n n n n e e e e L L L L i i i i s s s s t t t t until: E E E E d d d d i i i i t t t t E E E E n n n n t t t t r r r r y y y y ? ? ? ? to select:...
-
Page 41: Audio/Tone Settings
www.segalnovin.com Audio/Tone Settings AUDIO/TONE SETTINGS to select the tones setting. You will see the current status of the setting. The Audio/Tones menu allows you to customize to see the available optional the audio and tone settings on your radio. settings. (For Name Tone Tagging and Call Tone Tagging, details on selecting and GENERAL INSTRUCTIONS assigning tones are given in Name Tone Tag-... - Page 42 www.segalnovin.com Audio/Tone Settings Menu Items Optional Settings Function Tone list: Alert 1 Alert 2 Alert 3 Allows you to assign a speciÞc tone to ring when receiving a call Alert 4 from a speciÞc user. Choice of eight tones are available from the Name Tone Tag Alert 5 tone list (for details see Name Tone Tagging on page 23).
-
Page 43: Utilities
www.segalnovin.com Utilities UTILITIES until you see the setting that you wish to change. The Utilities menu allows you to customize some to select the setting to change. You will general settings on your radio. see the current status of the setting. to see the available optional GENERAL INSTRUCTIONS settings. -
Page 44: Setting The Time
www.segalnovin.com Utilities Menu Items Optional Settings Function Lights On Allows you to turn the back-light feature of the radio on or off. Light Disable Lights Off Software Displays the radioÕs software version number. Ñ Version # SETTING THE TIME 3:05 PM to enter Menu Mode.
Need help?
Do you have a question about the GP338 and is the answer not in the manual?
Questions and answers