
Summary of Contents for PowerTrainer PT-333
- Page 1 TREADMILL PT-333 OWNER’S MANUAL Powertrainer 20155 Ellipse Foothill Ranch, CA 92610 Tel: (886) 325-2339 Revision Date: 10/20/2004...
-
Page 2: Table Of Contents
Content Overview Page PRODUCT OVERVIEW ............2 IMPORTANT SAFETY INSTRUCTIONS......3-4 PRE-ASSEMBLY CHECK LIST..........5 ASSEMBLY INSTRUCTIONS ..........6-9 OPERATION OF POWERTRAINER PT-333 ......10-13 PROGRAM PROFILE ............14-15 EXPLODED VIEW PT-333 ..........16 PART LIST PT-333 ...............17 SAFETY PRECAUTIONS & MAINTENANCE ....18 TROUBLESHOOTING ............20-21 WARRANTY ................22... -
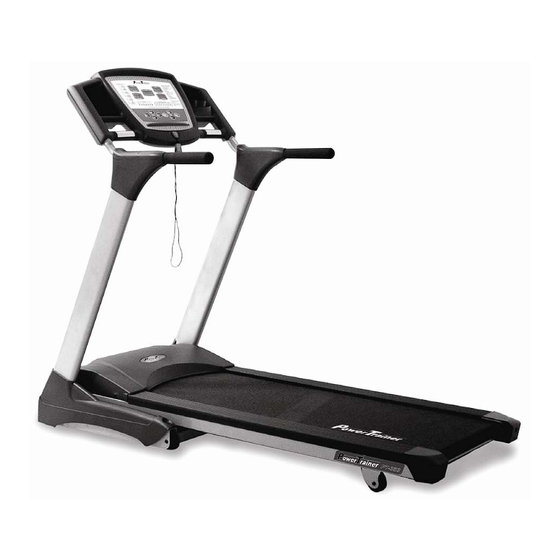
Page 3: Product Overview
PRODUCT OVERVIEW... -
Page 4: Important Safety Instructions
IMPORTANT SAFETY INSTRUCTIONS When using an electrical appliance, basic precautions should be followed, including the following: Please read, understand, and carefully follow all warnings, instruction, and procedures on the treadmill and in the owners/users manual before using this treadmill. DANGER! Indicates an imminently hazardous situation which if not avoided, will result in death or serious injury. -
Page 5: Important Safety Instructions
IMPORTANT SAFETY INSTRUCTIONS (CONT’D) 12. This appliance is intended for household use only. 13. Please obtain a medical exam before beginning any exercise program, If at any time you feel faint, dizzy or experience pain stop and consult your physician. 14. - Page 6 IMPORTANT SAFETY INSTRUCTIONS (CONT’D) GROUNDING INSTRUCTIONS This product must be grounded. If it malfunctions or breaks down, grounding provides a path of least resistance for electric current to reduce the risk of electric shock. This product is equipped with a cord which has an equipment-grounding conductor and a grounding plug.
- Page 7 MOTORIZED TREADMILL PRE-ASSEMBLY CHECK LIST ITEM Description ITEM Description Frame Water Holder Handrail(L) Screws M8xP1.25x15 Handrail(R) Screws M5xP0.8x10 Computer Console Screws K-299 Screws ∅5x25 Upright(L) Upright(R) 5mm Wrench Cover(L) 6mm Wrench Cover(R) Safety Key/Clip Handrail Upper Cover(L) Power Cord Handrail Upper Cover(R) Silicon Oil...
-
Page 8: Assembly Instructions
ASSEMBLY INSTRUCTION Please read, understand, and follow all of the safety precautions along with the assembly instructions for safe and easy assembly of your treadmill. CAUTION! A minimum of two people are required to assemble this treadmill. Also, read and understand all instructions thoroughly before assembling the treadmill. -
Page 9: Assembly Instructions
ASSEMBLY INSTRUCTION (CONT’D) 3. Press the left and right covers (G and H) into position and secure them with 4 (b) bolts as shown. 4. Insert left and right handrails (B and C) onto computer console (D) as shown in arrows, make sure that holes are line up with each other. - Page 10 ASSEMBLY INSTRUCTION (CONT’D) 5. Raise the assembled computer console, connect the control wire (upper) with the control wire (bottom). Then place the console on the upper portions of the uprights as shown. Note:Confirm that no cables are pinched while raising the unit. Then, tighten the console and the uprights with 4 of K-299 screws (c).
- Page 11 ASSEMBLY INSTRUCTION (CONT’D) 7. If the running belt tracks off center to the right or left deck a. Turn the power off b. Use a 6mm wrench to tighten the rear roller bolt on the side of the treadmill toward which the belt is moving as shown.
-
Page 12: Operation Of Powertrainer Pt-333
OPERATION OF POWERTRAINER PT-333 Glossary: Pulse – It is measured in terms of BPM Speed – Rate of motion Incline – Gradient measured in terms of % Distance – Workout range within a time frame Time – Workout duration Speed Keys – Preset programs available for immediate access to certain speed levels Calories –... - Page 13 2. Put the safety key into the recess of the console. A warning noise will sound and all displays will indicate 0 . This means the treadmill is in ready mode. Safety Key in Recess If the safety key is not in the recess area, you will see --- on all display windows.
- Page 14 3. Press “START” to begin. “MANUAL” LED will light up, and the treadmill will start to move at the speed of 1.0 mph. In manual mode, you can press “+” to accelerate, “-“ to decelerate, or “STOP” to stop. You can press to control the elevation.
- Page 15 Function of MODE key - In Ready Mode, you can press MODE to enter Program Setup to manually change both the Incline and Heart Rate value. The MANUAL LED will flash and you can press “+” or “-“, to select the desired programs P1 – P6. Then press “ENTER”...
-
Page 16: Program Profile
PROGRAM PROFILES The following is a dot-matrix level scale display showing INCLINE and SPEED windows of PowerTrane PT-422. Each pre-set program P1-P6 has 3 levels of workout choices as shown in the following profiles. P2 CARDIO P1 9 HOLE Speed Elevation Elevation Speed... -
Page 17: Program Profile
PROGRAM PROFILES (CONT’D) P3 RUNNING P4 FAT BURN Elevation Elevation Speed Speed P5 INTERVALS P6 HILL INTERVALS Elevation Elevation Speed Speed NOTE: The user can manually adjust any of the preset-programs (P1-P6) at any time during the workout by pressing “+” to accelerate, “-” to decelerate or “STOP” to stop. Press to control the elevation. -
Page 18: Exploded View Pt-333
EXPLODED VIEW PT-333... -
Page 19: Part List Pt-333
PART LIST PT-333... -
Page 20: Safety Precautions & Maintenance
SAFETY PRECAUTIONS & MAINTENANCE Keep all items away and avoid contact with the Cylinder cylinder as it may cause damage. If it is hit, the cylinder will not function smoothly and will not easily lower down when unfolding. Preventive Maintenance: WARNING! Always unplug the treadmill from the electrical outlet before cleaning, lubricating, or servicing the unit. -
Page 21: Troubleshooting
TROUBLESHOOTING ERROR MESSAGE PROBABLE CAUSES SOLUTION - Loss of Feedback Speed Sensor disconnected Check Speed Sensor Connection - Running Deck Running Deck not lubricated Check R-Deck oil Speed Sensor misaligned Check Sensor position Speed Sensor Faulty Replace S-Sensor Loose Display Cable Check Display Cable connection Faulty MCB... -
Page 22: Troubleshooting
TROUBLESHOOTING (CONT’D) ERROR MESSAGE PROBABLE CAUSES SOLUTION - Safety Key Off Safety Key Faulty Check Safety Key or Switch - Elevation Motor Elevation Motor not moving Check Elevation Motor connection - Stalled Elevation Elevation Motor screw binding Clean screw and lubricate Elevation Motor out of Range Check Zero Position of E-Motor E-Motor Potentiometer... -
Page 23: Warranty
Fitness Product as sold. The warranty does not apply to damage or failure due to accident, ® abuse, corrosion, discoloration of paint or plastic, or neglect. POWERTRAINER shall not be responsible for incidental or consequential damages. Parts and Electronic reconditioned to “AS ®...
Need help?
Do you have a question about the PT-333 and is the answer not in the manual?
Questions and answers