Advertisement
Quick Links
P/N 99944200907
Installation and Loading Instructions
Package Contents:
®
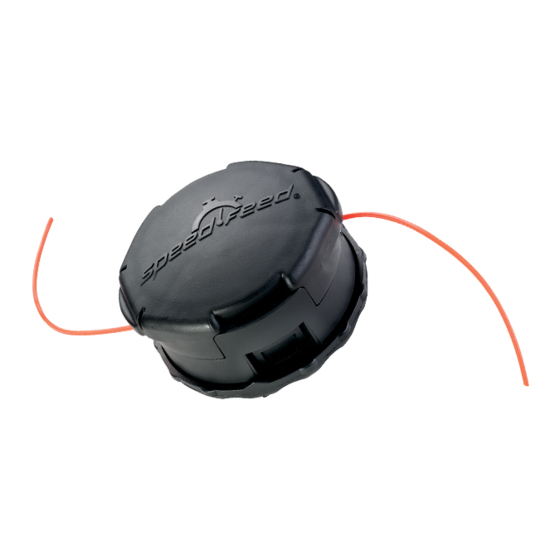
1 Speed-Feed
400 LH/RH Universal Mount Trimmer Head (K)
Bushings
(F) 1 - 8mm x 1.25mm LH Bushing (Red)
(G) 1 - 10mm x 1.0mm LH Bushing (Green)
(E) 1 - 10mm x 1.25mm LH Bushing (Gold)
(J)
1 - 10mm x 1.25 LH Long Bushing (Silver)
(N) 1 - 3/8-24 RH Bushing (Black)
Spacer
(M) 1 - Reversible Nylon Spacer w/20/25/38 mm Recesses
Trimmer Head Installation
1. Insert locking tool (A) into gear case to lock output shaft (B). Remove existing cutting attachment (C) from unit
following manufacturer's instructions.
IMPORTANT: Your unit must be equipped with a debris shield including a line cutter that will cut line to length
when trimmer line is advanced.
2. Install or reuse unit manufacturer's gear case base plate (D). Base plate must support trimmer head and allow it
to rotate freely.
3. Select and Install Mounting Hardware
®
Use the Speed-Feed
Application Chart provided to identify the bushing or bushing and mounting stud
combination needed for your model.
IMPORTANT: For Echo SRM units only. Check debris shield on unit for "R" mark between cutoff blade
screws.
a.
Units with "R" mark – Echo line head will fit on unit as is - go to Step 6.
b.
Units without "R" mark – Remove short bushing (E) from Echo line head and replace with long
bushing (J) and use spacer (M).
NOTE: If your brand or model number is not listed, match the existing mounting hardware from your model
with Echo mounting studs and/or bushings to determine the correct parts needed. If you need help, visit
echo-usa.com, or call the Consumer Product Support Department at 1-800-432-3246 from 8:30 am to 4:30 pm
(Central Time) Monday through Friday.
NOTE: Gold bushing (E) (used with LH1, LH2, LH6) is preinstalled in trimmer head. Black bushing (N) (used
with RH 1 and RH 2) is preinstalled in white core (P). If required, depress locking tabs (T), and open trimmer
head (K) to install new parts. Reassemble trimmer head in reverse order of disassembly. Make sure "L"
mark is facing away from bushing when replacing spool for LH units. Make sure "R" mark is facing away from
bushing for RH units. Trimmer head halves will snap together tightly only if parts are properly assembled.
4.
If required, install new mounting stud into threaded hole in gear case output shaft (B). Turn "LH" studs
counterclockwise to tighten. Turn "RH" stud clockwise to tighten.
5. If required, place reversible spacer (M) on base plate of gearcase, matching spacer recess to pilot diameter of
base plate.
NOTE: When spacer is properly matched and installed, there should be no gap between spacer and base
plate on gearcase.
6. Attach New Trimmer Head (K)
Thread LH trimmer head counterclockwise on to mounting stud or output shaft. Thread RH trimmer head on
clockwise. Hand-tighten only.
Echo SRM Only NOTE: There should be no gap between spacer and line head after tightening.
IMPORTANT: Do not force, otherwise threads will strip and cause permanent damage. Unscrew and confirm
correct thread size.
7. Remove locking tool (A) from gear case.
8. If necessary, cut trimmer lines so length does not extend beyond the cut-off blade on debris shield.
Operation
1. To feed trimmer line, bump bottom of trimmer head against ground while running at normal operating speed.
Loading Instructions – See Page 4.
X7672052500
07/13
Speed-Feed
®
Universal 400 LH/RH Trimmer Head
Mounting Studs
(H) 1 - 7mm x 10mm (LH) Mounting Stud (Gold)
(I)
1 - 8mm x 10mm (LH) Mounting Stud (Silver)
(O) 1 - 8mm x 3/8-24 (RH) Mounting Stud (Black)
Core
(P) 1 - White RH Core
C
"LH"
A
Echo SRM Only
"R"
I
O
H
J
E
www.
E, F, G, or J
"L"
H,I,O
D
"RH"
K
A
B
"RH"
D
F
G
N
P
T
T
"R"
M
J
B
A
"LH"
Advertisement

Related Manuals for Echo Speed-Feed Universal 400 LH/RH


Summary of Contents for Echo Speed-Feed Universal 400 LH/RH
- Page 1 Use the Speed-Feed Application Chart provided to identify the bushing or bushing and mounting stud combination needed for your model. IMPORTANT: For Echo SRM units only. Check debris shield on unit for “R” mark between cutoff blade screws. Units with “R” mark – Echo line head will fit on unit as is - go to Step 6. Units without “R” mark – Remove short bushing (E) from Echo line head and replace with long bushing (J) and use spacer (M).
- Page 2 Loading Instructions ENGLISH Speed-Feed 400 LH/RH Trimmer Head Total Line Capacity ® .080 (2.0 mm) dia. – 20’ (6 m) .095 (2.4 mm) dia. – 20’ (6 m) Loading Trimmer Line 1. Cut one piece of line to recommended length. 2.
- Page 3 ® IMPORTANT! Lorsque les indicateurs d’usure placés sous la tête Echo sont complètement usés, il faut remplacer la totalité de la tête. ¡IMPORTANTE! Cuando los indicadores de desgaste ubicados en la parte inferior de la cabeza Speed-Feed© estén lisos por el desgaste, o si aparecen agujeros, será...
- Page 4 REF# Blanc Noire Blanco Negro Base Central Moyeu Base Central Moyeu Oro, Or Noire, Negro Oro, Or Noire, Negro Noire, Negro Rouge, Rojo Rouge, Rojo Vert, Verde Oro, Or Argent, Plata...