
Summary of Contents for Japan Radio Co. JSS-2150
- Page 1 JSS-2150 JSS-2150 150W MF/HF RADIO EQUIPMENT 150W MF/HF RADIO EQUIPMENT SERVICE SERVICE MANUAL MANUAL...
- Page 3 CAUTIONS AGAINST HIGH VOLTAGE Radio and radar devices are operated by high voltages of anywhere from a few hundred volts up to many hundreds of thousands of volts. Although there is no danger with normal use, it is very dangerous if contact is made with the internal parts of these devices. (Only specialists should attempt any maintenance, checking or adjusting.) There is a very high risk of death by even a few thousand volts, in some cases you can be fatally electrocuted by just a few hundred volts.
- Page 4 First aid ☆Note points for first aid Unless there is impending danger leave the victim where he or she is, then begin artificial respiration. Once you begin artificial respiration, you must continue without losing rhythm. (1) Make contact with the victim cautiously, there is a risk that you may get electrocuted. (2) Switch off the machinery and then move the victim away slowly if you must.
- Page 5 ☆If the victim has a pulse but is not breathing (“Mouth to mouth” resuscitation) Figure 1 (1) Place the victim’s head facing backward (place something under the neck like a pillow). (2) Point the chin upward to widen the trachea. (3) Pinch the victim’s nose, take a deep breath, then put your mouth over the victim’s mouth and exhale completely, making sure that your mouth completely covers the victim’s mouth.
- Page 6 ☆If the victim has no pulse and is not breathing (Heart massage in combination with artificial respiration.) Figure 2 If the victim has no pulse, his or her pupils are dilated, and if you cannot detect a heartbeat, the heart may have stopped, beginning artificial respiration is critical.
- Page 7 Before Operation Concerning the symbols This manual uses the following symbols to explain correct operation and to prevent injury or damage to property. The symbols and descriptions are as follows. Understand them before proceeding with this manual. WARNING Indicates a warning that, if ignored, may result in serious injury or even death.
- Page 8 Handling precaution CAUTION Do not distribute this INSTALLATION MANUAL to ordinary users, because it has been created and published only for use by our service engineers. Do not use this equipment for anything other than specified. Doing so may cause failure or malfunction. Do not turn the trimmer resistors or the trimmer capacitors on the PCB unit, except when and if they need to be adjusted.
- Page 9 CAUTION Locate the antenna tuner, TX antenna and lead-in wire in locations as far as possible from people and surrounding structures to satisfy the following conditions. • Far at least 30cm beyond anyone’s reach. • Low vibration. • Good ventilation and drainage. •...
-
Page 10: Table Of Contents
..................1.1.3 System configuration ..............Block diagram .................. 1.2.1 DSC model ................. 1.2.2 DSC/NBDP model ............... Specifications ................... 1.3.1 JSS-2150 MF/HF Radio Equipment ..........1.3.2 Options ..................1-10 1.3.3 Peripheral interfaces ..............1-12 1.3.4 External dimensions ..............1-16 Interconnection diagram .............. - Page 11 Using the field maintenance menu ............ 2.2.1 Turning on the field maintenance mode ........2.2.2 Exiting the field maintenance mode ..........2.2.3 Menu tree ................... 2.2.4 How to configure settings ............2.2.4.1 MMSI registration ................2.2.4.2 Serial number registration ..............2.2.4.3 DMC/AME settings ................
- Page 12 3.1.2.9 Checking the basic operation ............3.1.2.10 Checking the Tx power and frequency ..........3.1.2.11 Checking the antenna VSWR ............. 3.1.2.12 Radiotelephone communication test ..........3.1.2.13 DSC communication test ..............3.1.2.14 NBDP communication test ..............3.1.2.15 Checking the documentation and explain operations ......3.1.2.16 Rechecking the installation ..............
- Page 13 5.1.4 CMJ-2250 WKR MODEM UNIT ........... 5.1.5 NCM-2150 MF/HF CONTROLLER ..........5.1.6 NDZ-227 DATA TERMINAL ............5.1.7 NFC-2150 ANTENNA TUNER (CFG-2150 MATCHING UNIT) ..5.2 Examples of inspection data and PA efficiency ........REPLACEMENT PROCEDURE for the CAH-2415 PA UNIT ......REPLACEMENT PROCEDURE for the CMN-2250 TRX UNIT ......
-
Page 15: Configuration And Specifications
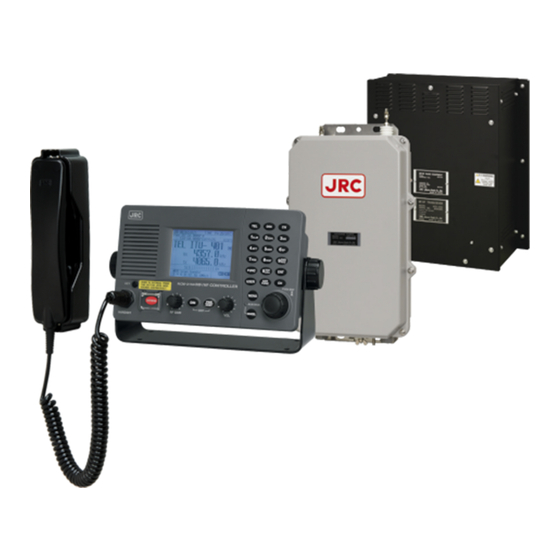
CONFIGURATION AND SPECIFICATIONS 1. CONFIGURATION AND SPECIFICATIONS 1.1 Basic configuration 1.1.1 DSC model 1.1.1.1 Standard components Description Model Notes MF/HF transceiver NTD-2150 MF/HF controller NCM-2150 Controller cable 7ZCJD0343 Handset NQW-261 Includes the cradle Antenna tuner NFC-2150 Instruction manual 7ZPJD0492 1.1.1.2 Options Description Model Notes... -
Page 16: Dsc/Nbdp Model
CONFIGURATION AND SPECIFICATIONS 1.1.2 DSC/NBDP model 1.1.2.1 Standard components Description Model Notes MF/HF transceiver NTD-2150 MF/HF controller NCM-2150 Controller cable 7ZCJD0343 Handset NQW-261 Includes the cradle Antenna tuner NFC-2150 Data terminal NDZ-227 DTE cable 7ZCJD0388 DTE power cable 7ZCJD0419 NBDP option Keyboard NDF-369 Printer... -
Page 17: System Configuration
CONFIGURATION AND SPECIFICATIONS 1.1.3 System configuration NKG-800 Printer NDZ-227 Data terminal NDF-369 Keyboard (DSC/NBDP model only) NCM-2150 MF/HF Controller NQW-261 Handset Expansion Controller NFC-2150 NTD-2150 MF/HF Transceiver Antenna Tuner NCH-321A DMC The radiotelephone can also be used when connected to remote maintenance system equipment. -
Page 18: Block Diagram
CONFIGURATION AND SPECIFICATIONS 1.2 Block diagram 1.2.1 DSC model Rx/WKR Tx antenna antenna JQD-69C Joint box Lead wire RG-12/UY TH-7/1.6 NQW-261 M-P-7 Handset 7ZCJD M-P-7/M-P-5 RX/WKR ANT TX ANT TTYCS- 4 M-P-7 M-A-JJ 0343 DPYC-2.5 (5m) RG-10/UY 5D-2VH NCM-2150 MF/HF Controller NTD-2150 NFC-2150 MF/HF Transceiver... -
Page 19: Dsc/Nbdp Model
CONFIGURATION AND SPECIFICATIONS 1.2.2 DSC/NBDP model Rx/WKR Tx antenna antenna JQD-69C Joint box Lead wire RG-12/UY TH-7/1.6 NQW-261 M-P-7 Handset 7ZCJD M-P-7/M-P-5 RX/WKR ANT TX ANT TTYCS- 4 M-P-7 M-A-JJ 0343 DPYC-2.5 (5m) RG-10/UY 5D-2VH NCM-2150 MF/HF Controller NTD-2150 NFC-2150 MF/HF Transceiver Antenna tuner TTYCYS-4... -
Page 20: Specifications
CONFIGURATION AND SPECIFICATIONS 1.3 Specifications 1.3.1 JSS-2150 MF/HF Radio Equipment General Specifications Transmission frequency 1605.0 - 27500.0 kHz (100 Hz steps) Reception frequency 90.0 - 29999.9 kHz (100 Hz steps) Within Frequency stability ±10 Hz Type of emission TEL mode... - Page 21 CONFIGURATION AND SPECIFICATIONS Transmitter Antenna output power 1605.0 - 3999.9 kHz : 75/ 100Wpep (Low: 33Wpep) 4000.0 - 27500.0 kHz : 75/ 100/ 150Wpep (Low: 50Wpep) Modulation method Low-power stage balanced modulation Occupied bandwidth J3E/ J2D/ H2B : Within 3 kHz F1B/ A1A : Within 0.5 kHz Carrier suppression (J3E)
- Page 22 CONFIGURATION AND SPECIFICATIONS DSC Watch Keeping Receiver. Reception frequency Distress and safety frequencies of 2187.5 kHz and 8414.5 kHz, and additionally on one or more of the 4207.5 kHz/ 6312.0 kHz/ 12577.0 kHz/ 16804.5 kHz Receiving system Double superheterodyne 1st IF 40.04025 MHz 2nd IF 40.25 kHz...
- Page 23 CONFIGURATION AND SPECIFICATIONS Controller Communication speed 57.6 kbps Communication interface RS-485 and RS-232C, and Centronics compliant Microphone input impedance 150Ω balanced Standard modulation input -54 dBm Audio output Internal loud speaker (8Ω) : 5W max External speaker impedance : 8Ω or more Handset phone (150Ω) : Rated 1mW or more LCD display...
-
Page 24: Options
CONFIGURATION AND SPECIFICATIONS 1.3.2 Options (1) AC/DC Power supply (NBD-2150) Source voltage 90 VAC to 264 VAC (50/60 Hz) and 24 VDC (21.6 VDC to 31.2 VDC) Output voltage AC operation : 24 VDC DC operation : Outputs the DC-IN directly Maximum output current 30 A Source switching function... - Page 25 CONFIGURATION AND SPECIFICATIONS (3) Printer (NKG-91) Printing system Thermal line dot Communication interface RS-232C, 4.8/9.6/38.4 kbps Data control RTS/CTS Data buffer 4096 byte Maximum print speed 20 mm/sec or more Roll paper width 58 mm Power supply voltage 6.5 VDC (5 VDC to 8.7 VDC) Current consumption Maximum 2 A (4) Printer (DPU-414)
-
Page 26: Peripheral Interfaces
CONFIGURATION AND SPECIFICATIONS 1.3.3 Peripheral interfaces GPS or other navigation aid interface Interface standard NMEA0183/IEC61162-1 compliant Protocol 4800 bps, start 1 bit, data 8 bit, stop 1 bit Non parity Input sentence NMEA0183 V1.5 : GGA/GLL/RMC V2.0 : GGA/GLL/RMC/ZDA V2.3 : GGA/GLL/RMC/GNS/ZDA (Talker = "GP"... - Page 27 CONFIGURATION AND SPECIFICATIONS (1.2) List of sentences and associated data fields (1.2.1) GGA – Global positioning system (GPS) fix data $--GGA, hhmmss, llll.ll, a, yyyyy.yy, a, x, xx, x.x, x.x, M, x.x, M, x.x, xxxx *hh<CR><LF> Differential reference station ID, 0000-1023 Age of differential GPS data Units of geoidal separation, m Geoidal separation...
- Page 28 CONFIGURATION AND SPECIFICATIONS (1.2.3) RMC – Recommended minimum specific GNSS data $--RMC, hhmmss.ss, A, llll.ll, a, yyyyy.yy, a, x.x, x.x, xxxxxx, x.x, a, a *hh<CR><LF> Mode indicator: A = Autonomous, D = Differential, E = Estimated, M = Manual input, S = Simulator, N = Data not valid Magnetic variation, degrees, E/W Date: dd/mm/yy...
- Page 29 CONFIGURATION AND SPECIFICATIONS RMS interface Interface standard IEC61162-1 compliant Protocol 4800 bps, start 1 bit, data 8 bit, stop 1 bit Non parity Output message IEC61162-1 compliant proprietary sentence $PJRCL sentence (for RMS log saving) $PJRCM sentence (Device ID = "CT") Data type Model number, serial number, self-diagnosis information, etc.
-
Page 30: External Dimensions
CONFIGURATION AND SPECIFICATIONS 1.3.4 External dimensions (1) MF/HF Transceiver (NTD-2150) Unit: mm Weight: Approx. 13 kg MF/HF Controller (NCM-2150) (2) Unit: mm Weight: Approx. 1.3 kg 1-16... - Page 31 CONFIGURATION AND SPECIFICATIONS Handset (NQW-261) (3) . Unit: mm Mounting hole Weight: Approx. 0.5 kg Connection box (NQD-2250) (4) Unit: mm Weight: Approx. 0.6 kg 1-17...
- Page 32 CONFIGURATION AND SPECIFICATIONS Antenna Tuner (NFC-2150) (5) Unit: mm Weight: Approx. 3.3 kg Junction Box (NQD-2253) (6) Unit: mm Weight: Approx. 1.2 kg 1-18...
- Page 33 CONFIGURATION AND SPECIFICATIONS Data Terminal (NDZ-227) (7) Unit: mm Weight: Approx. 4.6 kg Keyboard (NDF-369) (8) Unit: mm Weight: Approx. 0.4 kg 1-19...
- Page 34 CONFIGURATION AND SPECIFICATIONS AC/DC Power Supply (NBD-2150) (9) Unit: mm Weight: Approx. 9.8 kg 1-20...
- Page 35 CONFIGURATION AND SPECIFICATIONS (10) Battery Charger (NBB-724) Unit: mm Weight: Approx. 12.0 kg 1-21...
- Page 36 CONFIGURATION AND SPECIFICATIONS (11) Printer (NKG-800) ● Desktop type Unit: mm Weight: Approx. 3.7 kg 1-22...
- Page 37 CONFIGURATION AND SPECIFICATIONS (12) Printer (NKG-91) ● Wall mount type Wiring hole (side) Mounting hole Unit: mm Wiring hole (back) Weight: Approx. 1.5 kg ● Flush mount type Unit: mm Weight: Approx. 0.8 kg 1-23...
- Page 38 CONFIGURATION AND SPECIFICATIONS (13) Printer (DPU-414) ● Desktop type Unit: mm Weight: Approx. 0.6 kg 1-24...
-
Page 39: Interconnection Diagram
CONFIGURATION AND SPECIFICATIONS 1.4 Interconnection diagram 1.4.1 General configuration 1-25... -
Page 40: Overall Configuration
PRT-S NDZ-227 NDZ-227 ACCESSORY ACCESSORY PRT_PWR PRT_PWR (Option) NCM-2150 NCM-2150 7ZCJD0419 7ZCJD0419 MF/HF CONTROLLER (2m) (2m) MF/HF CONTROLLER (Option) HANDSET HANDSET NKG-800 NKG-800 PRINTER PRINTER (Option) NQW-261 NQW-261 KEYER KEYER HANDSET HANDSET JSS-2150 MF/HF RADIO EQUIPMENT INTERCONNECTION DIAGRAM (1/2) 1-26... - Page 41 DC 24V IN BATT OUT AC IN BATT Power source DC 24V AC100V/220V 7ZCJD0348(1.5m) Power source Power source AC100V/220V AC100V/220V BATTERY DC24V 200Ah (Dockyard Supply) Note: ※ marked cables are supplied by dockyard JSS-2150 MF/HF RADIO EQUIPMENT INTERCONNECTION DIAGRAM (2/2) 1-27...
-
Page 42: Exploded Views And Wiring Diagrams
CONFIGURATION AND SPECIFICATIONS 1.5 Exploded views and wiring diagrams 1.5.1 NTD-2150 MF/HF Transceiver MF/HF transceiver (NTD-2150) exploded view 1-28... - Page 43 CONFIGURATION AND SPECIFICATIONS 1-29...
- Page 44 CONFIGURATION AND SPECIFICATIONS 1-30...
- Page 45 CONFIGURATION AND SPECIFICATIONS 1-31...
- Page 46 CONFIGURATION AND SPECIFICATIONS MF/HF transceiver (NTD-2150) wiring diagram 1-32...
- Page 47 CONFIGURATION AND SPECIFICATIONS 1-33...
-
Page 48: Ncm-2150 Mf/Hf Controller
CONFIGURATION AND SPECIFICATIONS 1.5.2 NCM-2150 MF/HF Controller MF/HF controller (NCM-2150) exploded view 1-34... - Page 49 CONFIGURATION AND SPECIFICATIONS MF/HF controller (NCM-2150) wiring diagram W1 5ZCMD00018 Flat cable W2 5ZCMD00046 Flat cable from SP 7ZCJD0303 W3 7ZCJD0310 from LCD Flat cable W6 7ZCJD0302A W4 7ZCJD0300A W5 7ZCJD0301 W8 7ZCJD0304 Note: To connect or disconnect the flat cables, refer to the following description. Additionally, when connecting the flat cables, face up the blue tape and push the flat cable as far as it will go.
- Page 50 CONFIGURATION AND SPECIFICATIONS MF/HF controller (NCM-2150) handset terminal Microphone DM-96 Connector: (150O) LTWBD-08BFFA-LL equivalent product PTT S/W HOOK S/W Hall IC 100p 100p Phone DH-60 (150O) (Reference) NQW-261 handset connection diagram HANDSET terminal Name Description Connection point PHONE + For connecting the handset PHONE - (GND) HOOKSW (RXD) Hook switch (also for RXD)
-
Page 51: Nfc-2150 Antenna Tuner
CONFIGURATION AND SPECIFICATIONS 1.5.3 NFC-2150 Antenna tuner Antenna tuner (NFC-2150) exploded view 1-37... - Page 52 CONFIGURATION AND SPECIFICATIONS Antenna tuner (NFC-2150) wiring diagram 1-38...
-
Page 53: Ndz-227 Data Terminal
CONFIGURATION AND SPECIFICATIONS 1.5.4 NDZ-227 Data terminal Data terminal (NDZ-227) exploded view Name Diagram No. REFER TO A. MOUNT METAL REFER TO B. RUBBER MTT310999 KNOB BOLT MPTG30053 1-39... - Page 54 CONFIGURATION AND SPECIFICATIONS Name Diagram No. FRONT PANEL ASSYAAAAAAAAA REFER TO C REAR CASE ASSY REFER TO D COVER MTV304861 MAIN BODY LABEL MPNN46514 MODEL LABEL MPNN46516 OPERATION LABEL MPNN46517 VOID LABEL MPNN46515 LABEL MPNN44289 PT SCREW BRTG09223 1-40...
- Page 55 CONFIGURATION AND SPECIFICATIONS Name Diagram No. MOUNT METAL MOUNT METAL MTB396846 DIVIDED METAL MTB396847 RUBBER VIBRATION ISOLATOR MTV304863A COUNTERSUBK HEAD SCREW BRTG09152 1-41...
- Page 56 CONFIGURATION AND SPECIFICATIONS Name Diagram No. FRONT PANEL ASSY FRONT PANEL ASSY REFER TO E LCD BRACKET ASSY REFER TO F MF/HF COVER MTV304859 USB COVER MTT313662 KEY RUBBER MTT313667 LIGHT PIPE MTV304860 USB I/F BOARD CQD-3227 PT SCREW BRTG09224 PT SCREW BRTG09223 1-42...
- Page 57 CONFIGURATION AND SPECIFICATIONS Name Diagram No. REAR CASE ASSY REAR CASE MTV304858 CONNECTOR MOUNT METALAAAA MTB396778 GASKET MPPK31570 POWER CONNECTOR - PAN-HEAD SCREW BSNB04020B COUNTERSUBK HEAD SCREW BSSK03008R WASHER BSFW04000B BSHN04000W BSLN04000W WING NUT BSBN04000B SPRING WASHER BSSW04000S 1-43...
- Page 58 CONFIGURATION AND SPECIFICATIONS Name Diagram No. FRONT PANEL ASSY FRONT PANEL MTV304857A FILTER MTT313655 GASKET MPPK31571 GASKET MPPK31572 1-44...
- Page 59 CONFIGURATION AND SPECIFICATIONS Name Diagram No. LCD BRACKET ASSYAAAAAAAAA LCD BRAKET MTB396777 BRASS SPACER BRBP06614 SPRING WASHER BSSW03000S SPACER BRBP05062 TAPPING SCREW BRTG09751 PAN-HEAD SCREW BSNB03006R COLOR LCD CCN-3227 PROCESS CIRCUIT CDC-1346B INTERFACE UNIT CMH-3227 LCD I/F BOARD CQC-1262 1-45...
- Page 60 CONFIGURATION AND SPECIFICATIONS Data terminal (NDZ-227) wiring diagram Name Diagram No. FLAT CABLE 7ZCJD0365A CABLE WITH CONNECTOR 7ZCJD0389A FLAT CABLE 7ZCJD0364A CABLE WITH CONNECTOR 7ZCJD0332B CABLE WITH CONNECTOR 7ZCJD0363A CABLE WITH CONNECTOR 7ZCJD0330B 1-46...
-
Page 61: Setup And Adjustment
2.1 Overview of setup 2.1.1 Overview After installing the JSS-2150, configure the initial settings by referring to the setup procedure (flow chart) in the following section and the items below. For settings according to the installation conditions, see section "2.1.3 Settings". -
Page 62: Setup Procedure (Flowchart)
SETUP AND ADJUSTMENT 2.1.2 Setup procedure (flowchart) - Page 63 SETUP AND ADJUSTMENT...
-
Page 64: Settings
SETUP AND ADJUSTMENT 2.1.3 Settings Configure the following initial settings according to the installation conditions. MMSI registration (Menu F1.1.1 ID setup) Tx power for each band (Menu F2.3.1.1 TX band power adj.) Settings for Tx power of each user channel (Menu F2.3.1.2 TX CH power adj.) Printer setup and operation check (Menu 7.6 Option) Detection settings DC operation (for Menu F1.2.4.1 AC/DC detection) Inmarsat C parallel operation settings during DC operation (Menu F1.2.4.2 BATT use set) -
Page 65: Using The Field Maintenance Menu
SETUP AND ADJUSTMENT 2.2 Using the field maintenance menu 2.2.1 Turning on the field maintenance mode CAUTION In the field maintenance mode, all DSC functions including distress alert cannot be used. So when setup is complete, always restart by powering off and on using breakers, or place the system in sleep mode. -
Page 66: Exiting The Field Maintenance Mode
SETUP AND ADJUSTMENT Press DIM and PWR/CONT simultaneously to enter sleep mode. Holding down the MENU key, press the PWR/CONT key. An alarm is sounded and the equipment is turned on in the field maintenance mode. Remark 1: The alarm volume is adjustable by the menu 7.3.2.2 Notification level. Remark 2: Pressing and holding the PWR/CONT key for over 6 seconds restarts the equipment. -
Page 67: Menu Tree
SETUP AND ADJUSTMENT 2.2.3 Menu tree... - Page 68 SETUP AND ADJUSTMENT...
-
Page 69: How To Configure Settings
SETUP AND ADJUSTMENT 2.2.4 How to configure settings The details for the field maintenance menu (F1. Initial setting) are as follows (in order of menu numbers). 2.2.4.1 MMSI registration To use DSC, register the ship's MMSI assigned by the supervising authority. Operate the ENT key to move the cursor to the right of Self-ID(MMSI). -
Page 70: Dsc/Wkr Settings
The selection of "BATT use set" is available only when the "AC/DC detection" is Valid. Note3. When operating the Inmarsat C in DC if "Single" is selected here, turn off the power of the JSS-2150 or put it into sleep mode. 2-10... -
Page 71: Controller Settings
Register either 1 or 2. Maintenance mode off timer Set within a range of 1 to 60 minutes. When controlling the JSS-2150 by FSI commands of the EN standard, set to Valid. Normally this function is not used and left it as “Invalid”... - Page 72 SETUP AND ADJUSTMENT Category Sentence number and name Output cycle/event Status information EQP info 1 (System/Transceiver/ATU/Controller) 1 hour Operation ID information 1 hour System alarm information 60 seconds PA/ATU alarm information 60 seconds TRX(Main/Sub)/ WKR MODEM alarm information 60 seconds Controller1/2 alarm information 60 seconds Controller3/Spare unit alarm information (Not used)
-
Page 73: Adjustments And Inspections
SETUP AND ADJUSTMENT 2.2.5 Adjustments and inspections The details for the adjustment and detection menu (F2. Maintenance) in the field maintenance mode are as follows (in order of menu numbers). 2.2.5.1 Maintenance menu (mic gain adjustment) The menu screen of items for adjustment is as follows. *Mic gain is adjusted here. -
Page 74: Checking The I/O Ports
SETUP AND ADJUSTMENT 2.2.5.2 Checking the I/O ports Check the connection status by monitoring input signals or outputting simple data. Port selection RS-485 monitor: Connected controller AME monitor/output: DMC output: GPS monitor: RMS monitor/output: Remote maintenance Data output When AME, DMC or Remote maintenance is selected at Port selection, pressing ENT on Execute outputs the data from that port. -
Page 75: Self Diagnosis In The Field Maintenance Mode
SETUP AND ADJUSTMENT 2.2.5.3 Self diagnosis in the field maintenance mode The self diagnosis in the field maintenance mode can make an advanced self diagnosis of each item for each unit, in addition to self-diagnosis per unit in user mode. Remarks: Histories of self diagnosis executed here are not saved. -
Page 76: Setting The Transmission Conditions
SETUP AND ADJUSTMENT 2.2.5.4 Setting the transmission conditions Adjust the radio (mainly transmitter) as below. TX power adj. Check and adjust the Tx output. For details, refer to the explanation later. DSC/NBDP (AF) Used to measure the DSC or NBDP audio frequency. -
Page 77: Tx Power Adjustment Per Band
SETUP AND ADJUSTMENT 2.2.5.5 Tx power adjustment per band The Tx power for each band (1 MHz to 27 MHz bands) is preset to a rated value with a dummy load when shipped. After installation check the Tx power for each band and, adjust it if necessary. Pressing ENT on "1. -
Page 78: Tx Power Adjustment Per Channel
SETUP AND ADJUSTMENT 2.2.5.6 Tx power adjustment per channel Tx power for each user channel is applied from the Tx power for each band of the factory default setting. After installation check the Tx power for each user channel and, adjust it if necessary. Furthermore, the user channels information are saved as below. -
Page 79: Dsc/Nbdp Af Measurement
SETUP AND ADJUSTMENT 2.2.5.7 DSC/NBDP AF measurement Outputs the DSC/NBDP AF signal to the controller's audio output port such as the external speaker plug and handset terminal (Phone: Between 1 - 2). TX type Select the signal from DSC/NBDP 1615Hz, DSC/NBDP 1785Hz, or DSC/NBDP Dot. -
Page 80: Setting The Receiving Conditions
SETUP AND ADJUSTMENT 2.2.5.9 Setting the receiving conditions Adjust the receiver. RX antenna Split and use the WKR antenna: WKR/RX Use the TX antenna in common: Note: The factory default is WKR/RX. When connecting a receiving antenna to the RX ANT connector, the antenna is connected to the receiver by the hardware, regardless of the above setting. -
Page 81: Initializing Stored Information
SETUP AND ADJUSTMENT 2.2.5.10 Initializing stored information Initialize each unit and item, resetting them to their factory defaults. ATU/PA data Initialize items selected from the ATU and PA stored information below. * In any situation, moving the cursor to Initialize screen (see right) - Page 82 SETUP AND ADJUSTMENT Controller data The selected content below is initialized for controller stored information. Scan speed, Display form, My controller, Self diagnosis log (NCM), Option: User All controller stored information: Note: The following are initialized when All is selected. The above user items, Controller settings, MIC gain Alarm log...
-
Page 83: Upgrading The Software
SETUP AND ADJUSTMENT 2.2.5.11 Upgrading the software Software is embedded in the NCM-2150 CONTROLLER, CAH-2415 PA UNIT, CMN-2250 TRX UNIT, CMJ-2250 WKR MODEM UNIT and NDZ-227 DATA TERMINAL. Normally connect a notebook PC or similar device to the controller, set the necessary items on the menu below, and then upgrade the unit. Note that the data terminal software is upgraded via the USB memory or the serial port of itself. - Page 84 SETUP AND ADJUSTMENT 2-24...
-
Page 85: Operation Check After Installation
OPERATION CHECK AFTER INSTALLATION 3. OPERATION CHECK AFTER INSTALLATION 3.1 Checks and procedures 3.1.1 Checklist After the installation, configuration, and adjustment of the JSS-2150 is complete, do the checks in the table below. For details, refer to the explanation later. Procedure Item Description... -
Page 86: Checking Procedures
OPERATION CHECK AFTER INSTALLATION 3.1.2 Checking procedures 3.1.2.1 Checking the installation of the equipment • Is the equipment installed in the correct location? • Check if there is enough space for removing the side and top plates of the NTD-2150, and that there is nothing obstructing the cooling fan. -
Page 87: Checking The Registration Items
OPERATION CHECK AFTER INSTALLATION shuts off. • Check both the floating and equalizing charge voltages by the panel meter of the NBB-724. • Check both the charge and discharge currents by the panel meter of the NBB-724. 3.1.2.5 Checking the registration items •... -
Page 88: Checking The Antenna Vswr
OPERATION CHECK AFTER INSTALLATION Rating: Within ±10 Hz 3.1.2.11 Checking the antenna VSWR • Check the output power (Pf) and reflected power (Pr) using a through watt meter (CM power meter). Reference: When Pf = 150 W and Pr = 6 W, VSWR = 1.5 using the following equation. Note 1: When Pf is 150 W (±20%), it is best when Pr is less than 6 W. -
Page 89: Power Off
OPERATION CHECK AFTER INSTALLATION Then while retightening all screws to ensure they are securely tightened, check that the coaxial and other cables are securely connected. 3.1.2.17 Power off Turn the transceiver's power breaker off, and exit field maintenance mode. -
Page 90: Troubleshooting
OPERATION CHECK AFTER INSTALLATION 3.2 Troubleshooting Diagnose malfunctions while referring to the table below. Operating Cause and items to Symptoms Solution (example) condition check Provide appropriate voltage to the NBD-2150. Unable to start/ Insufficient voltage from (90 VAC to 132 VAC, 180 VAC to 264 VAC, DC OUTPUT on power source 21.6 VDC to 31.2 VDC) -
Page 91: Pa Software Errors
OPERATION CHECK AFTER INSTALLATION 3.2.1 PA software errors Each unit communicates using a single master/multi-slave protocol, such as Modbus. When polling with the PA as master (semaphore), the other units respond in order (same as JHS-770S). If the software does not function correctly due to a PA ROM (FROM) malfunction, all functions, including upgrades, stop functioning. -
Page 92: Locating Faults By The Self Diagnosis And The Countermeasures
OPERATION CHECK AFTER INSTALLATION 3.2.2 Locating faults by the self diagnosis and the countermeasures (1) Self diagnosis of the transceiver (Menu 6.1.1) Test item Description Result Countermeasure if NG • Check wiring between the OK: Normal NFC-2150, NQD-2253, • Serial I/F: Serial communication NG: Error and NTD-2150... - Page 93 OPERATION CHECK AFTER INSTALLATION Test item Description Result Countermeasure if NG • Memory1: FROM operation • Memory2: EEPROM operation • Memory3: SDRAM operation • PLL lock: Status of PPL for DDS clock • With Memory2, replace • Band1-RX BPF1: 2187.5 kHz Rx level EEPROM (IC502) •...
- Page 94 OPERATION CHECK AFTER INSTALLATION 3.2.3 System alarm list and countermeasures The types, descriptions, and countermeasures for system alarms displayed when an error is detected on the equipment are as follows. Even if a system alarm report screen is closed, the current alarm can still be checked on the Menu 6.2 Alarm information screen.
- Page 95 OPERATION CHECK AFTER INSTALLATION Location Message Description Countermeasure MCDSP WDT MCDSP stop was detected. Replace CMJ-2250 MODEM VDSP WDT VDSP stop was detected. Replace CMJ-2250 MODEM MMSI lost Detected that MMSI is not • Replace CMJ-2250 EEPROM MODEM registered or missing. (IC502) •...
- Page 96 OPERATION CHECK AFTER INSTALLATION Location Message Description Countermeasure Controller CTRL1 EXT KEY Detected an error with the • Check if was started up EXT KEY of controller 1. while EXT KEY on EXT MODEM was on • Check W5 in the NCM-2150 •...
- Page 97 OPERATION CHECK AFTER INSTALLATION Detected a serial communication error between ・ Check the data terminal controller (ID:2) and DTE. cable connection, or the Data My/OTH DTE lost Note) My or OTH indicates the condition of the data terminal relationship between that data terminal.
-
Page 98: Countermeasures For Other Malfunctions
OPERATION CHECK AFTER INSTALLATION 3.2.4 Countermeasures for other malfunctions The instructions for finding other malfunctions are as follows. Symptom Major cause and/or countermeasure • Check the connections with the GPS. GPS position information is not displayed. • Check the input sentence from the GPS device. After turning the power on and * Menu F2.1 Port maintenance waiting a while, the POS/TIME... - Page 99 Maintenance 4. MAINTENANCE Periodic inspections 4.1.1 Checklist Check the following items during periodic checks. If there are other regulations directed by the concerned administration or inspection body, follow those regulations. Procedure Item Description Check if the equipment is fixed properly and if Check installation of the equipment screws are tight.
-
Page 100: Maintenance
Maintenance 4.1.2 Measuring DSC/NBDP AF Measure the DSC or NBDP modulation frequency (1615 Hz/1785 Hz) as follows. 1) Connect the frequency counter to the external speaker output terminal (φ3.5-mm jack) on the rear of the controller. 2) Open Menu F2.3.2 DSC/NBDP (AF). 3) Select the frequency to measure from 1615 Hz or 1785 Hz at 1. -
Page 107: Unit Replacement
*2. After replacing a unit, check flat cables, antenna cables, and power cables are properly inserted. *3. After replacing a unit, fill out a copy of the "MF/HF JSS-2150 Maintenance Record" included at the end of this chapter and return it to the Marine Service Department. - Page 108 Maintenance 4-10...
-
Page 109: Stored Information List
Maintenance 4.2.2 Stored information list ● Transceiver (NTD-2150) Board Stored item Description Remark name Main controller ID Default: 0 Operational settings These information are Tx power reduction (high/low) Default: High portable by IC102 on Tune power (Normal/+1/+2/+3) Default: Normal the IC socket. Channel number User channels Send and receive frequencies... - Page 110 Maintenance ● Controller (NCM-2150) Board Stored item Description Remark name TEL/DSC/CW scan speed Default: 3/0.3/3 Not portable Scan speed Self diagnosis log for controller Not portable Self diagnosis log System clock UTC/LT information Default: UTC Not portable UTC/LT Time difference when LT set Default: 00:00 Not portable LT diff...
- Page 111 Maintenance ● Data terminal (NDZ-227) Board Stored item Description Remark name Communication Transferable Prepared telex communication files file USB memory Call logging Transferable Communication logs history USB memory Transferable Station list Frequency list for stations USB memory Transferable Station database Frequency list database USB memory Destination list...
-
Page 112: Upgrading The Software
- Upgrade cable ........RS-232C straight cable (Dsub 9 female - Dsub 9 male) or 7ZCJD0315 (handset connector - Dsub 9 female) as necessary - Upgrade tool (PC application) .....JSS-2150 FLASH Writer x.x.exe * x.x represents the version number - Upgradeable software ......2150_PA_xxxx.P1M For CAH-2415 2150_TRX_xxxx.T1M... -
Page 113: Normal Upgrade
(1) Connect a notebook PC to the NCM-2150 controller as follows and then turn on the notebook PC. (2) Start the JSS-2150 in maintenance mode. (3) On the F3. Software upgrade screen on the maintenance menu, select the baudrate, connector, and target unit as follows. - Page 114 Maintenance (5) Launch the PC application software (JSS-2150 FLASH Writer x.x.exe) on the notebook PC. (6) Select the RS-232C Com port on the notebook PC and select the same communication speed set earlier for the baudrate. (7) Select the target unit to upgrade by the Target pull-down menu. Note that if a controller program error is occurred and the controller upgrading is performed on the boot program displayed as shown in the following right, always select CNT (ID=1) regardless of the address of that controller.
- Page 115 Maintenance (8) Press the file select button and select the software to upgrade. * After selecting a file, the file name appears as follows in the file name field. 4-17...
- Page 116 Maintenance Press the Write start button to start the upgrade. * If there is a problem with the JSS-2150 reception settings discussed previously or the cable connection at this time, the following error message appears. Correct the problem and press Write start again.
- Page 117 ENT key of the controller to restart the system. (12) Clicking the X in the window closes the PC application software. Note 1: The "Restart the JSS-2150 radio?" dialog box is displayed. Normally, click "No" here. Note 2: To continue upgrading other units, repeat the procedure above.
-
Page 118: Upgrading At The Transceiver
(2) Connect an RS-232C straight cable to the J105 connector (Dsub-9) on the CAH-2415 PA UNIT to configure as shown below. JSS-2150 Notebook PC PA UNIT(CAH-2415) Dsub-9 on board COM port RS-232C straight cable (3) Start the JSS-2150 in user or maintenance mode. 4-20... - Page 119 Maintenance (4) Turn on the notebook PC and launch the upgrade tool (JSS-2150 FLASH Writer x.x.exe) discussed previously. (5) Select the RS-232C Com port on the notebook PC and select “38400 bps” as the fixed communication speed. (In this case, do not select “57600 bps” or “115200 bps”.) (6) Select the target unit (PA, TRX, or MODEM) to upgrade by the Target pull-down menu.
- Page 120 Maintenance (7) Press the file select button and select the software to upgrade. * After selecting a file, the file name appears as follows in the file name field. 4-22...
- Page 121 C o n n e c t o r : - - - - - *2. If there is a problem with the JSS-2150 reception settings or the cable connection at this time, the following error message appears. Correct the problem and press Write start again.
- Page 122 (12) Clicking the X in the window closes the PC application software. Note 1: The "Restart the JSS-2150 radio?" dialog box is displayed. Normally, click "Yes" here. Note 2: To continue upgrading other units, repeat the procedure above.
-
Page 123: Maintenance Mode Of The Data Terminal
4.4.1 Turning on/off the maintenance mode Turn on the maintenance mode of the data terminal by following the procedure below. Turn on the JSS-2150 in field maintenance mode. Through the controller hierarchical menus, select F3. Software upgrade to stop watching the DTE lost alarm. -
Page 124: Operation
4.4.2.1 Initial setting Confirm the serial number of the data terminal on the “1.Serial No.” menu, and register the number to the JSS-2150 via the F1.1.2 Serial number menu of the NCM-2150 MF/HF controller. Note. All of these menus (“1.Serial No.”, “2.Model barcode” and “3.Board barcode”) are inaccessible. -
Page 125: Software Upgrade
Maintenance 4.4.2.4 Software upgrade Upgrade the software of the data terminal through the condition given by the following menu. Target : Selects the object program from Main or keyboard*. Input port : Selects the input port from USB memory or Serial**. Maintenance No. - Page 126 Maintenance Input port : Serial After setting as described above, press * (asterisk) key to display the popup screen as shown at right. Select OK and press Enter key to set the data terminal to the receiving condition. Start sending the object file from the external computer with the upgrade software (NDZ-227 FLASH WRITER) as shown at right.
-
Page 127: Mf/Hf Maintenance Record
Japan 03 3779 1420 FAX +81 3 3779 1420 船名 Name of Vessel 識別番号 MMSI No. 総合番号 JSS-2150 System serial No. 機器名 項目 交換前 交換後 Unit name Item 機 器 製 造 番 号 MF/HF ト ラ ン シ ー バ... - Page 128 Maintenance 4-30...
-
Page 129: Appendix
APPENDIX 5. APPENDIX 5.1 Block diagram 5.1.1 NTD-2150 MF/HF TRANSCEIVER... -
Page 130: Cah-2415 Pa Unit
APPENDIX 5.1.2 CAH-2415 PA UNIT NAND... -
Page 131: Cmn-2250 Trx Unit
APPENDIX 5.1.3 CMN-2250 TRX UNIT LINE EXT MODEM KEY MODEM SEL TUNE KEY PA RDY PLL RST TX RDY TRX MAIN SCAN STOP IN SCAN STOP DISP KEY OUT DDS RST BK OUT F DAC RST BK ERR ERR485 D3R3V DUP BK OUT DUP BK DUP BK IN... -
Page 132: Cmj-2250 Wkr Modem Unit
APPENDIX 5.1.4 CMJ-2250 WKR MODEM UNIT... -
Page 133: Ncm-2150 Mf/Hf Controller
APPENDIX 5.1.5 NCM-2150 MF/HF CONTROLLER... -
Page 134: Ndz-227 Data Terminal
APPENDIX 5.1.6 NDZ-227 DATA TERMINAL... - Page 135 APPENDIX 5.1.7 NFC-2150 ANTENNA TUNER ( CFG-2150 MATCHING UNIT...
-
Page 136: Examples Of Inspection Data And Pa Efficiency
APPENDIX 5.2 Examples of inspection data and PA efficiency 定格出力試験 3.1.1.1 Rated output test 感度 周波数 電波型式 抑圧 スプリアス領域における不要発射 電力 空中線 Spurious radiation PA電圧 PA電流 出力 効率 搬送波 低減 電流 3.1.2.1 電力 (dB) Sensitivity Frequency Power Antenna Output Effici- Carrier 第2次... - Page 137 APPENDIX...
- Page 138 APPENDIX 5-10...
- Page 139 APPENDIX 5-11...
- Page 140 APPENDIX 5-12...
- Page 141 APPENDIX 5-13...
- Page 142 APPENDIX 5-14...
- Page 143 APPENDIX 5-15...
- Page 144 APPENDIX 5-16...
- Page 145 APPENDIX 5-17...
- Page 146 APPENDIX 5-18...
- Page 147 APPENDIX 5-19...
- Page 148 APPENDIX 5-20...
- Page 149 APPENDIX 5-21...
- Page 150 APPENDIX 5-22...
- Page 151 APPENDIX 5-23...
- Page 152 APPENDIX 5-24...
- Page 153 APPENDIX 5-25...
- Page 154 APPENDIX 5-26...
- Page 155 APPENDIX 5-27...
- Page 156 APPENDIX 5-28...
-
Page 157: Ndz-227 Data Terminal Dip Switch Setting Procedures
APPENDIX NDZ-227 データターミナル ディップスイッチ設定要領書 NDZ-227 Data terminal DIP switch setting procedures NDZ-227 データターミナルを装備の際は、以下に従ってディップスイッチほかの設定を行ってください。 To install NDZ-227 Data terminal, always set the DIP switch and other items as follows. MF/HF モードの設定 MF/HF mode selection Inmarsat-C mode a. NDZ-227 本体背面のディップスイッチを右記に従っ て MF/HF モードに設定してください。 (工場出荷時設定:インマルサットCモード)... -
Page 158: Ndz-227 Data Terminal Gasket Fitting Procedures
APPENDIX NDZ-227 データターミナル パッキン取付要領書 NDZ-227 Data terminal gasket fitting procedures NDZ-227 データターミナルのリアケースのパッキンが外れたときは、以下に従って取り付けてください。 If the gasket of the NDZ-227 Data terminal comes off, fit it again as follows. パ ッ キ ン の 先 端 と 末 端 を リ ア ケ ー ス 下 側 の 切 り 欠 き 中央を目印にして溝にはめる。... - Page 160 For further information,contact: Not use the asbestos http://www.jrc.co.jp Marine Service Department Telephone : +81-3-3492-1305 Facsimile : +81-3-3779-1420 e-mail : tmsc@jrc.co.jp AMSTERDAM Branch Telephone : +31-20-658-0750 Facsimile : +31-20-658-0755 e-mail : service@jrcams.nl SEATTLE Branch Telephone : +1-206-654-5644 Facsimile : +1-206-654-7030 e-mail : service@jrcamerica.com CODE No.7ZPJD0501 CODE No.7ZPJD0501...
Need help?
Do you have a question about the JSS-2150 and is the answer not in the manual?
Questions and answers