Table of Contents
Advertisement
Available languages
Available languages
Granitore - Granizadora - Granita machine
Gramolate-Geräts - Distributeur de granités
MANUALE ISTRUZIONI
Leggere attentamente queste istruzioni d'uso prima di utilizzare la macchina
MANUAL DE EMPLEO
Leer atentamente estas instrucciones de uso antes de utilizar la máquina
OPERATING INSTRUCTIONS
Read these operating instructions carefully before using the machine
BETRIEBSANLEITUNG
Diese Bedienungsanleitung ist vor dem ersten Gebrauch der Maschine
aufmerksam zu lesen
MODE D'EMPLOI
Lire attentivement ce mode d'emploi avant d'utiliser la machine
SL310005700 Ed.00 - 04-2011
Advertisement
Chapters
Table of Contents

Summary of Contents for Sencotel Granitore 1
- Page 1 Granitore - Granizadora - Granita machine Gramolate-Geräts - Distributeur de granités MANUALE ISTRUZIONI Leggere attentamente queste istruzioni d’uso prima di utilizzare la macchina MANUAL DE EMPLEO Leer atentamente estas instrucciones de uso antes de utilizar la máquina OPERATING INSTRUCTIONS Read these operating instructions carefully before using the machine BETRIEBSANLEITUNG Diese Bedienungsanleitung ist vor dem ersten Gebrauch der Maschine aufmerksam zu lesen...
- Page 2 Per le macchine marcate CE si riporta quanto segue: Ogni macchina riporta in targa dati le seguenti informazioni: Il costruttore dichiara sotto la propria esclusiva responsabilità che la macchina alla quale si riferisce il presente manuale (vedi targa dati applicata in copertina alla pre- xxxxxxxxxx xxxxxxxxxx Nome del costruttore...
- Page 3 Versione Italiana ............Pag.2 - IT Istruzioni originali Versión española ............Pag.2 - ES Traducción de las instrucciones originales English version ............Pag.2 - EN Translation of the original instructions Deutsche Version ............Pag.2 - DE Überesetung der originalanleitungen Version française ............Pag.2 - FR Traduction des instructions originales...
-
Page 4: Table Of Contents
7.8. Coperchio luminoso ...........17 4. MOVIMENTAZIONE E STOCCAGGIO ..6 7.8.1. Sostituzione della lampadina ......17 4.1. Imballo ..............6 7.9. Pulizia condensatore ..........18 7.9.1. Pulizia condensatore Granitore 1 - 1FF..18 4.2. Trasporto e movimentazione ........7 7.9.2. Pulizia condensatore 4.3. Stoccaggio ............7 Granitore 2-2FF-3-3FF ........18 5. -
Page 5: Informazioni Generali
Il costruttore non risponde di danni derivanti dalla mancata osservanza di que- 1. INFORMAZIONI GENERALI sto divieto. Il manuale istruzioni è parte integrante del prodotto acquistato e lo deve ac- compagnare sempre anche in caso di passaggio a successivi proprietari del 1.1. -
Page 6: Descrizione Macchina
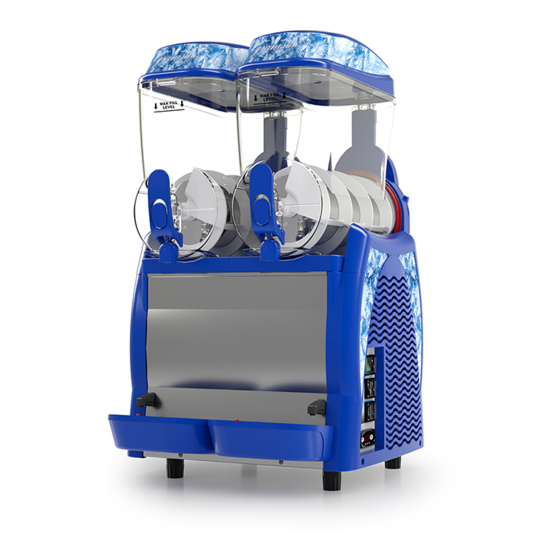
Granitore 2, identifi ca il Granitore a (2) due vasche; Granitore 3, identifi ca il Granitore a (3) tre vasche; Granitore 1 FF, identifi ca il Granitore a (1) una vasca con impianto frigorifero Fast Freeze; Granitore 2 FF, identifi ca il Granitore a (2) due vasche con impianto frigorifero Fast Freeze;... -
Page 7: Descrizione Funzioni Pannello Comandi
2.4. Descrizione funzioni pannello comandi I comandi della macchina sono sul pannello posto nella parte laterale. COMANDO MODELLO FUNZIONE Interruttore Generale: ha la funzione di comandare: - l’accensione della macchina; - lo spegnimento di tutte le funzioni presenti sulla macchina. TUTTI Interruttore Illuminazione coperchio: accende/spegne l’illuminazione (se presente) sui coperchi delle vasche. -
Page 8: Sicurezza
- installare la macchina sopra ad altre apparecchiature. 340 mm 540 mm 32 kg Granitore 1 FF 930 mm - l’utilizzo della macchina in atmosfera esplosiva, aggressiva o ad alta con- centrazione di polveri o sostanze oleose in sospensione nell’aria;... -
Page 9: Trasporto E Movimentazione
4.2. Trasporto e movimentazione 5. INSTALLAZIONE Assicurarsi che nessuno sosti nel raggio d’azione delle ope- Tutte le operazioni descritte nel capitolo 5 sono di esclusiva razioni di sollevamento e movimentazione del carico e, in con- competenza di tecnici specializzati che dovranno organizzare dizioni diffi... -
Page 10: Smaltimento Imballo
6. FUNZIONAMENTO Nota: nella parte superiore deve essere lasciato uno spazio di 25 cm (10 inch). Prima di procedere con l’avvio iniziale, il tecnico specializzato deve aver In fi g. 5 sono riportati gli spazi richiesti per gli accessi: verifi cato la corretta installazione della macchina. •... -
Page 11: Avvio Granitore
NON INTRODURRE LIQUIDI CALDI 6.2. Avvio Granitore (con temperatura maggiore di 25°C) Fig.8 Per semplicità sarà mostrato come azionare la sola vasca destra; per azionare le altre vasche è suffi ciente compiere la medesima sequenza d’operazioni sugli interruttori della vasca interessata. Interruttore in posizione “I”... -
Page 12: Avvio Granitore 1 (Termostato Elettronico)
è possibile scorrere i set-point “t1”; “t2” (Macchina 2 va- sche), “t1”; “t2”; “t3” (Macchina 3 vasche). 6.3. Avvio Granitore 1 (Termostato elettronico) - Quando il display visualizza il set-point che si vuole variare (“t1”o “t2” o “t3”), premere il tasto per visualizzare il valore del set-point. -
Page 13: Regolazione Consistenza Granita
ALLARMI In caso di sonda guasta il display visualizza i seguenti messaggi di allarme: Nota: Se durante l’utilizzo della macchina inavvertitamente si “A1”: Sonda vasca 1 scollegata dovesse spegnere il termostato elettronico, per riattivarlo pre- “A2”: Sonda vasca 1 in corto circuito mere il tasto . -
Page 14: Situazioni D'emergenza
6.9. Acc. opzionali (Temporizzatore) temperatura visualizzata dalla macchina. Con il prodotto in va- sca ancora da consumare, non togliere mai l’alimentazione alla macchina e non spegnere mai l’interruttore generale lasciando Il temporizzatore mostrato è indicativo. sempre la macchina accesa in funzione granita o frigobibita. Se la macchina non viene utilizzata con continuità, in caso di pro- dotti a base latte, occorre: - Spruzzare soluzione sanitizzante sull’area del rubinetto e sul... -
Page 15: Pulizia E Manutenzione
7. PULIZIA E MANUTENZIONE I materiali inossidabili, i materiali plastici, le gomme usate nella costruzione di dette parti e la loro particolare forma agevolano la pulizia, ma non impediscono la formazione di batteri e muffe La pulizia e la manutenzione dei componenti esterni della mac- in caso di pulizia insuffi... -
Page 16: Smontaggio Rubinetto
Successivamente spegnere l’interruttore miscelatore e l’interruttore generale; togliere la spina dalla presa di corrente. Fig.27 Fig.29 É vietato smontare il rubinetto se all’interno della vasca è pre- sente il prodotto o un qualsiasi altro liquido. 7.2. Smontaggio rubinetto 7.3. Smontaggio vasca e coperchio Prima d’iniziare a smontare la vasca si consiglia di procedere con lo smon- taggio del rubinetto;... -
Page 17: Lavaggio E Sanitizzazione Componenti
3. Utilizzando una spugna imbevuta di sanitizzante, sanitizzare la parte inferio- Fig.32 re del coperchio, avendo cura di non bagnare i contatti (X); 4. Lasciare agire per 30 minuti; 5. Risciacquare, solo la parte inferiore, due o più volte con una spugna pulita imbevuta di acqua fresca. -
Page 18: Ciclo Di Risciacquo
Premere la vasca in basso fi no al suo aggancio con il piano come mostrato in Installare la guarnizione (B) lubrifi candola con vaselina su tutta la superfi cie fi gura. indicata dalle frecce. Fig.39 Fig.36 Introdurre la coclea facendo agganciare la testina (C) con l’albero (D). Per montare il rubinetto procedere come segue: 1 lubrifi... -
Page 19: Pulizia Vasca Raccogli Gocce
7.7. Pulizia vasca raccogli gocce Fig.42 Giornalmente si deve procedere con lo svuotamento e la pulizia della vaschetta raccogli gocce. Fig.41 Attenzione: durante le operazioni di pulizia, fare attenzione a non danneggiare (piegare, rompere, ecc...) i contatti; in caso di danneggiamento si può... -
Page 20: Pulizia Condensatore
L’utilizzo della macchina è vietato quando anche un solo pan- nello (frontale, posteriore o laterale) non sia adeguatamente montato. La pulizia del condensatore è vietata all’operatore. 7.9.1. Pulizia condensatore Granitore 1 - 1FF Fig.47 I carter devono essere smontati utilizzando un cacciavite idoneo. -
Page 21: Manutenzione Periodica
8. DEMOLIZIONE Dopo aver accuratamente pulito il condensatore, rimontare tutti i componenti del carter. Le apparecchiature elettriche ed elettroniche devono essere smaltite secondo la Direttive Europea 2002/96/CE. 7.10. Manutenzione periodica Tale apparecchiature NON possono essere smaltite secondo il nor- male fl usso dei rifi uti solidi urbani, ma devono essere raccolti se- paratamente per ottimizzare il recupero e il riciclaggio dei materiali La macchina deve essere periodicamente, almeno una volta con i quali sono costruiti. -
Page 22: Problemi - Cause - Rimedi
9. PROBLEMI - CAUSE - RIMEDI Problemi Cause Rimedi La macchina non si accende. Interruttore generale spento (in posizione “O”). (Cap.6) Premere l’interruttore sulla posizione “I”. Spina non inserita. Inserire la spina in una presa conforme. Il rubinetto perde. Tappo rubinetto non lubrifi cato. (Fig.38) Lubrifi... - Page 23 10. SCHEMI ELETTRICI DI PRINCIPIO (GRANITORE 1 - 1 FF) t° 230 Volt (12 V a.c.) t° 115 Volt SL310005700 Ed.00 - 04-2011 - 21 _IT-...
-
Page 24: Schemi Elettrici Di Principio
SCHEMI ELETTRICI DI PRINCIPIO (GRANITORE 1 - 1 FF CON TERMOSTATO) 230 Volt SCHEMI ELETTRICI DI PRINCIPIO (GRANITORE 1 - 1 FF CON TERMOSTATO + TIMER) - 22 _IT- SL310005700 Ed.00 - 04-2011... - Page 25 SCHEMI ELETTRICI DI PRINCIPIO (GRANITORE 2 - 2FF) 230 Volt 115 Volt SL310005700 Ed.00 - 04-2011 - 23 _IT-...
- Page 26 SCHEMI ELETTRICI DI PRINCIPIO (GRANITORE 2 - 2 FF CON TERMOSTATO) 230 Volt SCHEMI ELETTRICI DI PRINCIPIO (GRANITORE 2 - 2 FF CON TERMOSTATO + TIMER) 230 Volt SCHEMI ELETTRICI DI PRINCIPIO (GRANITORE 3) / 230V - 24 _IT- SL310005700 Ed.00 - 04-2011...
- Page 27 SCHEMI ELETTRICI DI PRINCIPIO (GRANITORE 3 CON TERMOSTATO) 230 Volt SCHEMI ELETTRICI DI PRINCIPIO (GRANITORE 3 CON TERMOSTATO + TIMER) SCHEMI ELETTRICI DI PRINCIPIO (GRANITORE 3FF) / 230V SL310005700 Ed.00 - 04-2011 - 25 _IT-...
- Page 28 SCHEMI ELETTRICI DI PRINCIPIO (GRANITORE 3 FF CON TERMOSTATO) 230 Volt SCHEMI ELETTRICI DI PRINCIPIO (GRANITORE 3 FF CON TERMOSTATO + TIMER) SCHEMI ELETTRICI DI PRINCIPIO (GRANITORE 3) / 115V - 26 _IT- SL310005700 Ed.00 - 04-2011...
- Page 29 SCHEMI ELETTRICI DI PRINCIPIO (GRANITORE 3FF) / 115V LEGENDA Voce Descrizione D.G.B DEVIATORE GRANITA/BIBITA VASCA DGB.1 DEVIATORE GRANITA/BIBITA VASCA 1 DGB.2 DEVIATORE GRANITA/BIBITA VASCA 2 DGB.3 DEVIATORE GRANITA/BIBITA VASCA 3 ELETTROVALVOLA VASCA 1 ELETTROVALVOLA VASCA 2 ELETTROVALVOLA VASCA 3 FINECORSA REGOLAZIONE VASCA Fc.Tx FINECORSA TEMPORIZZATORE FINECORSA REGOLAZIONE VASCA 1...
- Page 30 - 28 _IT- SL310005700 Ed.00 - 04-2011...
-
Page 31: Garanzia
GARANZIA CONDIZIONI VALIDE SOLO IN ITALIA Per avere diritto alla garanzia si raccomanda dì seguire strettamente le istruzioni contenute nel manuale in dotazione circa il corretto e sicuro uso delle apparecchiature. Il costruttore garantisce la qualità dei materiali e del sistema produttivo impiegati nella realizzazione delle proprie macchine, le quali vengono tutte sottoposte a idonei test di verifi... - Page 32 4.2. Transporte y desplazamiento .......7 7.8.1. Sustitución de la bombilla ......17 4.3. Almacenamiento ..........7 7.9. Limpieza del condensador .........18 7.9.1. Limpieza del cond. Granitore 1-1FF ....18 5. INSTALACIÓN ..........7 7.9.2. Limpieza del cond. Granitore 2/2FF-3/3FF ..18 5.1. Lista de accesorios de serie .........7 7.10.
-
Page 33: Informac. De Carácter General
1. INFORMAC. DE CARÁCTER GENERAL Los operadores no deben ejecutar operaciones que están reservadas a los técnicos especializados. El fabricante declinará toda responsabilidad por daños que deriven de la inob- 1.1. Fabricante servancia de la precedente prohibición. El manual de instrucciones es parte integrante de la máquina adquirida y debe acompañarla siempre, incluso en caso de entrega de la misma a sucesivos Las indicaciones relativas al fabricante se encuentran en la placa de da- propietarios. -
Page 34: Descripción De La Máquina
Granitore 2, identifi ca la Granizadora de (2) dos depósitos; Granitore 3, identifi ca la Granizadora de(3) tres depósitos; Granitore 1 FF, identifi ca la Granizadora de (1) dos depósitos con instalación frigorífi ca Fast Freeze; Granitore 2 FF, identifi ca la Granizadora de (2) dos depósitos con instalación Fig.2... -
Page 35: Descripción Funciones Del Panel De Mandos
2.4. Descripción funciones del panel de mandos Los mandos de la máquina se encuentran en el respectivo panel situado en su parte lateral. MANDO MODELO FUNCION Interruptor General: tiene la función de mandar: - el encendido de la máquina; - el apagado de todas las funciones presentes en la máquina. TODOS Interruptor iluminación tapa: para encender/apagar la iluminación (si presen- te) sobre las tapas de los depósitos. -
Page 36: Seguridad
540 mm 930 mm 32 kg - instalar la máquina sobre otros aparatos; - el uso de la máquina en ambientes potencialmente explosivos, agresivos Granitore 1 FF 340 mm 540 mm 930 mm 32 kg o con alta concentración de polvos o sustancias aceitosas en suspensión... -
Page 37: Transporte Y Desplazamiento
5. INSTALACIÓN 4.2. Transporte y desplazamiento Controlar que ninguna persona esté presente dentro del radio Todas las operaciones ilustradas en el capítulo 5 son de exclu- operativo de elevación y desplazamiento de la carga y, en situa- siva competencia de técnicos especializados, los que deberán ciones de particular difi... -
Page 38: Tratamiento Del Embalaje
6. FUNCIONAMIENTO Nota: Dejar un espacio de 25 cm (10 pulgadas) en el lado su- perior. Antes de efectuar la primera puesta en funcionamiento el técnico especia- En la fi g. 5 se indican los espacios requeridos para los accesos: lizado deberá... -
Page 39: Arranque Granitore
6.2. Arranque Granitore NO INTRODUCIR LÍQUIDOS CALIENTES (con temperaturas superiores a 25 °C) Fig.8 Para simplifi car la explicación, se ilustrará sólo el accionamiento del depósito derecho; para accionar los restantes basta ejecutar la misma secuencia de operaciones en los interruptores de cada uno de ellos. Interruptor en posición “I”: máquina en tensión. -
Page 40: Puesta En Marcha Granizadora
Para obtener una BEBIDA FRÍA Fig.15 Desviador : en pos. “II” sistema de refrigeración en función (bebida). Fig.13 Después de 3 segundos desde la presión de la última tecla el dato es me- morizado y la pantalla electrónica muestra la temperatura del producto en el depósito. -
Page 41: Regulación De La Consistencia Del Granizado
ALARMAS En caso de sonda averiada la pantalla electrónica muestra los siguientes men- Nota: Si durante el empleo de la máquina inadvertidamente se sajes de alarma: tuviera que apagar el termostato electrónico, para reactivarlo apretar la tecla . Si el termostato electrónico ya no se reac- “A1”: Sonda depósito 1 desconectada tivara, apagar la máquina y dirigirse al centro de asistencia. -
Page 42: Situaciones De Emergencia
6.9. Accesorios opcionales (Temporizador) la temperatura visualizada por la máquina. Con el producto en el depósito todavía por consumir, no quitar nunca la corriente a la máquina y no apagar nunca el interruptor general, dejando El temporizador mostrado es solo un ejemplo. la máquina encendida en la función granizado o bebidas frías. -
Page 43: Limpieza Y Mantenimiento
7. LIMPIEZA Y MANTENIMIENTO El uso de materiales inoxidables, plásticos y de gomas para la fabricación de dichos componentes, así como su forma particu- lar, facilitan la ejecución de la limpieza pero no impiden la for- La limpieza y el mantenimiento de los componentes externos mación de bacterias y moho en caso de limpieza insufi... -
Page 44: Desmontaje Del Grifo
Por último, disponer en Off el interruptor mezclador y el interruptor general ; desconectar el enchufe respecto de la toma de corriente. Fig.27 Fig.29 7.2. Desmontaje del grifo Está prohibido desmontar el grifo con presencia de producto o de cualquier otro líquido en el depósito. Antes de desmontar el depósito es conveniente desmontar el grifo;... -
Page 45: Lavado E Higienización De Los Componentes
3. con una esponja humedecida con desinfectante desinfecte la parte inferior Fig.32 de la tapa; cuidado con no mojar los contactos (X) 4. deje actuar durante 30 minutos 5. enjuagar dos veces o más, sólo la parte inferior, con una esponja limpia humedecida con agua fresca. -
Page 46: Ciclo De Enjuague
Instalar la junta (B) lubricándola con vaselina en toda la superfi cie indicada Presionar el depósito hacia abajo hasta conseguir su enganche con la bandeja, mediante las fl echas. tal como se ilustra en la fi gura. Fig.39 Fig.36 Para montar el grifo, proceder de la siguiente forma: Introducir la pala espiral haciendo enganchar el cabezal (C) en el eje (D). -
Page 47: Limpieza De La Cubeta Receptora De Goteo
7.7. Limpieza de la cubeta receptora de goteo Fig.42 El vaciado y limpieza de la cubeta receptora de goteo deberá efectuarse dia- riamente. Fig.41 Atención: durante las operaciones de limpieza, poner atención en evitar de dañar (torcer, romper, etc.) los contactos; eventua- Nota. -
Page 48: Limpieza Del Condensador
Está prohibido usar la máquina incluso con un solo panel (fron- tal, trasero o lateral) no correctamente montado. La limpieza del condensador no debe ser efectuada por el operador. 7.9.1. Limpieza del condensador Granitore 1-1FF Fig.47 Utilizar un destornillador idóneo para desmontar los paneles de protección. -
Page 49: Mantenimiento Periódico
8. DESGUACE Después de haber limpiado detenidamente el condensador, vuelva a montar el panel lateral Los aparatos eléctricos y electrónicos deben ser eliminados de conformidad con la Directiva Europea 2002/96/CE. 7.10. Mantenimiento periódico Estos aparatos NO pueden ser eliminados según el fl ujo normal de residuos sólidos urbanos , sino deben ser recogidos separada- El aparato tiene que ser controlado periódicamente, por lo me- mente para optimizar la recuperación y el reciclado de los materia-... -
Page 50: Problemas, Causas Y Remedios
9. PROBLEMAS, CAUSAS Y REMEDIOS Problemas Causas Remedios La máquina no se enciende. Interruptor general en Off (en posición “O”). (Cap.6) Disponer el interruptor en posición “I”. Enchufe no conectado. Conectar el enchufe a una toma adecuada. Grifo con pérdida. Tapón del grifo no lubricado. - Page 51 10. ESQUEMAS ELÉCTRICOS NO ESPECIFICADOS (GRANIZADORA 1 - 1 FF) t° 230 Volt (12 V a.c.) t° 115 Volt SL310005700 Ed.00 - 04-2011 - 21 _ES-...
- Page 52 ESQUEMAS ELÉCTRICOS NO ESPECIFICADOS (GRANIZADORA 1 - 1 FF CON TERMOSTATO ELECTRÓNICO) 230 Volt ESQUEMAS ELÉCTRICOS NO ESPECIFICADOS (GRANIZADORA 1 - 1 FF CON TERMOSTATO ELECTRÓNICO +TEMPORIZADOR) - 22 _ES- SL310005700 Ed.00 - 04-2011...
- Page 53 ESQUEMAS ELÉCTRICOS NO ESPECIFICADOS (GRANIZADORA 2 - 2FF) 230 Volt 115 Volt SL310005700 Ed.00 - 04-2011 - 23 _ES-...
- Page 54 ESQUEMAS ELÉCTRICOS NO ESPECIFICADOS (GRANIZADORA 2 - 2 FF CON TERMOSTATO ELECTRÓNICO) 230 Volt ESQUEMAS ELÉCTRICOS NO ESPECIFICADOS (GRANIZADORA 2 - 2 FF CON TERMOSTATO ELECTRÓNICO +TEMPORIZADOR) 230 Volt ESQUEMAS ELÉCTRICOS NO ESPECIFICADOS (GRANIZADORA 3) / 230V - 24 _ES- SL310005700 Ed.00 - 04-2011...
- Page 55 ESQUEMAS ELÉCTRICOS NO ESPECIFICADOS (GRANIZADORA 3 CON TERMOSTATO ELECTRÓNICO) 230 Volt ESQUEMAS ELÉCTRICOS NO ESPECIFICADOS (GRANIZADORA 3 CON TERMOSTATO ELECTRÓNICO + TEMPORIZADOR) ESQUEMAS ELÉCTRICOS NO ESPECIFICADOS (GRANIZADORA 3FF) / 230V SL310005700 Ed.00 - 04-2011 - 25 _ES-...
- Page 56 ESQUEMAS ELÉCTRICOS NO ESPECIFICADOS (GRANIZADORA 3FF CON TERMOSTATO ELECTRÓNICO) 230 Volt ESQUEMAS ELÉCTRICOS NO ESPECIFICADOS (GRANIZADORA 3FF CON TERMOSTATO ELECTRÓNICO + TEMPORIZADOR) ESQUEMAS ELÉCTRICOS NO ESPECIFICADOS (GRANIZADORA 3) / 115V - 26 _ES- SL310005700 Ed.00 - 04-2011...
- Page 57 ESQUEMAS ELÉCTRICOS NO ESPECIFICADOS (GRANIZADORA 3FF) / 115V LEYENDA Sigla Descripción D.G.B DESVIADOR GRANIZADO/BEBIDA CUBA DGB.1 DESVIADOR GRANIZADO/BEBIDA CUBA 1 DGB.2 DESVIADOR GRANIZADO/BEBIDA CUBA 2 DGB.3 DESVIADOR GRANIZADO/BEBIDA CUBA 3 ELECTROVÁLVULA CUBA 1 ELECTROVÁLVULA CUBA 2 ELECTROVÁLVULA CUBA 3 FINAL DE CARRERA REGULACIÓN CUBA Fc.Tx FINAL DE CARRERA TEMPORIZADOR FINAL DE CARRERA REGULACIÓN CUBA 1...
- Page 59 TARJETA DE GARANTÍA Pol.Ind. Rafelcofer - C/ Tramuntana, 10 46716 - RAFELCOFER (Valencia - España) e-mail l info@sencotel.es Tel. 96 280 11 12 - Fax 96 289 94 10 DATOS DEL CLIENTE Nombre: Domicilio: Nº: Localidad: Provincia: C.P.: Teléfono: Fax: MODELO: Nº...
- Page 61 TARJETA DE GARANTÍA Pol.Ind. Rafelcofer - C/ Tramuntana, 10 46716 - RAFELCOFER (Valencia - España) e-mail l info@sencotel.es Tel. 96 280 11 12 - Fax 96 289 94 10 DATOS DEL CLIENTE Nombre: Domicilio: Nº: Localidad: Provincia: C.P.: Teléfono: Fax: MODELO: Nº...
- Page 64 7.8.1. Bulb replacement ...........17 4.2. Conveyance and handling ........7 7.9. Cleaning the condenser ........18 4.3. Storage ..............7 7.9.1. Cleaning the Granitore 1/1FF condenser ..18 7.9.2. Cleaning Granitore 2/2 FF - 3/3 FF cond..18 5. INSTALLATION ...........7 7.10. Periodic maintenance .........19 5.1.
- Page 65 1. GENERAL INFORMATION The manufacturer will not be liable for any damage or injury caused as a result of failure to comply with this rule. The instruction manual is an integral part of the product purchased and must 1.1. Manufacturer therefore be handed over to any subsequent owners.
- Page 66 Granitore 2, identifi es a Granita machine with two (2) bowls; Granitore 3, identifi es a Granita machine with three (3) bowls; Granitore 1 FF, identifi es a Granita machine with one (1) bowl and Fast Freeze refrigeration system; Fig.2 Granitore 2 FF, identifi...
- Page 67 2.4. Control panel description and functions The machine controls are located on the side control panel. COMMAND MODEL FUNCTION Main switch: its function is to command: - the starting of the machine; - the switching off of all the functions present on the machine. Lid light switch: to turn on/off light (if present) on the bowl lids.
- Page 68 Granitore 1 340 mm 540 mm 930 mm 32 kg faculties: under the infl uence of drugs, alcohol, etc. Granitore 1 FF 340 mm 540 mm 930 mm 32 kg - install the machine on top of other equipment. Granitore 2...
- Page 69 5. INSTALLATION 4.2. Conveyance and handling Make sure that no one is stationed within range of lifting and All of the operations described in chapter 5 may be carried handling operations. In diffi cult conditions, specialized person- out exclusively by specialized technicians, who must organ- nel should be appointed to oversee the movements of the ma- ize all the operational sequences and use suitable equip- chine.
- Page 70 6. OPERATION Note: Leave a 25 cm (10 inches) space in the upper part. Before the machine may be started up for the fi rst time, specialized tech- Fig. 5 shows the clearances required for access: nical personnel must check that it functions properly. •...
- Page 71 6.2. Starting a Granitore NEVER INTRODUCE HOT LIQUIDS (with temperatures exceeding 25°C) Fig.8 Fig.8 For the sake of simplicity only the operation of the right bowl will be illustrated; to operate the other bowls simply carry out the same sequence of steps on the switches of the bowl in question.
- Page 72 To dispense COLD DRINKS: Fig.15 Changeover switch : in position “II” refrigeration system on (cooling mode). Fig.13 3 seconds after the last key is pressed, the setting is stored to memory and the display will show the temperature of the product in the tank. ALARMS In case of probe failure, the display will read A1.
- Page 73 ALARMS In case of probe failure, the display will show the following alarm messages: Note: If while using machine, the electronic thermostat should switch off suddenly, to start it again press the . key. If the “A1”: Tank 1 probe disconnected electronic thermostat should not switch on again, switch off the “A2”: Tank 1 probe short circuit machine and contact your nearest assistance centre.
- Page 74 6.9. Optionals (Timer) is still product to be used up in the hopper, never disconnect the machine from the mains power or switch off the machine; leave the machine on in granita or refrigerated drinks mode. The timer shown is given as an indication only. If the machine is not used continuously, when used with milk- based products, it is necessary to: - spray sanitizer solution around the spigot area and on the...
- Page 75 7. CLEANING AND MAINTENANCE The stainless materials, plastic and rubber used to manufacture said parts, as well as their particular shape, make them easy to clean but do not prevent the build-up of germs and mold in the Before undertaking any cleaning and maintenance of external event of inadequate cleaning.
- Page 76 After that, put off both the main switch and mixer switch and unplug the ma- chine. Fig.27 Fig.29 7.2. Disassembling the dispensing tap Never disassemble the tap if the product or any other liquid is present inside the bowl. Before removing the bowl it is recommended to disassemble the tap; after cleaning the tap must not be reapplied until the bowl has been correctly posi- tioned in its seat.
- Page 77 3. Using a sponge dipped in sanitising solution, sanitise the bottom part of the Fig.32 lid, taking care not to wet the contacts (X); 4. Allow to act for 30 minutes; 5. Rinse twice or more, only the bottom part, with a clean sponge soaked in fresh water.
- Page 78 Apply seal (B), lubricating the entire surface indicated by the arrows with Vase- Press the bowl downward until it engages the surface as shown in the fi gure. line. Fig.39 Fig.36 Introduce the auger, engaging head (C) with shaft (D). Follow these instructions to refi...
- Page 79 7.7. Cleaning the drip tray Fig.42 The drip tray should be emptied and cleaned daily. Fig.41 Warning: during the cleaning operations, take care not to dam- Note: all of the drip trays present in the machine should be age (bend, break, etc.) the contacts; any damage might cause a cleaned.
- Page 80 It is forbidden to use the machine when even only one panel (front, rear or side) is not set properly in place. It is prohibited for the operator to clean the condenser. 7.9.1. Cleaning the Granitore 1/1FF condenser Fig.47 The safety guards must be removed by means of a suitable screwdriver.
- Page 81 8. SCRAPPING After having thoroughly cleaned the condenser, reassemble all the components. Electric and electronic equipment must be disposed of in ac- 7.10. Periodic maintenance cordance with European Directive 2002/96/EC. Such equipment may not be disposed of as normal municipal solid waste but must rather be separately collected to optimise recovery The machine must be periodically checked (at least once a and recycling of the materials used to manufacture them.
- Page 82 9. TROUBLESHOOTING Problem Cause Remedy The machine does not turn on. The main switch is off (positioned on “O”). (Chap.6) Press the switch into position “I”. The machine is not plugged in. Insert the plug in a suitable outlet. The tap leaks. The tap plug is not lubricated.
- Page 83 10. BASIC WIRING DIAGRAMS (GRANITORE 1 - 1 FF) t° 230 Volt (12 V a.c.) t° 115 Volt SL320005700 Ed.00 - 04-2011 - 21 _EN-...
- Page 84 BASIC WIRING DIAGRAMS (GRANITA MAKER 1 - 1 FF WITH ELECTRONIC THERMOSTAT) 230 Volt BASIC WIRING DIAGRAMS (GRANITA MAKER 1 - 1 FF WITH ELECTRONIC THERMOSTAT +TIMER) - 22 _EN- SL320005700 Ed.00 - 04-2011...
- Page 85 BASIC WIRING DIAGRAMS (GRANITORE 2 - 2FF) 230 Volt 115 Volt SL320005700 Ed.00 - 04-2011 - 23 _EN-...
- Page 86 BASIC WIRING DIAGRAMS (GRANITA MAKER 2 - 2 FF WITH ELECTRONIC THERMOSTAT) 230 Volt BASIC WIRING DIAGRAMS (GRANITA MAKER 2 - 2 FF WITH ELECTRONIC THERMOSTAT +TIMER) 230 Volt BASIC WIRING DIAGRAMS (GRANITORE 3) / 230V - 24 _EN- SL320005700 Ed.00 - 04-2011...
- Page 87 BASIC WIRING DIAGRAMS (GRANITA MAKER 3 WITH ELECTRONIC THERMOSTAT) 230 Volt BASIC WIRING DIAGRAMS (GRANITA MAKER 3 WITH ELECTRONIC THERMOSTAT +TIMER) BASIC WIRING DIAGRAMS (GRANITORE 3FF) / 230V SL320005700 Ed.00 - 04-2011 - 25 _EN-...
- Page 88 BASIC WIRING DIAGRAMS (GRANITA MAKER 3 FF WITH ELECTRONIC THERMOSTAT) 230 Volt BASIC WIRING DIAGRAMS (GRANITA MAKER 3 FF WITH ELECTRONIC THERMOSTAT +TIMER) BASIC WIRING DIAGRAMS (GRANITORE 3) / 115V - 26 _EN- SL320005700 Ed.00 - 04-2011...
- Page 89 BASIC WIRING DIAGRAMS (GRANITORE 3FF) / 115V LEGEND Item Description D.G.B SLUSH/DRINK SWITH DGB.1 TANK 1 SLUSH/DRINK SWITH DGB.2 TANK 2 SLUSH/DRINK SWITH DGB.3 TANK 3 SLUSH/DRINK SWITH TANK 1 SOLENOID VALVE TANK 2 SOLENOID VALVE TANK 3 SOLENOID VALVE LIMIT SWITCH ADJUSTMENT Fc.Tx TIMER LIMIT SWITCH...
- Page 90 4.2. Transport und Lagerung ........7 7.8.1. Lampenersetzung ..........17 4.3. Lagerung ..............7 7.9. Reinigung des Kondensators ......18 7.9.1. Reinigung des Kond. Granitore 1/1FF ...18 5. INSTALLATION ...........7 7.9.2. Reinigung des Kond. Granitore 2/2FF-3/3FF ..18 5.1. Liste des mitgelieferten Zubehörs ......7 7.10. Turnusmäßige Wartung ........19 5.2.
-
Page 91: Allgemeine Informationen
1. ALLGEMEINE INFORMATIONEN Der Hersteller haftet nicht für Schäden, die wegen Missachtung dieses Verbots entstanden sind. Die Betriebsanleitung ist Bestandteil des gekauften Produkts und muss dieses immer, auch im Falle eines Besitzerwechsels, begleiten. 1.1. Hersteller 1.3.3. Aufbewahrung Die Angaben zum Hersteller befi nden sich auf der ersten und/oder letzten Seite des Handbuchs. -
Page 92: Maschinenbeschreibung
Granitore 1, Gramolate-Gerät mit (1) einem Behälter; Granitore 2, Gramolate-Gerät mit (2) zwei Behältern; Granitore 3, Gramolate-Gerät mit (3) drei Behältern; Granitore 1 FF, Gramolate-Gerät mit (1) einem Behälter und Kühlanlage Fast Freeze; Granitore 2 FF, Gramolate-Gerät mit (2) zwei Behältern und Kühlanlage Fast Abb.2 Freeze;... -
Page 93: Beschreibung Der Funktionen Der Bedienertafel
2.4. Beschreibung der Funktionen der Bedienertafel Die Bedienelemente für die Maschine befi nden sich auf der seitlich angebrachten Bedientafel. BEFEHL MODELL FUNKTION Hauptschalter: hat die Steuerfunktionen: - Einschalten der Maschine; - Ausschalten aller Funktionen der Maschine. ALLE Schalter Deckelbeleuchtung: schaltet die Beleuchtung (falls vorhanden) der Behälterdeckel ein. -
Page 94: Sicherheit
540 mm 930 mm 32 kg - die Maschine in schlechtem Gesundheitszustand, oder unter Einfl uss von Drogen, Alkohol, Medikamenten usw. zu benutzen, Granitore 1 FF 340 mm 540 mm 930 mm 32 kg - die Maschine auf anderen Maschinen zu installieren,... -
Page 95: Transport Und Lagerung
4.2. Transport und Lagerung INSTALLATION Sicherstellen, dass sich beim Heben und Handhaben der Last Für alle in Kapitel 5 beschriebenen Arbeitsgänge ist aus- niemand im Aktionsbereich aufhält. Unter schwierigen Bedin- schließlich Fachpersonal zugelassen, das alle Arbeitsläufe gungen Personal für die Überwachung der auszuführenden Be- und den Einsatz von entsprechenden Mitteln zum Arbeiten wegungen bereitstellen. -
Page 96: Entsorgen Der Verpackung
6. BETRIEB Hinweis: Im oberen Teil müssen 25 cm (10 Zoll) frei gelassen werden. Vor der ersten Inbetriebnahme ist die korrekte Installation der Maschine In Abb. 5 ist der Platzbedarf für den Zugang angegeben: durch einen Fachtechniker zu prüfen. • zur Bedientafel auf der rechten Seite; •... -
Page 97: Start Granitore
6.2. Start Granitore KEINE WARME FLÜSSIGKEIT EINGIESSEN (mit einer Temperatur von mehr als 25°C) Abb.8 Der Einfachheit halber wird nur gezeigt, wie der rechte Behälter zu betätigen ist; für die Bedienung der anderen Behälter braucht nur dieselbe Schrittfolge an den Schaltern des betreffenden Behälters ausgeführt zu werden. Schalter in Stellung “I”: An der Maschine liegt Spannung an. -
Page 98: Start Granita-Maschine
Für ein KALTGETRÄNK Abb.15 Wechselschalter : in Pos. “II” Kühlanlage in Betrieb (Getränk). Abb.13 3 Sekunden nach Betätigung der letzten Taste ist der Wert gespeichert und das Display zeigt wieder die Temperatur des Produkts im Behälter an. ALARME Bei einer Störung der Sonde zeigt das Display die Meldung A1 an. Der Regelausgang und die Programmierung sind in diesem Fall gesperrt. -
Page 99: Einstellung Der Festigkeit Der Gramolate
ALARME Bei einer Störung der Sonde zeigt das Display die folgenden Alarmmeldungen Hinweis: Sollte sich während des Betriebs der Maschine plötz- lich der elektronische Thermostat abschalten, ist die Taste zu betätigen, um ihn wieder zu aktivieren. Sollte es nicht mög- “A1”: Sonde Behälter 1 nicht angeschlossen lich sein, den Thermostaten wieder zu aktivieren, die Maschine ausschal- “A2”: Sonde Behälter 1 kurzgeschlossen... -
Page 100: Notsituationen
6.9. Sonderzubehör (Zeitschaltuhr) Maschine angezeigten Temperatur entspricht. Solange das noch zu verzehrende Produkt sich im Behälter befi ndet, darf die Stromversorgung der Maschine nicht unterbrochen und Die gezeigte Zeitschaltuhr hat nur Beispielcharakter. der Hauptschalter nicht ausgeschaltet werden. Die Maschine muss in der Funktion Granita oder Getränkekühlung belas- sen werden. -
Page 101: Reinigung Und Wartung
7. REINIGUNG UND WARTUNG Die Maschinenteile bestehen aus rostfreien Materialen, Kunst- stoff und Gummi und sind auch durch ihre besondere Form sehr reinigungsfreundlich. Sie verhindern jedoch nicht die Bildung Für die Reinigung und Wartung der Außenteile der Maschine von Bakterien und Schimmel bei mangelhafter Reinigung. den Ein-/Ausschalter auf -0- stellen und den Netzstecker zie- hen. -
Page 102: Ausbau Des Hahns
Anschließend den Rührwerkschalter und den Hauptschalter ausschalten und den Stecker abziehen. Abb.27 Abb.29 Es ist verboten, den Hahn auszubauen, solange das Produkt 7.2. Ausbau des Hahns oder irgendeine andere Flüssigkeit im Behälter ist. Es wird empfohlen, vor dem Ausbau des Behälters den Hahn auszubauen; an- schließend darf der Hahn erst nach der vorschriftsmäßigen Aufstellung des Be- 7.3. -
Page 103: Reinigung Und Desinfektion Der Teile
3. Mit einem mit Desinfektionsmittel getränkten Schwamm die Unterseite des Abb.32 Deckels desinfi zieren, dabei darauf achten, dass die Kontakte (X) nicht nass werden. 4. 30 Minuten einwirken lassen. 5. Nur die Unterseite mit einem mit frischem Wasser getränkten Schwamm zwei Mal oder öfters nachspülen. -
Page 104: Spülzyklus
Die Dichtung (B) anbringen und auf der ganzen durch die Pfeile bezeichneten Den Behälter nach unten drücken, bis er auf der Aufl agefl äche einrastet, wie in Fläche mit Vaseline einfetten. der Abbildung gezeigt. Abb.39 Abb.36 Die Rührschnecke einführen und den Kopf (C) auf die Welle (D) aufsetzen. Zum Anbringen des Hahns wie folgt vorgehen: 1 den Verschluss (Y) in geeigneter Weise mit der mitgelieferten Vaseline ein- Abb.37... -
Page 105: Reinigung Der Tropfschale
7.7. Reinigung der Tropfschale Abb.42 Die Tropfschale muss täglich geleert und gereinigt werden. Abb.41 Achtung: Bei den Reinigungsarbeiten darauf achten, dass die Kontakte nicht beschädigt (verbogen, abgebrochen) werden; Anmerkung: Alle an der Maschine vorhandenen Schalen reini- bei Beschädigung kann es zu Funktionsstörungen des Deckels gen. -
Page 106: Reinigung Des Kondensators
Wenn auch nur eine Platte (vorne, hinten oder seitlich) nicht korrekt montiert ist, darf die Maschine nicht in Betrieb gesetzt werden. Die Reinigung des Kondensators ist nicht Aufgabe des Benutzers. 7.9.1. Reinigung des Kond. Granitore 1/1FF Fig.47 Die Schutzabdeckungen mit einem geeigneten Schraubenzieher abschrau- ben. -
Page 107: Turnusmäßige Wartung
8. ABBAU Nach gründlicher Reinigung des Kondensators alle Teile der Schutzabdeckung wieder anbringen. Elektrische und elektronische Geräte müssen nach der euro- päischen Richtlinie 2002/96/EG entsorgt werden. 7.10. Turnusmäßige Wartung Solche Geräte dürfen NICHT zusammen mit dem normalen Haus- müll entsorgt werden, sondern müssen getrennt gesammelt wer- Die Maschine muss regelmäßig, und zwar mindestens ein Mal den, um eine optimale Rückgewinnung und Wiederverwertung der im Jahr, von einem Fachmann überprüft werden. - Page 108 PROBLEME - URSACHEN - MASSNAHMEN Probleme Ursachen Maßnahmen Die Maschine schaltet sich nicht ein. Hauptschalter aus (in Stellung “O”). (Kap.6) Den Schalter auf “I” stellen. Stecker nicht eingesteckt. Den Stecker an eine passende Steckdose anschließen. Der Hahn ist nicht dicht. Hahnverschluss nicht eingefettet.
- Page 109 10. STROMLAUFPLÄNE (GRANITA-MASCHINE 1 - 1 FF) t° 230 Volt (12 V a.c.) t° 115 Volt SL310005700 Ed.00 - 04-2011 - 21 _DE-...
-
Page 110: Stromlaufpläne
STROMLAUFPLÄNE (GRANITA-MASCHINE 1 - 1 FF MIT ELEKTRONISCHEM THERMOSTAT) 230 Volt STROMLAUFPLÄNE (GRANITA-MASCHINE 1 - 1 FF MIT ELEKTRONISCHEM THERMOSTAT +TIMER) - 22 _DE- SL310005700 Ed.00 - 04-2011... - Page 111 STROMLAUFPLÄNE (GRANITA-MASCHINE 2 - 2FF) 230 Volt 115 Volt SL310005700 Ed.00 - 04-2011 - 23 _DE-...
- Page 112 STROMLAUFPLÄNE (GRANITA-MASCHINE 2 - 2 FF MIT ELEKTRONISCHEM THERMOSTAT) 230 Volt STROMLAUFPLÄNE (GRANITA-MASCHINE 2 - 2 FF MIT ELEKTRONISCHEM THERMOSTAT +TIMER) 230 Volt STROMLAUFPLÄNE (GRANITA-MASCHINE 3) / 230V - 24 _DE- SL310005700 Ed.00 - 04-2011...
- Page 113 STROMLAUFPLÄNE (GRANITA-MASCHINE 3 MIT ELEKTRONISCHEM THERMOSTAT) 230 Volt STROMLAUFPLÄNE (GRANITA-MASCHINE 3 MIT ELEKTRONISCHEM THERMOSTAT +TIMER) STROMLAUFPLÄNE (GRANITA-MASCHINE 3FF) / 230V SL310005700 Ed.00 - 04-2011 - 25 _DE-...
- Page 114 STROMLAUFPLÄNE (GRANITA-MASCHINE 3FF MIT ELEKTRONISCHEM THERMOSTAT) 230 Volt STROMLAUFPLÄNE (GRANITA-MASCHINE 3FF MIT ELEKTRONISCHEM THERMOSTAT +TIMER) STROMLAUFPLÄNE (GRANITA-MASCHINE 3) / 115V - 26 _DE- SL310005700 Ed.00 - 04-2011...
- Page 115 STROMLAUFPLÄNE (GRANITA-MASCHINE 3FF) / 115V LEGENDE Bezeichnung Beschreibung D.G.B UMSCHALT. GRAMOLATE/GETRÄNK DGB.1 UMSCHALT. GRAMOLATE/GETRÄNK BEHÄLTER 1 DGB.2 UMSCHALT. GRAMOLATE/GETRÄNK BEHÄLTER 2 DGB.3 UMSCHALT. GRAMOLATE/GETRÄNK BEHÄLTER 3 MAGNETVENTIL BEHÄLTER 1 MAGNETVENTIL BEHÄLTER 2 MAGNETVENTIL BEHÄLTER 3 ENDANSCHLAG EINSTELLUNG Fc.Tx ENDANSCHLAG ZEITSCHALTER ENDANSCHLAG EINSTELLUNG BEHÄLTER 1 ENDANSCHLAG EINSTELLUNG BEHÄLTER 2 ENDANSCHLAG EINSTELLUNG BEHÄLTER 3...
- Page 116 7.8.1. Changer l’ampoule .........17 4.3. Stockage ..............7 7.9. Nettoyer le condensateur ........18 7.9.1. Nettoyer le cond. Granitore 1/1FF ....18 5. INSTALLATION ...........7 7.9.2. Nettoyer le cond. Granitore 2/2FF - 3/3FF ..18 5.1. Liste des accessoires fournis avec la machine ..7 7.10.
- Page 117 1. INFORMATIONS GENERALES Le Fabricant décline toute responsabilité en cas de dommages dérivant de la violation de cette interdiction. Ce manuel d’instructions fait partie intégrante de l’appareil que vous venez d’acheter ; il doit toujours accompagner la machine même en cas de change- 1.1.
- Page 118 Granitore 2, correspond au distributeur de granités à (2) deux réservoirs ; Granitore 3, correspond au distributeur de granités à (3) trois réservoirs ; Granitore 1 FF, correspond au distributeur de granités à (1) un réservoir avec frigo Fast Freeze;...
- Page 119 2.4. Description des fonctions du panneau de commande Les commandes de la machine sont sur le tableau, situé sur la partie latérale. COMMANDE MODELE FONCTION Interrupteur Général: il a la fonction de commander: - l’allumage de la machine; - l’arrêt de toutes les fonctions de la machine. TOUS Interrupteur éclairage couvercle: pour allumer/éteindre l’éclairage (si pré- sent) sur les couvercles des réservoirs.
- Page 120 340 mm 540 mm 930 mm 32 kg - utiliser la machine dans un milieu explosible, agressif ou à haute concen- Granitore 1 FF 340 mm 540 mm 930 mm 32 kg tration de poussières ou substances huileuses en suspension dans l’air;...
- Page 121 5. INSTALLATION 4.2. Transport et levage Assurez-vous que personne ne stationne dans le rayon d’action Toutes les opérations décrites sous la rubrique 5 sont de la des opérations de levage et transport de la charge. Si les condi- compétence exclusive de techniciens spécialisés ; ceux-ci tions sont diffi...
- Page 122 6. FONCTIONNEMENT Note: Laisser un espace de 25 cm (10 pouces) dans la partie supérieure. Avant de mettre la machine en marche la première fois, le technicien spé- cialisé doit d’abord vérifi er si elle est correctement installée. Voir fi g. 5 les distances mini pour les accès: •...
- Page 123 6.2. Démarrer Granitore NE PAS INTRODUIRE DES LIQUIDES CHAUDS (à une température supérieure à 25°C) Fig.8 Pour simplifi er, nous illustrerons uniquement comment actionner le réservoir droit ; pour actionner les autres réservoirs, il suffi t d’effectuer la même séquen- ce d’opérations sur les interrupteurs du réservoir intéressé.
- Page 124 Pour obtenir une BOISSON FROIDE: Fig.15 Commutateur : en pos. “II” frigo en fonction (boisson). Fig.13 3 secondes après voir frappé la dernière touche, la donnée est enregistrée et l’affi cheur visualise la température du produit dans la cuve. ALARMES En cas de sonde endommagée, l’affi...
- Page 125 ALARMES En cas de sonde endommagée, l’affi cheur visualise les messages d’alarme Note: Si, pendant l’utilisation de la machine, le thermostat élec- suivants: tronique s’éteint accidentellement, frapper la touche . pour le rallumer. Si le thermostat électronique ne se rallume plus, “A1”: Sonde cuve 1 débranchée éteindre la machine et contacter le centre de service après-vente.
- Page 126 6.9. Acc. optionnels (Temporisateur) échantillon, corresponde à la température affi chée par la ma- chine. Avec le produit dans la cuve encore à consommer, ne jamais couper l’alimentation électrique et ne jamais éteindre Le temporisateur illustré est indicatif. l’interrupteur général, mais laisser toujours la machine allumée sur la fonction granités ou réfrigérateur à...
- Page 127 7. NETTOYAGE ET ENTRETIEN Les matériaux inoxydables, les matériaux plastiques, les caout- choucs utilisés dans la fabrication de ces pièces et leur forme par- ticulière facilitent le nettoyage mais n’empêchent pas la formation Le nettoyage et l’entretien des composants externes de la ma- de bactéries et de moisissures si le nettoyage est insuffi...
- Page 128 Eteignez l’interrupteur mélangeur et l’interrupteur général ; retirez la fiche de la prise de courant. Fig.27 Fig.29 7.2. Démonter le robinet Il est interdit de démonter le robinet si le réservoir contient du produit ou un tout autre liquide. Avant de commencer à démonter le réservoir, il est recommandé de procéder au démontage du robinet ;...
- Page 129 3. Avec une éponge imbibée de stérilisant, stérilisez la partie inférieure du cou- Fig.32 vercle en veillant à ne pas mouiller les contacts (X); 4. Laissez agir pendant 30 minutes; 5. Rincer deux ou plusieurs fois, la partie inférieure seulement, avec une épon- ge propre imbibée d’eau fraîche.
- Page 130 Appuyez sur le réservoir en bas pour qu’il s’encastre sur le plan comme le Installez le joint (B) en la lubrifi ant avec de la vaseline sur toute la superfi cie montre la fi gure. indiquée par les fl èches. Fig.39 Fig.36 Introduisez la vis s.f.
- Page 131 7.7. Nettoyer la cuvette d’écoulement Fig.42 Une fois par jour, videz et nettoyez la cuvette d’écoulement. Fig.41 Attention: pendant les opérations de nettoyage, faites attention Nota bene : les opérations de nettoyage doivent être effectuées à ne pas endommager (plier, rompre, etc.) les contacts; tout en- sur tous les réservoirs de la machine.
- Page 132 L’utilisation de la machine est interdite dès qu’un panneau (frontal, arrière ou latéral) n’est pas correctement monté. Le nettoyage du condensateur est interdit à l’opérateur. 7.9.1. Nettoyer le condens. Granitore 1/1FF Fig.47 Les carters doivent être démontés avec un tournevis.
- Page 133 8. DEMOLITION Nettoyez avec soin le condensateur puis remontez tous les composants du carter. Les déchets d’équipements électriques doivent être éliminés conformément à la Directive Européenne 2002/96/CE. 7.10. Entretien périodique Ces équipements NE PEUVENT PAS ETRE ELIMINES suivant le fl ux normal des déchets solides urbains, mais doivent être collec- tés séparément pour optimiser la réutilisation et le recyclage des La machine doit être vérifi...
- Page 134 9. PROBLEME - CAUSE - REMEDE Problème Cause Remède La machine ne s’allume pas. L’interrupteur général est éteint (position “O”). (Rubr.6) Mettez l’interrupteur sur la position “I”. La fi che n’est pas enfoncée dans la prise. Enfoncez la prise dans une prise conforme. Le robinet perd.
- Page 135 10. SCHEMAS DES CIRCUITS ELECTRIQUES (GRANITORE 1 - 1 FF) t° 230 Volt (12 V a.c.) t° 115 Volt SL320005700 Ed.00 - 04-2011 - 21 _FR-...
- Page 136 SCHEMAS DES CIRCUITS ELECTRIQUES (DISTRIBUTEUR DE GRANITÉS 1 - 1 FF AVEC THERMOSTAT ÉLECTRONIQUE) 230 Volt SCHEMAS DES CIRCUITS ELECTRIQUES (DISTRIBUTEUR DE GRANITÉS 1 - 1 FF AVEC THERMOSTAT ÉLECTRONIQUE +TEMPORISATEUR) - 22 _FR- SL320005700 Ed.00 - 04-2011...
- Page 137 SCHEMAS DES CIRCUITS ELECTRIQUES (DISTRIBUTEUR DE GRANITÉS 2 - 2FF) 230 Volt 115 Volt SL320005700 Ed.00 - 04-2011 - 23 _FR-...
- Page 138 SCHEMAS DES CIRCUITS ELECTRIQUES (DISTRIBUTEUR DE GRANITÉS 2 - 2 FF AVEC THERMOSTAT ÉLECTRONIQUE) 230 Volt SCHEMAS DES CIRCUITS ELECTRIQUES (DISTRIBUTEUR DE GRANITÉS 2 - 2 FF AVEC THERMOSTAT ÉLECTRONIQUE + TEMPORISATEUR) 230 Volt SCHEMAS DES CIRCUITS ELECTRIQUES (DISTRIBUTEUR DE GRANITÉS 3) / 230V - 24 _FR- SL320005700 Ed.00 - 04-2011...
- Page 139 SCHEMAS DES CIRCUITS ELECTRIQUES (DISTRIBUTEUR DE GRANITÉS 3 AVEC THERMOSTAT ÉLECTRONIQUE) 230 Volt SCHEMAS DES CIRCUITS ELECTRIQUES (DISTRIBUTEUR DE GRANITÉS 3 AVEC THERMOSTAT ÉLECTRONIQUE + TEMPORISATEUR) SCHEMAS DES CIRCUITS ELECTRIQUES (DISTRIBUTEUR DE GRANITÉS 3) / 230V SL320005700 Ed.00 - 04-2011 - 25 _FR-...
- Page 140 SCHEMAS DES CIRCUITS ELECTRIQUES (DISTRIBUTEUR DE GRANITÉS 3FF AVEC THERMOSTAT ÉLECTRONIQUE) 230 Volt SCHEMAS DES CIRCUITS ELECTRIQUES (DISTRIBUTEUR DE GRANITÉS 3FF AVEC THERMOSTAT ÉLECTRONIQUE + TEMPORISATEUR) SCHEMAS DES CIRCUITS ELECTRIQUES (DISTRIBUTEUR DE GRANITÉS 3) / 115V - 26 _FR- SL320005700 Ed.00 - 04-2011...
- Page 141 SCHEMAS DES CIRCUITS ELECTRIQUES (DISTRIBUTEUR DE GRANITÉS 3 - 3FF) / 115V LÉGENDE Article Description D.G.B DEVIATEUR GRANITE/BOISSON RESERVOIR DGB.1 DEVIATEUR GRANITE/BOISSON RESERVOIR 1 DGB.2 DEVIATEUR GRANITE/BOISSON RESERVOIR 2 DGB.3 DEVIATEUR GRANITE/BOISSON RESERVOIR 3 ELECTROVALVE RESERVOIR 1 ELECTROVALVE RESERVOIR 2 ELECTROVALVE RESERVOIR 3 FIN DE COURSE REGLAGE RESERVOIR Fc.Tx...
Need help?
Do you have a question about the Granitore 1 and is the answer not in the manual?
Questions and answers