Table of Contents
Advertisement
Quick Links
Advertisement
Table of Contents

Summary of Contents for NIXER PD Dante
- Page 1 PD Dante User Manual v2.02 (rev a 31/10/18)
- Page 2 Nixer Ltd 45 Evelyn Road Dunstable Bedfordshire LU5 4NG Telephone +44 1582 343111 email info@nixerproaudio.com website www.nixerproaudio.com PD Dante version 2.02 rev a - 31/10/18...
-
Page 3: Table Of Contents
Important Safety Information ....................6 General Precautions ......................... 7 Introduction ..........................8 Welcome and Unpacking ......................9 Quick Start Guide ........................9 PD Dante Front View ......................11 Left View ..........................11 Right View ..........................12 Power ............................. 12 PD Dante Software ......................... 13 Main Input Screen ........................ - Page 4 Configuring Dante Networks ....................38 Correct IP configuration ......................38 Possible IP network configuration mistakes ................38 Dimensioned drawing ......................43 15way D-type pinout ......................43 PD Dante version 2.02 rev a - 31/10/18...
-
Page 5: Manufacturer's Ce Declaration Of Conformity
EN 550022:2007-06-01, wired Immunity EN 61000-6-1:2007-12-01: EN 61000-4-2 + A1+A2: 2002-02-01, EN 61000-4-3: 2007-11-01, EN 61000-4-4: 2005-09-01, EN 61000-4-5:2007-08-01, EN 61000-4- 6+A1:2002-02-01, Product safety: 2006/95/EG ROHS: Signature of manufacturer's representative: Nick Fletcher PD Dante version 2.02 rev a - 31/10/18... -
Page 6: Important Safety Information
The exclamation point within an equilateral triangle is intended to alert the user to the presence of important operating and maintenance (servicing) instructions in the literature accompanying the appliance. PD Dante version 2.02 rev a - 31/10/18... -
Page 7: General Precautions
General Precautions • Do not place heavy objects on the PD Dante, expose it to sharp objects or handle it in any way that may cause damage, e.g., rough handling and/or excessive vibration. • Do not subject the equipment to dirt, dust, heat or vibration during operation or storage. -
Page 8: Introduction
Introduction Thank you for purchasing your new Nixer PD Dante audio network confidence monitor, diagnostic and testing tool. This unit has been designed to make it convenient and easy to test, setup and monitor audio signals within Dante networks. Operation is via it’s clear and simple to use touchscreen interface and it is housed in a compact and robust case. -
Page 9: Welcome And Unpacking
You will then be able to select sources and destinations for your PD Dante For more advice on using Dante Controller please visit the Audinate Website Once you have done this you will be able to start using your PD Dante via the touch screen interface Please take the time to register your PD Dante here http://www.nixerproaudio.com/Registration/registration.php... - Page 10 View of Dante Controller with PD Dante connected Basic PD Dante connection diagram PoE Enable Switch Computer running Dante Controller for setting initial connections Dante Network USB Plug Top containing other Supply Dante enabled devices PD Dante powered via PoE or alternatively via...
-
Page 11: Pd Dante Front View
Left View Left view of the PD Dante showing the two 1G RJ45 Ethernet ports, Primary and Secondary The Primary port is also a PoE input. The PD Dante can be powered from a standard 13W PoE supply PD Dante... -
Page 12: Right View
PSU redundancy. The USB port is also used for firmware upgrades for the PD Dante When powering the PD Dante from a PC/Laptop port it will need to be a high power (up to 2.5A) port to work. Please check your computer manual for information on this. -
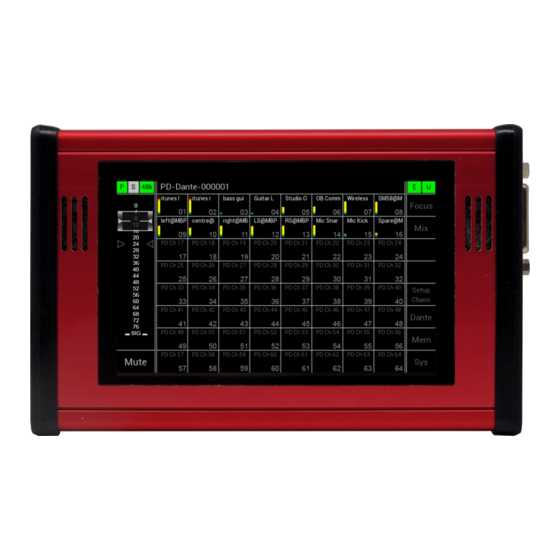
Page 13: Pd Dante Software
PD Dante Software Main Input Screen 1. Dante Network Status Bar Primary port status is shown by a “P” on a square box. The colour of the box will change to reflect the current connection a. Green = 1GHz network connection b. - Page 14 2. Main Menu Bar The Main Menu Bar displays the Dante network name of the PD Dante 3. The Mode Indicator The operational mode of the PD Dante is shown here a. Mix – allows the selection of channel(s) and assignment to the Left and Right outputs b.
- Page 15 (settings for this are under the Meter tab in the Sys menu) iii. L and R routing assignment iv. Input channel number c. Touching a channel will open the Channel Assignment window PD Dante version 2.02 rev a - 31/10/18...
-
Page 16: Channel Assignment Window
• Channel Focus – toggles channel focus for the currently selected channel • << - pressing this button decrements one channel • >> - pressing this button increments one channel • X – pressing this button closes this window PD Dante version 2.02 rev a - 31/10/18... -
Page 17: Channel Setup Menu
• Clear All Routing – pressing this button will clear all channel routing • Focus All Off – Turns off Focus on all channels • Focus All On – Turns on Focus on all channels • X – pressing this button closes this window PD Dante version 2.02 rev a - 31/10/18... -
Page 18: Focus
Focus The Focus function on the PD Dante allows the user to highlight particular channels that are of more interest/importance Pressing the Focus button on the main screen toggles the Focus function Any channels which have had their Focus set to off in the Channel Assignment window will be dimmed relatively to channels which have their Focus set to on. -
Page 19: Dante Menu
• View TX Channels – will show the TX channels for the currently selected device and will be greyed out when no device is selected • Set Routing – allows the local RX channels of the PD Dante to be assigned to other devices on the network •... -
Page 20: View Rx Channels
Example of viewing the RX channels of the selected device Please note that to obtain the channel names the PD Dante will communicate via the network with the selected device which means there will be a short delay before the list is populated. -
Page 21: View Tx Channels
Example of viewing TX channels Set Routing To set the local routing of the PD Dante firstly select the device that is to be connected to the PD Dante in the list so that it turns white After this press the Set Routing button PD Dante version 2.02 rev a - 31/10/18... - Page 22 Press Prev to go back to the previous screen or Home to return to the main Dante menu Select a channel to route to and the list will automatically fill in with the number of channels that were selected in the Source Channel(s) page PD Dante version 2.02 rev a - 31/10/18...
- Page 23 Press Route to subscribe the selected routing and the following display will appear The Selection has now been subscribed Press Prev to go back to the previous screen or Home to return to the main Dante menu PD Dante version 2.02 rev a - 31/10/18...
-
Page 24: Memory Menu
Pressing the name of a memory will highlight that memory which will then be displayed in a larger font. This indicates which memory will be recalled, saved or have its name edited. PD Dante version 2.02 rev a - 31/10/18... -
Page 25: Editing The Name Of A Memory
• Or press Cancel to escape without saving any of the changes Selecting auto recall of a memory A memory can be selected to Auto Recall when the PD Dante is turned on • Select the memory you would like to Auto Recall •... -
Page 26: The System Menu
• Outputs • >> Mode • Mix – Selects the PD Dante to Mix mode where it allows the selection of channel(s) and assignment to the Left and Right outputs. Mixes can then be saved and recalled to the Memories •... -
Page 27: Inputs
15way D-Sub socket • Test Signal o A stereo meter displaying the test signal level (post trim) o The PD Dante also features an internal signal generator o There is a choice of the following signal generators § Sine wave §... - Page 28 200Hz will not be audible from them o The signal level of the generator can be varied from 0dBFs down to -60dBFs in 0.5dB steps via the volume bar PD Dante version 2.02 rev a - 31/10/18...
-
Page 29: Route Matrix
Output Level indicator o Output Level trim controls which allow the output to be attenuated in 1dB steps from 0db to -60dB o Output Level can also be trimmed via the volume control PD Dante version 2.02 rev a - 31/10/18... -
Page 30: Outputs
A stereo meter displaying the current output level o AES out follow: § Vol – when selected output will follow main mix Volume control § Mute – when selected output will follow main mix Mute PD Dante version 2.02 rev a - 31/10/18... - Page 31 Dante channels already assigned to an output will be skipped as Dante outputs cannot be assigned to the same Dante channels >> Press this Tab to see additional Setup pages << Press this Tab to return to the previous Setup Pages PD Dante version 2.02 rev a - 31/10/18...
-
Page 32: Meter Control
Trim+ – increments the OVL trigger level in 1dB steps o OVL trigger level can be set from 0dbFS down to -12dBFS o Clear OVL – clears any set OVL markers on the main channel window PD Dante version 2.02 rev a - 31/10/18... -
Page 33: System Info
Network Speed • Secondary Connection o IP Address o Mask IP Address o Gateway IP Address o Network Speed • Brooklyn II Card firmware(s) • PD Dante firmware and FPGA version PD Dante version 2.02 rev a - 31/10/18... -
Page 34: Update
• Also download the latest firmware from ww.nixer.uk.com to your PC • Next attach the PD Dante to the PC via the USB cable that came with your product • Navigate to the Update Menu in the System menus and press the button to enter Boot Loader Mode. - Page 35 • Click the Erase-Program Button and your device will be reprogrammed. You will see the progress in the status window and by the status bar which will gradually fill as the device is programme PD Dante version 2.02 rev a - 31/10/18...
- Page 36 • When the device has been programmed the status window will say “Programming completed. Click Run Main and your unit will reboot with its updated software • To update the FPGA firmware, start the Nixer BLM program • Select FPGA Flash from the pull-down menu and click connect •...
- Page 37 • Once the status window says Programming complete click Run Main and your PD Dante will reboot • When the Splash Window starts you will see confirmation of the Main CPU firmware followed by the FPGA version PD Dante version 2.02 rev a - 31/10/18...
-
Page 38: Configuring Dante Networks
• Incorrectly configured static IP addresses • You shouldn’t typically need to configure static IP addresses at all. If for some reason you do, it must be in the same subnet as the rest of the network. PD Dante version 2.02 rev a - 31/10/18... - Page 39 • Stranded copper cores are more flexible, but not so good at long distance transmission • Keep 60m maximum with stranded cable • A lot of rugged “stage-cable” is stranded, so take care. PD Dante version 2.02 rev a - 31/10/18...
- Page 40 Do NOT under any circumstance use switches with EEE (Energy Efficient Ethernet or 'Green Ethernet') enabled If you are using a managed switch then please go into the system settings of the switch and disable EEE PD Dante version 2.02 rev a - 31/10/18...
- Page 41 Nixer PD Dante Specifications 1. Monitoring of 64 Dante channels at 48kHz (32 channels at 96kHz) 2. Output up to 64 Dante channels at 48kHz (32 channels at 96kHz) 3. Sample rates supported a. 44.1kHz b. 48kHz c. 88.2kHz d. 96kHz 4.
- Page 42 5-point touch capacitive touch overlay with gesture support 22. Size a. 173mm long by 106mm wide by 34mm height b. 0.5kG 23. Optional mounting brackets 24. Optional Case 25. Optional breakout connector for 15way D-type connector PD Dante version 2.02 rev a - 31/10/18...
-
Page 43: Dimensioned Drawing
Line Output 1- Line Output 2+ Line Output 2- Nixer reserves the right to change product details and specifications without notice Dante is a registered trademark of Audinate Pty iPod and iPhone are registered trademarks of Apple Inc. PD Dante...