Advertisement
Advertisement
Table of Contents

Related Manuals for Toslon TF300


Summary of Contents for Toslon TF300
-
Page 2: Check The Content
Check the content Display Transducer Transd (Optional) (O (Opti nal) (Optional) (O (Opti nal) 1) Transducer 2) Knobs 3) Rubber 1) Transducer 2) Knobs 3) Rubber Note: the rubber is different according to different bait boats 1) CCU 2) Power cable 3) Charger cable 4) Data conversion cable 5) Antenn (2pcs;... -
Page 3: Installation
Installation (transducer) 1) For general boats, like Carp Madness, Anatec Monocoque, you need to drill a hole on the boat bottom to fix the transducer. 2) For boats of Carplounge/- Waveruner/ Vegaboat/Carpboat etc, there is a transducer groove on the bottom. So, you only need to simply match the transducer to the boat... - Page 4 Installation (antenna & wiring) Antenna Installation 1) Drill an hole (5mm diameter) feeder cable on the selected position. antenna for CCU 2) Screw down the wisher and nut from the feeder cable , then hold the cable through the hole from inner housing, and Screw tighted the nut by an wrench.
- Page 5 Powering For display For transmitter Recomended voltage 6-12V 6-12V Absolute Maximum voltage 14.8V 14.8V Note: overvoltage may burn the elements in the device! From bellow shows the voltage range of the most popular batteries in the market: Battery Type Voltage Permission 12V Lead-acid 10.8v~14.8V...
-
Page 6: Using Instruction
Using Instruction 1) TF300 can be used by fixing to a remote. 2) TF300 also can be used by fixing to a tripod. Note: make sure the antenna is tighten on the boat, otherwise the R/C distance will be greatly shorten. -
Page 7: Key Function
Key function Function X-Pilot 1) Open menu settings [Menu] 2) Switch between menus 1) Move up to select menu [Up] 2) Increase a value of option 1) Confirm a setting / selection [Enter] 2) Enter the menu settings 1) Move down to select menu [Down] 2) Decrease a value of option 1) Power on / off the unit... -
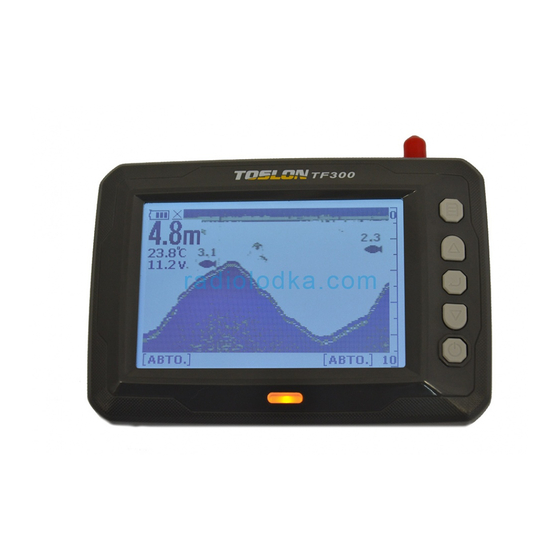
Page 8: What's On The Display
What’s on the display Water Fish Unrecognized Strength of Up range surface symbol fish radio signal Battery strength Depth readout Water temperature Voltage of CCU Bottom Gain setting SD card ready Shallow water mode Depth range at bottom... - Page 9 SONAR SETTING In most time the default setting is enough. However in some situation, to get a better using, you need adjusting the menu setting. 1) Sensivity Determines how echoes will be displayed on the screen. Increasing the sensitivity will make you see more details on the screen.
- Page 10 Menu List Sensivity Controls the level of details shown on the display Fish ID. Sens. Adjust the threshold of fish size display. Higher setting allows weak returns being displayed as fish, while a low setting will prevent it being displayed as fish Surface Clarify Reduces surface clutter by decreasing the sensivity of the receiver near the surface Gain...
-
Page 11: Specifications And Features
Specifications and Features Display size: 4.5"FSTN, Sunlight Viewable Display Resolution: 240*128Pixels; 4Gray Scal screen Language: Multi-language Depth Capability: Max 30m (100ft) Sonar Frequency: 115Khz Sonar Sonar Beam Angle: 60deg @-10db Sonar Alarms: Fish / Shallow / Low Battery Radio Frequency: 433Mhz RC Power: 20dBm(note: normally 180m(600ft) range can be expected, the height of atenna and weather can result huge difference of the radio range) Radio Frequency: 433MHz...
Need help?
Do you have a question about the TF300 and is the answer not in the manual?
Questions and answers