Table of Contents
Advertisement
Advertisement
Table of Contents

Related Manuals for CoaguSense PT/INR


Summary of Contents for CoaguSense PT/INR
- Page 2 CoaguSense. CoaguSense has made every reasonable effort to ensure that all the information contained in this manual is correct at the time of printing. However, CoaguSense reserves the right to make any changes necessary without notice as part of ongoing product development.
-
Page 3: Table Of Contents
Table of Contents Table of Contents ..................3 Introduction ................1 System Description ..............3 Meter Specifications .............10 Performance Characteristics ..........11 Warnings and Precautions ...........12 Hazards and Symbols ............17 Directions for Use .................18 Meter Setup ................18 Performing a Control Test ............26 Collecting a Fingerstick Sample ...........31 Performing a PT Test ............35 Reviewing the Memory ............40... -
Page 5: Introduction
Patients should be stabilized on warfarin-type (coumarin) anticoagulation therapy prior to self- testing. The device is not intended to be used for screening purposes. Importance of PT/INR Monitoring Blood-Clotting Time: The rate at which blood clots is measured in units is called International Normalized Ratio (INR). - Page 6 The purpose of the Coag-Sense Prothrombin Time (PT)/INR Monitoring System User Manual is to help you understand your Coag-Sense PT/INR system, its parts, and its intended function. It provides you with the information you need to perform a PT test with the Coag-Sense PT/INR system.
-
Page 7: Table Of Contents
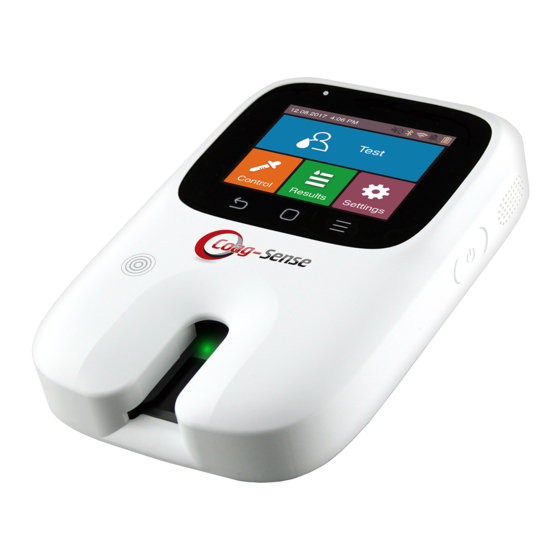
System Description The Coag-Sense Prothrombin Time (PT)/INR System is used for quantitative measurement of INR (International Normalized Ratio) based on a Prothrombin Time (PT) response to monitor the effect ® of therapy with vitamin K antagonists like Coumadin (warfarin). The system uses fresh, capillary whole blood. Page 3... - Page 8 Meter: The meter has a TFT color LCD Touch screen that shows results, information, icons and results recalled from memory. To select an option, gently click on display button. There are three touch buttons, Cancel or Previous Screen Button, Home Screen Button and View Button Screen for the Guided User Interface (GUI) operation.
- Page 9 calibration data communicated by the NFC tag and subsequently stored in the meter. INR is a mathematical correction of the PT result that adjusts for sensitivity differences among different PT systems. Control Strips and Control Activation Solution Quality control is an important part of PT testing to verify the integrity of the performance characteristics of the testing system.
- Page 10 A stylus with a rubber capacitive tip may be used to facilitate typing. Power Supply and Battery: Coag-Sense PT/INR Patient Self-Test System can be operated only with the power adapter provided. The power adapter also serves as a charger. It charges the in-built Lithium Polymer Battery.
- Page 11 Single-Use- 21g Auto Safety Lancets Note: These materials are not provided with the PT/INR system. The Coag- Sense Patient Self-Test Test Strip Kit- 50 may be ordered from your meter distributor or home testing service provider separately. Page 7...
- Page 12 Overview of Buttons and Icons The buttons and icons that appear during normal operation are shown here, along with their respective meanings. Error messages their description provided „Troubleshooting‟ section. Buttons/Icons Meaning Power ON/OFF To power ON/OFF the meter, press and hold Power Button.
- Page 13 Buttons/Icons Meaning Icons on the touchscreen: a) Back Icon- Directs to the previous screen b) Home Icon- Directs to the home screen c) Settings Icon- Directs to the setting screen d) User Information Icon- Directs to the User Information screen e) Log-out Icon- Directs to the logout pop up screen.
-
Page 14: Meter Specifications
Meter Specifications Operating Temperature 65°F to 90°F (18°C to 32°C) Operating Humidity 10% to 85% (without condensation) Storage Temperature 32°F to 122°F (0°C to 50°C) Storage Humidity 20% to 80% Memory Capable of storing up to, 2000 patient test results with date and time ... -
Page 15: Performance Characteristics
It is recommended that the same method be used to monitor the anticoagulation therapy over time. Measuring Range: INR 0.8 to 8.0 Normal Range: The following example represents a common normal range for the Coag-Sense PT/INR system. INR: 0.7 to 1.2 PT: 8.0 to 15.0 Page 11... -
Page 16: Warnings And Precautions
(DOACs) including Factor Xa and Direct Thrombin inhibitors. Test Site and Blood Sample The Coag-Sense PT/INR system is for in vitro diagnostic use only. The Coag-Sense meter will not produce a result if the test strip is past its expiration date. - Page 17 Use only fresh fingerstick capillary blood for testing. The blood should only come in contact with the products provided with the Coag-Sense PT/INR system. Other products may have anti-coagulant agents on their surfaces and result in unreliable test results.
- Page 18 “Test Cancelled, Remove Strip‟ The strip should be removed at this time only. Store and use the Coag-Sense PT/INR system following the instructions in this manual. This equipment is tested to meet the limits for medical...
- Page 19 (PT)/INR Monitoring System.” “The use of accessories, transducers and cables other than those specified by CoaguSense, may result in increased EMISSIONS or decreased IMMUNITY of the EQUIPMENT.” “The Coag-Sense Prothrombin Time (PT)/INR Monitoring System should not be used adjacent to or stacked with other...
- Page 20 Test Strips/ Control Strips/Control Strip Activating Solution The test strips are designed for single use only. Do not reuse the test strips. Patient samples, used strips, transfer tubes and lancets are potentially infectious. Discard used materials in a puncture resistant, biohazard waste...
-
Page 21: Hazards And Symbols
Hazards and Symbols Warning: This indicates warning precaution, requiring special attention. Class II Equipment. The Power Adapter is double insulated. Biological Risks: Disposable items pose biological risks. The strips and fingerstick materials should be disposed of in appropriate biohazard waste containers. Electronic device. -
Page 22: Directions For Use
Directions for Use Meter Setup Operating Conditions To ensure that your Coag-Sense PT/INR system is working correctly, be sure the following conditions are met: Be sure that the meter and strips are at room temperature before use. Operating conditions are between 65ºF and 95ºF (18ºC and 35ºC). - Page 23 (UTC-8:00). User may modify User settings as appropriate. Refer to User Settings section in this manual for the list of settings and their function. These User settings help the User to configure their PT/INR meter. Action Image guided instruction Device Information Setting...
- Page 24 Action Image guided instruction Software Version Update a) If there is a new software version available, it can be found in this screen (only if meter is connected Internet- Refer Section 15). Clicking version will download the version. c) User may choose to Reboot the meter after the download push...
- Page 25 Action Image guided instruction Theme: User chooses from Mono/Blue/Color Language Setup Note: The default language is set to English. Date Format Setup Time Format Setup Date and Time Setup Note: The time automatically adjusts for daylight savings time. Page 21...
- Page 26 Action Image guided instruction Time Zone Setup Brightness: User chooses from range of 1-7 Sound Setting: User chooses to Turn sound ON or OFF Target Range Setup Alarm: User can set alarm as a reminder function with Time and set to repeat on selected days of the week.
- Page 27 Action Image guided instruction Communication Settings The screen lists the status communication channels. If connected to Wireless (Wi-Fi), touchscreen displays the name Wi-Fi network. forward button on each type will direct User detailed view. Wireless (Wi-Fi) Setting: This screen displays icons that a) Scan for Wireless networks nearby b) Wireless ON/OFF icon...
- Page 28 This screen displays the list of scanned Bluetooth enabled devices. Broadcast Bluetooth will pair Coag-Sense PT/INR meter to external device. Note: Set the external device ready to connect to the Coag-Sense meter. The touchscreen displays a message if the Bluetooth connection fails.
- Page 29 Action Image guided instruction External Connection: a) Screen lists server IP address socket communication b) Open/Close port for serial communication with external program c) Connects PT/INR meter program using Bypass Mode. Page 25...
-
Page 30: Performing A Control Test
8. Performing a Control Test There are 2 low control strips, 2 high control strips and a control strip activation solution shipped with each Coag-Sense test strip kit. Controls should be tested immediately upon receipt of each new lot number. Extra controls may be ordered separately if more frequent QC testing is required. - Page 31 Action Image guided instruction Note: The sequence of running the controls is not important. Representative example only Strip confirmation screen displays the Lot information of the strip that was last recorded. Proceed with testing if the control strip is from the same lot.
- Page 32 Action Image guided instruction Open the packaging of the selected control strip by tearing the notched end. Holding the round end, gently push strip completely into meter. strip fits snuggly when pushed all the way toward the back wall of the strip insertion area.
- Page 33 Action Image guided instruction activation solution. Let capillary action fill until solution flow stops at white plug. The meter beeps once displays “Apply Control Solution” when it is ready for the control strip activation solution. Note: You now have up to 2 ½ minutes to apply the activation solution to the control strip.
- Page 34 Action Image guided instruction When testing complete, the Pass/Fail results are displayed in PT units. Date and Time is also displayed. Note: Control test results only display PT seconds, this is to avoid confusing control strip INR results with patient test strip INR results. Repeat Steps 3-12 using the „High control strip‟.
-
Page 35: Collecting A Fingerstick Sample
Collecting a Fingerstick Sample Tips for a Successful Fingerstick Make sure that you have all the supplies needed before you start. 21g Lancet device (Single use, auto disabling) Sample Transfer Tubes For fingerstick blood testing, increasing the flow of blood in the finger will help you capture a good drop of blood. - Page 36 The best test sample is when: The blood is collected right after the fingerstick and put into the sample well without delay. If there is any delay in sample collection or application, repeat with a fresh fingerstick and a new strip.
- Page 37 Action Image guided instruction Choose a site just off center near the top of one of the middle fingers to lance. Note: Avoid the more sensitive area in the center. Avoid any calluses or scars. Remove the cap from the single use lancet.
- Page 38 Action Image guided instruction plug WARNING: Squeezing the fingerstick site excessively (milking releases interstitial “tissue layer” fluid that cause unreliable results. Once you have collected blood sample, IMMEDIATELY put it into the sample well on the test strip. “Performing a PT Test” section of this manual.
-
Page 39: Performing A Pt Test
10. Performing a PT Test WARNING: Place the meter on a stationary, level surface for testing. DO NOT move the meter or allow it to vibrate during the test. Unreliable results may occur. Follow the steps below to perform a patient test: Action Image guided instruction Turn the meter ON by... - Page 40 Action Image guided instruction If NFC tag information is not available, you may manually enter the Lot # and Barcode # using the keypad touchscreen into respective fields. Press the forward button. Note: Make sure the expiration date on the strip packaging has not passed.
- Page 41 Action Image guided instruction When the warm-up is complete, the meter beeps (if sound is turned ON) the screen displays „Apply Sample‟ message. Note: You now have up to 2 ½ minutes to perform a fingerstick and apply the sample to the test strip.
- Page 42 Action Image guided instruction When testing is complete, the meter beeps (if sound is turned ON). The results (INR and PT seconds) displayed screen along with date and time of the test. Note: Memo field allows you to make notes such as medication or diet change along with the results.
- Page 43 What to do when you get an unexpected result: Follow instructions for re-testing on the Coag-Sense PT/INR meter. For unexpected results, contact Technical Support at 1-866-903- 0890. Always follow your doctor‟s instructions for adjusting your dose of anticoagulant medication, or any other corrective action.
-
Page 44: Reviewing The Memory
11. Reviewing the Memory The Coag-Sense meter stores up to 2000 patient test results and 500 control test results, along with the respective date and time of the test performed. When the memory has reached maximum storage capacity, the oldest result is automatically deleted and gets replaced with the most recent result. - Page 45 Action Image guided instruction 4 Clicking the chart icon displays the test results for the selected time interval. Note: The target range lines are set in "Settings>Device Settings>Target range". The unit of the x-axis value of the chart depends on the period selected. The User may choose to view up to one month.
-
Page 46: Printing
12. Printing With the portable printer (optional accessory) available from CoaguSense, results from the Coag-Sense meter memory can be printed on thermal paper. What you‟ll need: Coag-Sense meter Optional Portable Printer, Catalog # 03P52-55 2” Thermal Paper, Catalog # PD99906-OM Follow the general steps below for printing results. - Page 47 If the results fail to print, confirm that the printer is ON and charged as it automatically turns OFF after a few minutes. Note that the meter can only print to specific printers qualified and supplied by CoaguSense. The meter cannot print directly to your home computer printer.
-
Page 48: Network Connectivity And Security
For security reasons, it is recommended that you only connect your Coag-Sense meter to Bluetooth apps that have been provided to you by your home testing service provider or CoaguSense. 15. Meter Software Update When connected to the Internet the Coag-... -
Page 49: Battery
16. Battery The Coag- Sense meter has a factory installed Rechargeable Lithium Polymer Battery, that charges when the power adapter (provided with the meter) is plugged into the wall socket. A charged battery (6 hours to fully charge) can run approximately 200 tests. Please be aware that battery life may be affected by many factors such as operating conditions (e.g. -
Page 50: Cleaning And Disinfecting The Meter
17. Cleaning and Disinfecting the Meter No maintenance is required other than routine cleaning and/or disinfecting. When the power is off and the USB cable is not connected, the meter housing can be cleaned and disinfected. Wipe all exposed surfaces with Healthcare Bleach Germicidal Wipes containing Sodium Hypochlorite (EPA No. - Page 51 Always refer to local, state and federal disinfecting guidelines. More information on bloodborne pathogen safety and proper disinfecting techniques can be found at: “FDA Public Health Notification: Use of Fingerstick Devices on More than One Person Poses Risk for Transmitting Bloodborne Pathogens: Initial Communication”...
-
Page 52: Troubleshooting
This section details how to resolve most problems that you might encounter. If you have any questions or problems during the troubleshooting process, note the display wording and contact Technical Support at 866-903- 0890 or email techsupport@coagusense.com. Meter Possible Cause(s) Solution... - Page 53 Meter Possible Cause(s) Solution Display If the message displays again contact Technical Support. DETECT There may be a problem with Take the strip out and PROBLEM the strip insertion or with the reinsert holding motor carriage in the meter. back of the instrument steady with one hand while inserting the strip completely...
- Page 54 Meter Possible Cause(s) Solution Display problem with the meter. operating temperature range meter (65ºF to 90ºF, 18ºC to 32ºC) and allow meter time to adjust to correct temperature. Repeat testing. Turn meter off then on again after 5-7 minutes Try again with another strip.
- Page 55 Meter Possible Cause(s) Solution Display DETECTED message persists and if have additional There was insufficient control inventory of the test activation solution transferred strip kit from the same to the test strip. Possible kit lot, use the control causes include; an air bubble strip from that box(es).
- Page 56 Meter Possible Cause(s) Solution Display RANGE This due to a range, contact problem with Technical Support. shipment/storage control strips or the control Control strips should be activation solution. Plasma tested immediately on control strips has a limited upon receipt of your shelf life and the clotting time shipment of new test will change when exposed to...
- Page 57 Meter Possible Cause(s) Solution Display tube. Depress black plunger completely to dispense the sample Repeat entire procedure (including fingerstick) with a new strip. same message displays, use an alternative testing method contact Technical Support. The meter battery is low meter BATTERY complete the current test.
- Page 58 Issue Possible Causes Solution Insertion insertion area. area. Area‟ Use your thumbnails to Wheel is not seated properly push wheel spindles into stanchions of test strip. down to snap wheel into place. If issue persists, Contact Technical Support. Touch Insufficient/Low Battery Connect power screen...
- Page 59 Issue Possible Causes Solution Issues issue install software version available Settings_Device Information settings_Software Version) If issue persists, press Reset button to restore factory settings. issue still exists, contact Technical Support. Lost NFC Misplaced NFC Tag The NFC tag is affixed to each test strip kit box.
- Page 60 Issue Possible Causes Solution the tag or scanner. If the issue persists, contact Technical Support. NFC Tag Scanner works Scan the alternate NFC scanner intermittently or does not tag provided. issue work. Touch or bring the NFC tag to proximity of the NFC Tag scanner.
-
Page 61: Warranty
Limited One (1) Year Warranty Use of the Coag-Sense PT/INR System The Coag-Sense PT/INR system is designed for use in monitoring patients on oral anticoagulant therapy. Proper adherence to the instructions in this User Manual and package insert are critical to proper operation. -
Page 62: Reordering Information
20. Reordering Information For a description of the products listed below, please see the information above. Product Catalog # Coag-Sense PT/INR Patient Self-Test 03P70-01 System Coag-Sense Test Strip Kit, Box of 50 03P56-50 Coag-Sense Control Strip Kit -10 03P69-10 Sample Transfer Tubes with Plungers,... -
Page 63: Index
21. Index External Connection, 24 Alarm, 22 Alcohol wipes, 13 Fingerstick Sample, 31 Battery, 6, 45 Hazards And Symbols, 17 Battery Low, 53 Heater Problem, 50 Blood Flow, 31 High Control Strip, 26 Bluetooth, 44 Bluetooth Setting, 24 Brightness, 22 Icons, 8 Buttons, 8 IEC 60601-1, 14... - Page 64 Sound Setting, 22 Squeezing the Fingerstick Operating Conditions, 18 Site, 13 System Description, 3 System Settings, 19 Performance Characteristics, Performing a Control Test, 26 Target Range Setup, 22 Performing a Patient Test, 35 Test Strip, 6 Power, 40 Time Zone Setup, 22 Power ON/OFF, 18 Troubleshooting, 48 Printing, 42...
- Page 65 Technical Support CoaguSense, Inc. 48377 Fremont Blvd., STE 113 Fremont, CA 94538 Toll Free: 1-866-903-0890 E-Mail: techsupport@coagusense.com CoaguSense, Inc. 48377 Fremont Blvd, STE 113 Fremont, CA 94538 USA Tel: (510) 270-5442 Fax: (510-226-6540 Manufactured in South Korea 61010-01 CSI P/N 200219 Rev AA...
Need help?
Do you have a question about the PT/INR and is the answer not in the manual?
Questions and answers
I messed up my device and got into a language that I can’t understand. I can’t recover back to English. Help