
Summary of Contents for St. Jude Medical QUANTIEN
- Page 1 State: Released Date: 2019.03.06 22:30 GMT QUANTIEN™ Measurement System Diagnostic Computer C12787 Instructions for Use...
- Page 2 CAUTION: Federal (USA) law restricts this device to sale by or on the order of a physician. Unless otherwise noted, ™ indicates that the name is a trademark of, or licensed to, St. Jude Medical or one of its subsidiaries. ST. JUDE MEDICAL and the nine-squares symbol are trademarks and service marks of St. Jude Medical, LLC and its related companies.
-
Page 3: Table Of Contents
Basic Setup Using Wi-Box™ AO Transmitter (Wireless AO Source) ......12 Install Wi-Box™ AO Transmitter ..................13 Unpack QUANTIEN™ Measurement System ..............13 Mount QUANTIEN™ Main Unit in the Cath Lab ..............14 Room Configuration ......................16 Measure FFR or RFR ....................17 Warnings and Precautions .................... - Page 4 Guidance and Manufacturer’s Declaration - Electromagnetic Emissions ......80 Guidance and Manufacturer’s Declaration - Electromagnetic Immunity ....... 81 Recommended Separation Distances Between Portable and Mobile RF Communications Equipment and QUANTIEN™ System ................83 Warranty Disclaimer ....................84 Australian Warranty ....................84...
-
Page 5: Quantien™ Measurement System
This IFU contains both the instructions for use for the operator and technical information including installation and maintenance instructions. This IFU describes the handling of the QUANTIEN™ measurement system. For operation of the QUANTIEN measurement system, other devices need to be connected. Consult the IFU for each of these devices for details on handling and safety information. -
Page 6: Product Description
Introduction Figure 1. QUANTIEN™ Main Unit with Table Stand and Remote Control The QUANTIEN™ measurement system is a diagnostic computer designed to record, compute, display and store data from PressureWire™ guidewire and other external transducers. The information is displayed as graphs as well as numerical values on the screen. Data includes, but is not limited to: systolic, diastolic and mean blood pressure, heart rate, Fractional Flow Reserve (FFR), and data from ECG. -
Page 7: Intended Use
Installation: Hospital technician/IT personnel, St. Jude Medical sales representative/technician. Product Interface and Symbols The QUANTIEN™ measurement system includes a main unit with a touch screen user interface and several input/output ports, a remote control, a power cable and an ethernet patch cable with... - Page 8 State: Released Date: 2019.03.06 22:30 GMT Figure 2. QUANTIEN™ Interface Table 2. QUANTIEN™ Interface and Port Symbols Symbol or marking Explanation QUANTIEN™ main unit Display – touch screen Power cable with power supply unit Indicator light, power supply Patch cable and isolation box PressureWire™...
-
Page 9: Symbols Used On Product, Packaging, And Ifu
State: Released Date: 2019.03.06 22:30 GMT Table 2. QUANTIEN™ Interface and Port Symbols Symbol or marking Explanation PressureWire™ OUT PressureWire OUT on PressureWire interface – Pd signal to external monitor (green sleeve). Connection to applied part. DVI-I output – video display/monitor USB port –... - Page 10 European conformity, affixed according to the relevant provisions of MD directives 93/42/EEC and 2011/65/EU, and RE directive 2014/53/EU Annex II. Hereby, St. Jude Medical declares that this device complies with the essential requirements and other relevant provisions of these directives.
-
Page 11: Remote Control Symbols And Functions
Additional Devices and Accessories Devices and accessories that are required or optional for use with the QUANTIEN™ measurement system are listed in the tables below. Only these products are permitted to be used with the QUANTIEN measurement system. All are ordered separately, either from St. Jude Medical or from... -
Page 12: General Warnings, Precautions, And Safety Information
Warnings No modification of this equipment is allowed. Do not open or remove access covers on the QUANTIEN™ measurement system unless specifically instructed by St. Jude Medical technical support to do so. External equipment intended for connection to signal input, signal output or other... - Page 13 If in doubt, contact a qualified technician, or alternatively, a St. Jude Medical representative or technical support. Do not use the QUANTIEN measurement system if it has been dropped or in any other way ...
-
Page 14: Graphical User Interface
ECG display is not intended for cardiac diagnostics. Functional Safety During use according to this IFU, the QUANTIEN™ measurement system will maintain following essential performance: Accuracy of measurements Accuracy of signal outputs ... - Page 15 State: Released Date: 2019.03.06 22:30 GMT Figure 4. Display Menu (Illustrates the Layout of and Common Functions in the Graphical User Interface) Table 6. Description of Display Menu Information bar Display depends on the current menu (e.g. patient, selected room, time, etc.).
-
Page 16: Indicator Lights And Sounds
An FFR or RFR procedure requires a proximal pressure (Pa) signal from an AO transducer and a distal pressure (Pd) signal from a PressureWire™ guidewire. This chapter describes the basic configuration of the QUANTIEN™ measurement system where a wireless AO source (Wi-Box™ AO transmitter) and either a wireless PressureWire™ guidewire or cable connected PressureWire™... -
Page 17: Install Wi-Box™ Ao Transmitter
St. Jude Medical). The Wi-Box AO transmitter is permanently mounted underneath the cath lab table, one in each room where the QUANTIEN™ measurement system will be used. The AO pressure transducer signal is connected to the Wi-Box AO transmitter and then passed through unaffected to the HRS. -
Page 18: Mount Quantien™ Main Unit In The Cath Lab
CAUTION: For markets other than those specified in the table above, make sure the chosen cord set fulfills applicable regulations. To be able to mount and install the QUANTIEN main unit, a mounting bracket is required. Use brackets supplied separately from St. Jude Medical or use an existing bracket compatible with standard VESA 75 x 75 mm or 100 x 100 mm. - Page 19 Mount the QUANTIEN main unit in the desired place in the cath lab. Do not tilt the main unit backward more than a maximum of 45º from the vertical line. Do not mount the main unit tilted forward to prevent risk of ingress of liquids, such as IV-infusion etc.
-
Page 20: Room Configuration
Check that the mains cable is connected to the power supply unit and to the mains power outlet. Press the power switch on the bottom panel to start the QUANTIEN™ measurement system. The screen will remain dark for a few seconds before a startup beep indicates that the system is booting up. -
Page 21: Measure Ffr Or Rfr
Measure FFR or RFR Warnings and Precautions WARNING: Do not use the QUANTIEN™ measurement system if it has been dropped, or in any other way exposed to mechanical or electrical damage, or if liquids are suspected to have penetrated the casing or the power supply unit. This can cause the user or patient to be exposed to electric shock or cause faulty readings of data. -
Page 22: Live Window
State: Released Date: 2019.03.06 22:30 GMT Live Window Figure 6. Live Window (Default after Preparation Setup) Table 11. Explanation of Live Window Interface Information bar (name, patient #, Room ID, system time). Mode selection dropdown menu: FFR - Fractional Flow Reserve (Default) ... -
Page 23: Ffr/Rfr Measurement Procedure
State: Released Date: 2019.03.06 22:30 GMT Table 11. Explanation of Live Window Interface Main function button NOTE: Appearance/function changes depending on current mode. Zero Pa to zero the AO transducer during preparation step 1. Connect to connect the PressureWire™ guidewire during preparation step 2. ... - Page 24 QUANTIEN measurement system. Start System and Select Room Ensure that the QUANTIEN™ measurement system is connected to mains socket and turn on the device, the Select Room screen will be displayed after logging into the system. Select the room to be used by touching the corresponding Room button.
- Page 25 State: Released Date: 2019.03.06 22:30 GMT incorrect value; see Display Settings (page 44). Zero the Aortic Pressure Transducer The preparation screens can be used to guide you through the procedure set up. If the guide is used, follow the instructions on screen. Activating/deactivating the guide is done in the (Setup) Menu, Display menu, Other.
- Page 26 State: Released Date: 2019.03.06 22:30 GMT Connect Wireless). Turn on the PressureWire™ transmitter. The transmitter will connect to the QUANTIEN™ measurement system and zero PressureWire guidewire. Figure 9. Turn on the PressureWire™ Guidewire Alternatively: A PressureWire™ cable-connected guidewire: Insert the PressureWire cable connector into PressureWire IN. The PressureWire guidewire is automatically zeroed.
- Page 27 State: Released Date: 2019.03.06 22:30 GMT Figure 11. Select Recording Mode Table 12. Study Options by Recording Mode Recording Type Snapshot Type Record Pd/Pa Pullback FFR Recording The system is now ready to measure FFR. Advance the PressureWire™ guidewire distal of the lesion. Use standard cath lab techniques to induce maximum hyperemia.
- Page 28 State: Released Date: 2019.03.06 22:30 GMT Snapshot Recordings Advance the PressureWire™ guidewire to the desired location. Press the camera icon in the RFR or FFR measurement box. Figure 12. Location of Camera Icon The measurement window will change to a status bar to count the next five heartbeats. NOTE: The cancel button is active to exit the snapshot progress.
-
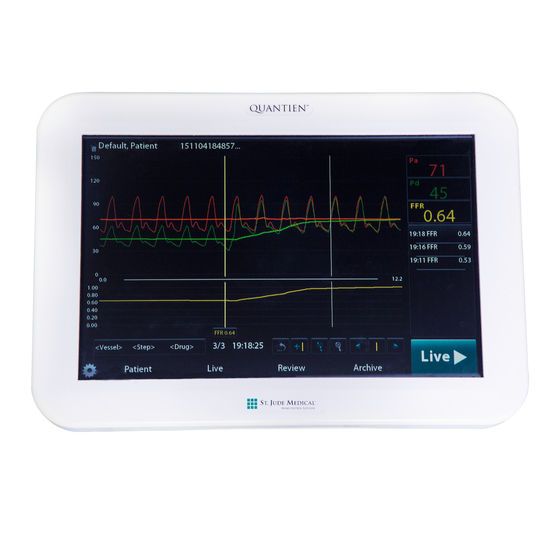
Page 29: Review Recordings
State: Released Date: 2019.03.06 22:30 GMT Review Recordings Review Window Figure 14. Review Window Functions not described in the table below are found in the section, Live Window (page 18). Table 13. Review Window Primary cursor (yellow for FFR and blue for RFR): Indicates the position where the pressure values and index value are taken from. -
Page 30: Study Summary
State: Released Date: 2019.03.06 22:30 GMT Table 13. Review Window Zoom in Zoom out Cursor button selected: the arrow button moves the cursor to the left. Cursor button unselected: the arrow button moves the graph to the left. Toggle between moving the Cursor and moving the entire timeline. Cursor button selected: the arrow button moves the cursor to the right. - Page 31 State: Released Date: 2019.03.06 22:30 GMT CAUTION: The system may place the cursors at the wrong location (value) due to artifacts in Pa or Pd pressure. The responsible physician should confirm that the point selected by the system is a valid point for the selected index. NOTE: When there is a decrease in the RFR value during a pullback raw data will not be displayed.
-
Page 32: Export Data
State: Released Date: 2019.03.06 22:30 GMT Table 14. Summary of RFR Validation Result RFR-FFR -FFR Diagnostic Accuracy 93.6% (469/501) 92.2% (462/501) [91.1%, 95.6%] [89.5%, 94.4%] Percent Positive Agreement 91.3% (219/240) 88.8% (213/240) [86.9%, 94.5%] [84.1%, 92.5%] Percent Negative Agreement 95.8% (250/261) 95.4% (249/261) [92.6%, 97.9%] [92.1%, 97.6%]... - Page 33 Select the Accept button to export. Select the Cancel button to leave the dialogue box without exporting. The QUANTIEN measurement system can be configured to automatically export data after a recording has been reviewed. Excel is a trademark of Microsoft Corporation.
-
Page 34: Review Archived Studies
State: Released Date: 2019.03.06 22:30 GMT NOTE: To use the Network and DICOM alternatives these need to be configured, see Network Configuration (page 41). A copy of the recording will remain in the system memory after export. To remove a recording it must be deleted. -
Page 35: Export And Delete Files In Archive
Use the New Study button to start a new study for the current patient. Free-up Storage Space The QUANTIEN™ measurement system is not intended for long-term archiving. The Storage Space box in the archive window displays remaining storage space as a percent of total memory. -
Page 36: Settings
− Other − Other Room Setup The QUANTIEN™ measurement system handles different room configurations in the Select Room window. This window is displayed immediately at startup or is reached through the (Setup) Menu. When a room has been selected the Patient window is automatically displayed. To leave the Select Room window and open Setup without selecting a room, press Skip. - Page 37 "Room A" Identification name of the room (or Not Set) "Wi-Box" + number The Wi-Box™ AO transmitter within radio range of the QUANTIEN™ measurement system+ ID number of Wi-Box device AUX IN 1 Room configured for AO pressure via cable A Wi-Box AO transmitter transmitting (blue symbol).
- Page 38 Select Room window will be bypassed at start up and the Patient window will be displayed directly. This setting is preferred when the QUANTIEN measurement system is permanently installed in a room. If the QUANTIEN measurement system is intended for mobile use, configure all rooms where it...
-
Page 39: Regional Settings
The user interface language is changed in Language version from the available options. Save settings with the Set Language button. The QUANTIEN™ measurement system must be restarted after each setting in order for the change to take effect. Set Time Zone/Date... -
Page 40: Security Settings
Only a Site Admin user can make changes to user profiles. Contact St. Jude Medical service if the site admin has forgotten their password. To add a user: Select Users from the Setup menu. Touch the Add User button. -
Page 41: Connections
St. Jude Medical representative/technical support. No modification of this equipment is allowed. Do not open or remove access covers on the QUANTIEN measurement system unless specifically instructed by St. Jude Medical technical support to do so. The AUX inputs/outputs are isolated with one means of operator protection (MOOP); see the ... - Page 42 Connect AO Via Analog Input AUX IN 1 Connection: The AO signal may be imported to the QUANTIEN™ measurement system from a HRS. Connect an AUX IN cable between an analog output port on the recording system and AUX IN 1 (Product Interface and Symbols (page 3)) on the QUANTIEN main unit.
- Page 43 State: Released Date: 2019.03.06 22:30 GMT Press Zero and Calibrate – the Dialogue box in the figure below opens. Make sure that the AO pressure channel on the cath lab HRS is zeroed. Press the Zero button in the left column. The AO signal is now zeroed. Figure 21.
- Page 44 Connect an AUX IN (ECG) cable between an analog ECG output port on the HRS and AUX IN 2 (Product Interface and Symbols (page 3)) on the back of the QUANTIEN main unit. The cable used must be compatible with the specific HRS.
-
Page 45: Network Configuration
Connection: Connect the video port on the receiving monitor/equipment to the DVI-I port (Product Interface and Symbols (page 3)) on the bottom panel of the QUANTIEN main unit using a standard video cable. NOTE: The QUANTIEN measurement system will automatically detect the external monitor's resolution. - Page 46 State: Released Date: 2019.03.06 22:30 GMT Overview: Connecting the QUANTIEN measurement system to a network will allow data export for remote review or archiving, communication with a DICOM server for import of a DICOM worklist and screen image export to DICOM compatible archives.
- Page 47 NOTE: Time and time zone have to be correct set for retrieval of worklist from DICOM server. All network and DICOM settings are case sensitive. The following information is required: Local AE Title (Name of the QUANTIEN measurement system. Might have to be registered on the local network) Remote AE Title (DICOM server) ...
-
Page 48: Display Settings
State: Released Date: 2019.03.06 22:30 GMT The following settings are required: Date limitation options Procedures Scheduled for Today Procedures in the Range: Enter number of Days Before Today´s Date Enter number of Days After Today´s Date Do Not Consider Date Scheduling options Procedures Schedule for Modality (the Modality selected earlier is displayed for information) - Page 49 State: Released Date: 2019.03.06 22:30 GMT The slow sweep is used during RFR pullback regardless of user setting. Options: Slow (40 seconds/screen) Medium (20 seconds/screen) Fast (10 seconds/screen) ECG (AUX IN 2) ECG Configuration Scale. Select the desired ECG scale. ...
-
Page 50: Service
This will save any system setup changes made in demo mode. Otherwise the system will discard any changes when exiting demo mode. Access the QUANTIEN™ measurement system hardware and software version information in (Setup) Menu, System, Info, Equipment. Demo Mode Select Start Demo Mode from the Select Room window. -
Page 51: Troubleshooting
FFR measurement procedure. Any system setup changes made in demo mode will be discarded when the QUANTIEN™ measurement system is turned off or if you are exiting demo mode to normal mode. The settings can be saved in the Service menu, select Save setup changes. - Page 52 State: Released Date: 2019.03.06 22:30 GMT Table 19. System on-screen messages Current Message Reason Action Cancel "Patient <Last, First> has When trying to Select No delete Confirm delete several studies associated, delete a patient Cancel or OK and close and close mark the ones you wish to who has more window...
- Page 53 State: Released Date: 2019.03.06 22:30 GMT Table 19. System on-screen messages Current Message Reason Action Cancel "Network update failed. Failed to write Contact Confirm and Failed to save network network St. Jude close window settings to the settings to file system" Medical appropriate file.
- Page 54 "Hardware initialization One or several Select Continue failed. Contact your local of the hardware "Override" or startup St. Jude Medical modules for turn off (button text PW, AO or AUX representative" system "Override") initialized with error at startup "The application failed to...
- Page 55 Select a room with a working Wi-Box unit Faulty signal/data from Restart Wi-Box unit Wi-Box AO transmitter (Red frame) Restart System Contact St. Jude Medical (Wi-Box Error) AO USB missing Restart System (Red frame) AO USB reports error Contact St. Jude Medical...
- Page 56 State: Released Date: 2019.03.06 22:30 GMT Table 22. PW Source — PressureWire™ Wireless Guidewires Type Current Message Event Action (on Pd button) Automatic zeroing after Ensure the successful mate failed PressureWire™ (Yellow frame) guidewire is correctly prepared (Pd Not Zeroed) Try to connect again The PressureWire Replace the...
-
Page 57: Tracing Em Interference
Try to zero again Tracing EM Interference The QUANTIEN™ measurement system uses digital signal processing techniques that operate in the radio frequency (RF) energy range. The system is therefore susceptible to interference generated by other RF energy sources such as medical devices, information technology products, or radio/television transmission towers. - Page 58 State: Released Date: 2019.03.06 22:30 GMT Is the interference present if the QUANTIEN measurement system is moved to a different location in the facility? Moving cables or other medical equipment away from the system can reduce electromagnetic interference. Please answer these questions before contacting your service representative. The answers will help a service representative determine if the problem is in the system or in the imaging environment.
-
Page 59: Troubleshooting Tables
State: Released Date: 2019.03.06 22:30 GMT Troubleshooting Tables Contact St. Jude Medical for correct replacement parts and/or further instructions. Table 24. General function Erroneous Possible cause Check Normal function Corrective action function No sign of system The main switch The main switch... - Page 60 Check functioning normally switch to another ambient light source Table 26. Pressure signal on QUANTIEN™ measurement system when acquired via Wi-Box AO transmitter Erroneous Possible cause Check Normal function Corrective action function Wi-Box™ AO Wi-Box unit not Check LED’s of...
- Page 61 State: Released Date: 2019.03.06 22:30 GMT Table 26. Pressure signal on QUANTIEN™ measurement system when acquired via Wi-Box AO transmitter Erroneous Possible cause Check Normal function Corrective action function Abnormal or Bad contact in Stress the actual The pressure Replace any...
- Page 62 State: Released Date: 2019.03.06 22:30 GMT Table 27. Pressure signal on QUANTIEN™ measurement system when acquired via AUX IN function Erroneous Possible cause Check Normal function Corrective action function Unable to zero Varying pressure Refer to IFU for Stable pressure...
- Page 63 HRS on how to check pressure to correct output from HRS output signal pressure output signal Table 28. Distal pressure signal on QUANTIEN™ measurement system when acquired via PW IN Erroneous Possible cause Check Normal function Corrective function action...
- Page 64 State: Released Date: 2019.03.06 22:30 GMT Table 28. Distal pressure signal on QUANTIEN™ measurement system when acquired via PW IN Erroneous Possible cause Check Normal function Corrective function action The PressureWire Connections of the Properly Correct the guidewire not proximal...
- Page 65 State: Released Date: 2019.03.06 22:30 GMT Table 29. Distal pressure signal on QUANTIEN™ measurement system when acquired via wireless PressureWire™ guidewire Erroneous Possible cause Check Normal function Corrective action function The wireless The Wireless Switch on at the PressureWire PressureWire...
- Page 66 State: Released Date: 2019.03.06 22:30 GMT Table 29. Distal pressure signal on QUANTIEN™ measurement system when acquired via wireless PressureWire™ guidewire Erroneous Possible cause Check Normal function Corrective action function Signal from the Defective LED on the LED is lit...
- Page 67 State: Released Date: 2019.03.06 22:30 GMT Table 30. ECG signal on QUANTIEN™ measurement system Erroneous Possible cause Check Normal function Corrective action function Wrong type of AUX IN cable HRS listed on the Replace with a AUX IN cable compatibility with...
- Page 68 State: Released Date: 2019.03.06 22:30 GMT Table 32. Pressure signal on the HRS via AUX OUT Erroneous Possible cause Check Normal function Corrective action function Bad contact in Stress the actual The pressure Replace the cable connectors connection signal on the HRS broken cable will remain mechanically...
- Page 69 State: Released Date: 2019.03.06 22:30 GMT Table 33. DICOM worklist function Erroneous Possible cause Check Normal function Corrective action function Patient not found Patient not Check that Patient is Correct in worklist registered in patient is registered in registration In registered in DICOM host DICOM host...
- Page 70 Check Normal function Corrective action function Disturbances or Video OUT (DVI-I) Connection of DVI QUANTIEN Correct the failing no QUANTIEN™ not properly cable. Stress the display viewed on connection or display viewed on connected to actual connection replace broken external monitor...
-
Page 71: Maintenance
State: Released Date: 2019.03.06 22:30 GMT Table 35. External display function Erroneous Possible cause Check Normal function Corrective action function Defective external Test with another QUANTIEN Replace the monitor external monitor display viewed on external monitor external monitor External monitor Monitor input Replace the... -
Page 72: System Backup Battery
Replace the plastic holder and close the case. Secure it with the screw. System Backup Battery The internal system backup battery is recharged by leaving the QUANTIEN™ measurement system turned on. The battery is not intended to be replaced. Disposal... -
Page 73: Leakage Current Measurement
Service report form, can be downloaded from sjmprofessional.com Preparation: Connect the leakage current adapters to their respective connector on the QUANTIEN™ measurement system. Turn on the QUANTIEN measurement system before starting this control. To perform leakage current measurements proceed as follows: Connect the applicable leakage current adapters to the leakage current instrument for each test that will be performed. -
Page 74: Testing Pw In
Service report form, can be downloaded from sjmprofessional.com Preparation Switch on QUANTIEN™ measurement system at least 10 minutes before starting this test. To test the PressureWire™ IN, proceed as follows: Restart QUANTIEN measurement system by switching the main switch OFF. Wait for 5 seconds and switch ON again. -
Page 75: Testing Pw Out And Associated Monitor Channel
Service report form, can be downloaded from sjmprofessional.com Preparation Switch on QUANTIEN™ measurement system at least 10 minutes before starting this test. Connect the monitor cable from PW OUT to the associated Pd input channel on the HRS. -
Page 76: Testing Aux In 1 And Associated Monitor Channel
Service report form, can be downloaded from sjmprofessional.com Preparation Switch on QUANTIEN™ measurement system at least 10 minutes before starting this test. Connect the AUX IN 1 cable from the HRS to AUX IN 1. To test the AUX IN 1, proceed as follows: Restart QUANTIEN™... -
Page 77: Testing Aux In 2 And Associated Monitor Channel
Service report form, can be downloaded from sjmprofessional.com Preparation Switch on QUANTIEN™ measurement system at least 10 minutes before starting this test. Connect the AUX IN 2 cable from the HRS to AUX IN 2. To test the AUX IN 2, proceed as follows: Restart QUANTIEN measurement system by switching the main switch OFF. -
Page 78: Test Probes
Check the value, subtracted with the value read for 0.0 V reference signal, is between 0.95 and 1.05 V. 10. Set "Off" as the output reference signal on QUANTIEN measurement system. 11. Connect the AUX OUT cable from AUX OUT 2 to a measuring device. -
Page 79: Leakage Adapters
PW IN Proprietary PressureWire™ interface Isolation: IEC 60601-1 Type CF Defibrillation protected PW OUT According to ANSI/AAMI BP22:1994 Excitation voltage: 2.4 to 8 Volt DC The accuracy is given for the combination of the QUANTIEN™ measurement system and PressureWire™ systems. - Page 80 Version: 2.0, supports Hi-speed communication Connector: Type A, Receptacle Ethernet 10/100 Mbit/s Connector: RJ45 Screen resolution of QUANTIEN™ main unit: 1280x800 Output resolutions (DVI out): Auto Frequency: 60 Hz Connector: DVI-I (Integrated - digital and analog) Connect with a standard VGA cable and DVI to VGA adapter (analog signal) Connect with a DVI to VGA cable (analog signal) ...
-
Page 81: Dimensions
State: Released Date: 2019.03.06 22:30 GMT Dimensions Table 45. Dimensions Height 260 mm (10.2 in) Depth 100 mm (3.9 in) Width 375 mm (14.8 in) Weight 4.8 kg (10.6 lbs) Environmental Conditions Table 46. Environmental conditions Operating, temperature 15°C to 35°C (59°F to 95°F) Operating, relative humidity 30% - 75% Operating, ambient... -
Page 82: Isolation Diagram
State: Released Date: 2019.03.06 22:30 GMT Isolation Diagram Figure 23. Isolation Diagram 1. Certified PSU 2. Main Unit 3. Plastic Enclosures 4. Touch Screen Display 5. Metal Enclosure Table 47. Isolation Data Isolation Insulation Type Maximum Working Voltage [V] 1 MOP 240 VAC 2 MOOP 1 MOOP... -
Page 83: File Formats
Compliance with Regulatory Requirements Compliance with Standards and Directives St. Jude Medical hereby declares that the QUANTIEN™ measurement system is in compliance with the essential requirements and other relevant provisions of the Medical Device Directive (EC Directive 93/42/EEC), RE directive 2014/53/EU Annex II, and Quality System Regulation (US). A copy of the Full Declaration of Conformity can be obtained by contacting the EU Representative. -
Page 84: Guidance And Manufacturer's Declaration - Electromagnetic Emissions
Guidance and Manufacturer’s Declaration - Electromagnetic Emissions The QUANTIEN™ measurement system is intended for use in the electromagnetic environment specified below. The customer or user of the system should assure that it is used in such an environment. Table 50. Guidance and Manufacturer’s Declaration - Electromagnetic Emissions... -
Page 85: Guidance And Manufacturer's Declaration - Electromagnetic Immunity
Manufacturer’s Declaration - Electromagnetic Immunity The QUANTIEN™ measurement system is intended for use in the electromagnetic environment specified below. The customer or user of the system should assure that it is used in such an environment. Table 51. Guidance and Manufacturer’s Declaration - Electromagnetic Immunity... - Page 86 IEC 61000-4-8 environment. Portable and mobile RF communication equipment should be used no closer to any part of the QUANTIEN measurement system, including cables, than the recommended separation distance calculated from the equation applicable to the frequency of the transmitter.
-
Page 87: Recommended Separation Distances Between Portable And Mobile Rf Communications Equipment And Quantien™ System
Recommended Separation Distances Between Portable and Mobile RF Communications Equipment and QUANTIEN™ System The QUANTIEN™ measurement system is intended for use in the electromagnetic environment where radiated RF disturbances are controlled. The customer or the user of this system can help... -
Page 88: Warranty Disclaimer
Australian Warranty This warranty is given by St. Jude Medical (SJM). To make inquiries regarding this warranty, use the contact information for either the manufacturer or Australian Sponsor located on the back cover. - Page 89 EXCEPT FOR MANDATORY TERMS IMPLIED BY LAW, MANDATORY CONSUMER GUARANTEES, OR AS EXPRESSLY PROVIDED IN THIS WARRANTY, ST. JUDE MEDICAL DISCLAIMS ANY REPRESENTATION OR WARRANTY OF ANY KIND, EXPRESS OR IMPLIED. See the Terms and Conditions of Sale for further information.
- Page 90 State: Released Date: 2019.03.06 22:30 GMT...
- Page 91 State: Released Date: 2019.03.06 22:30 GMT...
- Page 92 State: Released Date: 2019.03.06 22:30 GMT St. Jude Medical St. Jude Medical Australia Pty. Limited St. Jude Medical Coordination Center BVBA 17 Orion Road One St. Jude Medical Drive The Corporate Village Lane Cove NSW 2066 St. Paul, MN 55117-9913 USA...
Need help?
Do you have a question about the QUANTIEN and is the answer not in the manual?
Questions and answers