
Summary of Contents for Kleinwaechter CPM 374
- Page 1 MANUAL Charge Plate Monitor CPM 374 Incl. Electrostatic Field Meter System Prof. Dr.-Ing. Hans Kleinwächter...
-
Page 2: Table Of Contents
Manual CPM 374 Inhalt Product Description ..............................3 1.1. Specifications ..............................3 1.2 Legend ..................................4 Initial Operation ................................ 5 Mode Selection ................................5 Charge Plate Mode ..............................5 4.1. Decay Time and Offset Voltage ......................... 5 4.2. Saving Data ................................ 7 4.2.1. -
Page 3: Product Description
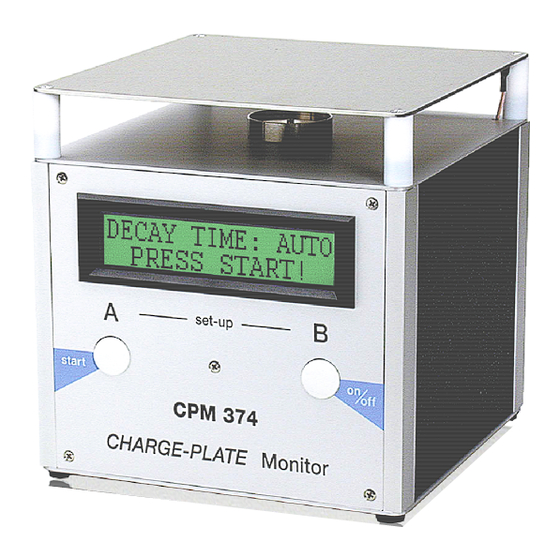
Important: The high voltage unit is protected by high impedance and therefore touch-proof. By the use of battery power and its compact design the CPM 374 is perfectly suited for mobile application. Of course it can be operated by using the provided wall power supply. As the CPM 374 is menu-driven and operated by 2 pushbuttons the device is very user-friendly. -
Page 4: Legend
Manual CPM 374 1.2 Legend Plate electrode 8 Handhold LCD-Display 9 Mains connection 12V DC Button «A» 10 Serial interface Protective cap 11 ±1V analog output with banana jack Modulator system 12 Ground jack Button «B» 13 Ground jack Thread for spacers... -
Page 5: Initial Operation
Furthermore the device has automatic power shut-off after 10min of inactivi- 3. Mode Selection The CPM 374 can be driven as charge plate monitor, voltmeter or electrostatic field meter. By pressing button «B» the modes can be switched. - Page 6 Manual CPM 374 The timer starts by passing the upper threshold (1000V in the example) TIMER = XX.Xs U = XXXXV and determines the decay time by reaching the lower threshold (100V in the example). The pa- rameters for the timer can be selected in the Setup.
-
Page 7: Saving Data
Charge Plate Mode 4.2. Saving Data It is possible to save the measured data in the internal memory. After every measurement the device prompts : SAVE VALUES? A<YES NO>B By pressing button «B» the current data are discarded and the next measurement can be per- formed. -
Page 8: Choose Storage Space
Manual CPM 374 4.2.1. Choose Storage Space In case of enough free space the device prompts: FILE NO: XX A<YES CHANGE>B Confirm the selection by pressing «A». The data is stored: PLEASE WAIT ! SAVING ! The selection can be modified by pressing button «B». The device displays: FILE NO: XX A<-10... - Page 9 Charge Plate Mode Afterwards the starting voltage can be set START: U = 1000V A<OK CHANGE>B Confirm the displayed value by pressing «A» or press «B» to select a new one. Values are switched in the following order: Next the stop voltage is set: STOP: U = 100V A<OK CHANGE>B...
-
Page 10: Calibration
Manual CPM 374 After pressing button «A» the device inquires if the memory should be cleared: CLEAR MEMORY? A<YES NO>B Important: If you have changed the parameters, the memory must be cleared to apply the changes, because stored data always include the stored parameters. -
Page 11: Voltmeter Mode
5. Voltmeter Mode 5.1. Volt Meter For metering voltages with the CPM 374 the plate electrode has to be removed. Afterwards the voltage measuring head MK11 has to be mounted on the modulator system of the integrated electrostatic field meter. -
Page 12: Zero Adjust
Manual CPM 374 V-Mode: Plate! A<OK CHANGE>B Confirm the selection and exit SETUP by pressing «A». Mount the selected part (Mk11 or Plate) on the system. The result is displayed in Volts for the selected part. 5.3.2. Zero Adjust If you press button «B» for NO in 5.3 Settings the device asks for a zero adjust: ZERO ADJUST ? A<YES... -
Page 13: Electrostatic Field Meter Mode
Electrostatic Field Meter Mode 6. Electrostatic Field Meter Mode For operation in electrostatic field meter mode the upper plate has to be removed. Νο Νο Νο Νο measuring head may be installed. 6.1. Metering an Electrostatic Field Only static (DC) fields can be measured with the integrated electrostatic field meter . -
Page 14: Warranty
Manual CPM 374 EFM DEFECT ! REPAIR IS NEEDED If the supply voltage of the NiMH battery falls below 6.7 Volt, the device returns in the upper line: LOW BATTERY ! The battery has to be charged, although the current measurement can be completed. -
Page 15: Maintenance And Calibration
External static fields caused by high charges in the instruments surrounding have to be avoided. 13. Scope of Delivery The charge plate monitor CPM 374 is delivered with: • Charge Plate Monitor CPM 374 •... - Page 16 Manual CPM 374...
Need help?
Do you have a question about the CPM 374 and is the answer not in the manual?
Questions and answers