Table of Contents
Advertisement
Quick Links
Advertisement
Table of Contents

Summary of Contents for SPECS XR 50
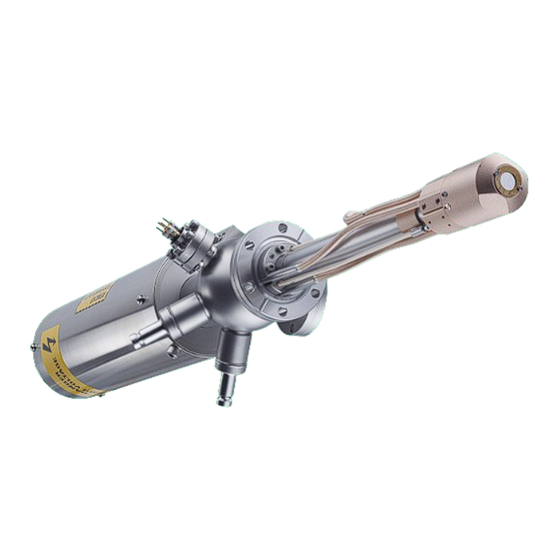
- Page 1 XR 50 XR 50 NAP X-Ray Source User Manual V3.1 | May 02, 2016...
- Page 2 © 2016 . All rights reserved. No part of this manual may be reproduced without the prior per- mission of SPECS GmbH. Other product and company names mentioned in this document may be the trademarks or registered trademarks of their respective owners and are used for iden-...
-
Page 3: Table Of Contents
Basic Electrical Checks Unstable Operation at Low Power Cross Talk between Anodes Chapter 5 – Maintenance X-Ray Source Check Replacing the Anode Replacing the Cathode Replacing the Water Inlet Replacing the Aluminium Window Anode Storage XR 50 V3.1 | May 02, 2016... - Page 4 Voltages and Currents 7.3.1 Anode Voltage and Current 7.3.2 Emission Current 7.3.3 Filament Current and Voltage 7.3.4 Water Current Magnetic Fields Chapter A – XR 50 NAP Construction Operation Replacing the Window Index XR 50 V3.1 | May 02, 2016...
- Page 5 Figure 23: Anode cooling circuit Figure 24: Heat cooling circuit Figure 25: Principle of operation Figure 26: The voltages and currents involved in the X-ray source Figure 27: Construction of the XR 50 HP and XR 50 XR 50 V3.1 | May 02, 2016...
- Page 6 This page intentionally left XR 50 V3.1 | May 02, 2016...
-
Page 7: Chapter 1 - Introduction
Chapter 1 – Introduction Welcome to the user manual for the SPECS XR 50. This instrument is an X-ray source with a twin anode that is optimized for XPS measurements. This chapter explains briefly how to use the manual and points you to further sources of inform- ation. -
Page 8: Safety
Make measurements only with specially insulated tools rated for voltages higher than 20 kV! The XR 50 module uses high voltages up to 15 kV! It is important to comply with the following safety directives: Ÿ... -
Page 9: Environmental Operating Conditions
1.5 mm thickness are not permeable. In addition to the regulations, restrictions, codes, and rules for protection against radiation which have to be observed by the law at the operational site of the XR 50, SPECS recommends the following: Ÿ... - Page 10 Ÿ 800–1200 mbar Air conditioning is advisable in order to ensure the ambient requirements, especially for dis- sipating heat produced by the equipment. XR 50 V3.1 | May 02, 2016...
-
Page 11: Chapter 2 - Installation
35 mm is too small. There are no major restrictions on the orientation of the XR 50; however, if it is mounted on a spherical chamber with the energy analyzer on top, the 4-pin feedthrough should be aligned horizontally. -
Page 12: Differential Pumping
Reduction of aging effects of the anode and the Al window. Figure 1: Differential pumping flange The simplest solution for a bypass is the installation of a flexible bellows between the XR 50 bypass flange and a suitable flange on the vacuum chamber. Depending on your configuration, you may also want to fit a valve to the bypass line in order to be able to isolate the differential pumping section from the pumping chamber. -
Page 13: Z-Drive (Optional)
Figure 2: Bypass ring in the open position 2.2.3 Z-Drive (Optional) The XR 50 can be supplied with an optional Z-drive so that the source can be retracted from its working position. This protects the head of the source (and its aluminium window) from dam- age, e.g. -
Page 14: Water Cooling
2.4.1 Fitting the Protection Cap During operation, the top flange of the XR 50 is at high voltage. For safety reasons, a protection cap prevents access to this flange. A safety interlock switch mounted on the side of the cap is closed when the cap is correctly in position. -
Page 15: Head Cooling Circuit
2.4.2 Head Cooling Circuit The XR 50 has a second cooling circuit to cool the area around the filament and anode. The body of the source remains cool, reducing radiative transfer of heat to other components (or the sample). -
Page 16: Connecting Electrical Supplies
2.5.1 Electrical Connections Figure 4 provides an overview of the electrical as well as the water connections for the XR 50. If you have a water chiller supplied by SPECS, you can set it so that is it automatically switched on and off by the CCX 70. -
Page 17: Interlocks
Figure 4: Electrical and water connections 2.5.2 Interlocks The XR 50 is protected by a number of interlocks: Ÿ Water—sensors inside the CCX 70 monitor the water flow and temperature, sending the signal to the UXC 1000. If these parameters fall outside the limits set in the UXC 1000, source operation is stopped. -
Page 18: Anode And Filament Conditioning
Anode and Filament Conditioning After baking out the XR 50, there will still be adsorbates on the working surfaces of the source. These will cause outgassing and HV discharges when you try to operate the source. The con- ditioning procedure removes these adsorbates by slowly ramping the source parameters up to their operating values. -
Page 19: Figure 6: Conditioning The Filament
13. Condition the filament and power for anode 2 in the same way as for anode 1. Note As noted above, the HV conditioning applies to both anodes. There is therefore no need to per- form the Anode 2 HV conditioning if you have already done this for anode 1. XR 50 V3.1 | May 02, 2016... - Page 20 This page intentionally left XR 50 V3.1 | May 02, 2016...
-
Page 21: Chapter 3 - Operation
Chapter 3 – Operation This chapter describes how to switch the XR 50 on and off and alter the operating parameters. The UXC 1000 controls the source. It also activates the CCX 70 water cooling control box and reads the status of the water cooling. Figure 7 shows the front panel of the UXC 1000 with the controls. -
Page 22: Figure 8: Entering The Presets Menu
5. Press the ► key to select the preset. A new screen appears which shows a list of para- meters for the preset. The center column shows the current values of parameters; the right column shows the saved preset parameters that you are going to use. XR 50 V3.1 | May 02, 2016... -
Page 23: Adjusting Settings During Operation
After starting the source, the operating menu is displayed. The top parameter shows the power. This is the high voltage multiplied by the emission current. You can adjust the power with the encoder wheel. Figure 11: Operating menu XR 50 V3.1 | May 02, 2016... -
Page 24: Switching Off The Source
This switches the high voltage off and sets the filament to its standby value. The water cooling is still on in this case. Ÿ Press the Shutdown button. This switches the high voltage, the filament and the water sup- ply off. XR 50 V3.1 | May 02, 2016... -
Page 25: Chapter 4 - Troubleshooting
High-Voltage Sparks The most common problem that occurs during the operation of the XR 50 is high-voltage spark- ing. There are a number of reasons for this. If HV sparks occur, the power supply will switch off the HV and go into standby mode. At the beginning of operation and after venting or after repla- cing parts, some sparks may occur. -
Page 26: Basic Electrical Checks
The following checks may help you locate the cause of the problem. Contact SPECS (sup- port@specs.com) before performing potentially dangerous test procedures in your laboratory. As a first step, check the following: Ÿ Water cooling. Make sure that the water temperature, flow and quality are all adequate. -
Page 27: Unstable Operation At Low Power
When you try to operate the source around this threshold, the operation can be unpredictable. As a result, the XR 50 should be operated at powers above 5 W. Cross Talk between Anodes As described in "Cross-Talk"... -
Page 28: Figure 14: Correct Orientation Of Anode
Figure 15 is a cutaway that shows the correct distance between the top of the anode and the top of the copper cap (or underside of the protection ring). Figure 15: Distance of anode to cross-talk suppression ring XR 50 V3.1 | May 02, 2016... -
Page 29: Figure 16: Setting The Cap Position
Loosen the eight screws in the cap and slide the cap to the correct position. You can then tighten the screws. Figure 16: Setting the cap position Caution! Do not damage the surface of the anode. XR 50 V3.1 | May 02, 2016... - Page 30 This page intentionally left XR 50 V3.1 | May 02, 2016...
-
Page 31: Chapter 5 - Maintenance
Chapter 5 – Maintenance The major working parts of the XR 50 are easily accessible and can be replaced in a normally equipped laboratory. This chapter describes the maintenance tasks that you may need to per- form. For prices and delivery of spare parts, please contact SPECS. If you have any questions con- cerning these procedures or need further assistance, SPECS support is glad to help. -
Page 32: Replacing The Anode
5. Using the old anode as a guide, find the correct orientation of the new anode. Note the fol- lowing points: XR 50 V3.1 | May 02, 2016... -
Page 33: Replacing The Cathode
It will take 3 minutes before all high voltages are absent in the system. Wait at least 3 minutes before disconnecting any cables from the power supply or the X-ray source. Figure 17: Cathode (filament) assembly XR 50 V3.1 | May 02, 2016... - Page 34 Al-window has the same orientation as the anode. Push the cap all the way down so that it has the same distance as before. Remember to keep the spacer rings in place. 11. Check that the filament is correctly positioned as follows: XR 50 V3.1 | May 02, 2016...
-
Page 35: Replacing The Water Inlet
Even if you do not need to remove the anode, it is a good idea to do so—it will give you the opportunity to check the condition of the anode. Ÿ The length of the cooling tube should fit exactly—you should not need to force the tube into place. XR 50 V3.1 | May 02, 2016... -
Page 36: Replacing The Aluminium Window
It will take 3 minutes before all high voltages are absent in the system. Wait at least 3 minutes before disconnecting any cables from the power supply or the X-ray source. To replace the aluminium window: XR 50 V3.1 | May 02, 2016... -
Page 37: Anode Storage
Take care not to remove the active mater- ial of the anode. Ÿ Use a different brush for each anode material to prevent contamination. Label the brushes for future use. XR 50 V3.1 | May 02, 2016... - Page 38 This page intentionally left XR 50 V3.1 | May 02, 2016...
-
Page 39: Chapter 6 - Source Overview
Chapter 6 – Source Overview The XR 50 is a high-intensity twin anode X-ray source optimized for X-ray photoelectron spec- troscopy (XPS) experiments, also known as electron spectroscopy for chemical analysis (ESCA). Figure 19 shows the major parts that make up the XR 50. -
Page 40: Anode
"X-Ray Source Check" on page 25. general maintenance procedures) Table 1: Source features Anode The XR 50 has a silver-tipped anode coated with two thin films for different excitation energies. Using silver prevents the presence of Cu L breakdown structures that could otherwise com- α... -
Page 41: Excitation Energies
Mg K 1253.64 0.68 α1,2 Al K 1486.61 0.85 α1,2 Zr M 151.4 0.77 ζ Cu K 8055 α1 Cu L 931.6 α Cr K 5417 α1,2 Zr L 2042.4 α Ag L 2984.4 α XR 50 V3.1 | May 02, 2016... -
Page 42: Cross-Talk
Figure 21: Cross-talk suppression A cross-talk spectrum is shown in Figure 22. The peak highlighted in the aluminium spectrum is due to Mg cross-talk. XR 50 V3.1 | May 02, 2016... -
Page 43: Water Circulation
Water cooling is essential in order to prevent the anode from melting. Circuits There are two cooling circuits in the XR 50. The anode cooling is shown in the cutaway picture in Figure 23. Two concentric axial tubes form the cooling circuit—the inner delivers water directly to the anode, while the outer carries it away. -
Page 44: Specifications
As you can see, there are cooling blocks on either side which are connected with a U-tube. Figure 24: Heat cooling circuit Specifications The sections below describe the specifications for various aspects of the XR 50. 6.2.1 Anode The properties of the anode are listed below. Property... -
Page 45: Setup
Al, thickness about 1.7–2 µm, pressure proof to 1 mbar difference Mounting flange DN40CF, larger flanges upon request Max. diameter 37.8 mm Z-shift (optional) 50/100 mm Copper gaskets DN38CF Weight 10 kg Table 7: Mechanical properties specifications XR 50 V3.1 | May 02, 2016... - Page 46 This page intentionally left XR 50 V3.1 | May 02, 2016...
-
Page 47: Chapter 7 - Principles Of Operation
Chapter 7 – Principles of Operation The sections in this chapter offer some background details about he operation of the XR 50. Although not essential for normal use, this information may help you get a better under- standing of how the source works. The following topics are covered: Ÿ... -
Page 48: Voltages And Currents
. It is capable of powering the filament up to 10 V/ 8 A. When the XR 50 is in standby mode, the filament current is set to a lower value. The standby cur- rent is set so that the emission current in standby mode is around 0.1 mA. Under certain... -
Page 49: Water Current
Magnetic Fields The source is constructed mainly from copper, aluminium and other non-magnetic or dia- magnetic materials. There is a small residual magnetic field of >0.5 μT. XR 50 V3.1 | May 02, 2016... - Page 50 It is necessary to have a small field in the volume between the anode, sample and energy ana- lyzer in order to produce X-ray excited photoelectron lines of different kinetic energies from the same element inside the acceptance area. XR 50 V3.1 | May 02, 2016...
-
Page 51: Chapter A - Xr 50 Nap
X-ray source is isolated from the rest of the vacuum chamber. There is a thin (0.2 μm) silicon nitride window mounted on the front end of the XR 50 NAP. This allows the transmission of X-rays while providing a physical barrier between the source interior and the high pressure in the chamber. -
Page 52: Operation
Figure 27: Construction of the XR 50 HP and XR 50 Operation You need to attach a 60 l/s turbopump to the pumping port on the XR 50. This allows a max- imum pressure in the analysis chamber of 25 mbar. We recommend that you fit a bypass with a valve between the source and chamber. -
Page 53: Replacing The Window
If the window appears to have burst, it is likely that some flakes of the window will have landed inside the source. In this case, you need to remove the anode (see "Replacing the XR 50 V3.1 | May 02, 2016... - Page 54 There needs to be an electrical contact between the window and the body of the source; however, this only needs to be a thin connection. You will see the paint applied to the original window—use this as a guide when applying new paint. XR 50 V3.1 | May 02, 2016...
-
Page 55: Index
High pressure Emission 17 , 42 Excitation Lines Radiation Window See Aluminium Window Relative Intensities Return/ Repair Feedthrough 21 , 34 Filament See Cathode Safety Safety Interlock Switch Satellites Guard Ring 22 , 31 Shutdown XR 50 V3.1 | May 02, 2016... - Page 56 19 , 46 Specifications Standby Troubleshooting Water Current Water Circulation Water Cooling Water Current Water Inlet Weight Window 45 , 47 Working Distance Working Pressure X-Rays Excitation Energies Generation 15 , 41 Z Shift XR 50 V3.1 | May 02, 2016...
- Page 57 Continue on a separate sheet if necessary. Substance Decontamination Method 5. Legally Binding Declaration Organization Address Phone/Fax Name/Position I hereby declare that the information supplied on this form is complete and accurate. Date Signature Company Stamp SPECS Health and Safety Declaration | Page 1/1...
Need help?
Do you have a question about the XR 50 and is the answer not in the manual?
Questions and answers