Table of Contents
Advertisement
SAFETY WARNING
The symbols shown above are internationally accepted symbols that warn of potential hazards
with electrical products. The lightning flash with arrowpoint in an equilateral triangle means
that there are dangerous voltages present within the unit. The exclamation point in an
equilateral triangle indicates that it is necessary for the user to refer to the owner's manual.
These symbols warn that there are no user serviceable parts inside the unit. Do not open the
unit. Do not attempt to service the unit yourself. Refer all servicing to qualified personnel.
Opening the chassis for any reason will void the manufacturer's warranty. Do not get the unit
wet. If liquid is spilled on the unit, shut it off immediately and take it to a dealer for service.
Disconnect the unit during storms to prevent damage.
WARNING FOR YOUR PROTECTION READING THE FOLLOWING:
READ THESE INSTRUCTIONS
KEEP THESE INSTRUCTIONS
HEED ALL WARNINGS
FOLLOW ALL INSTRUCTIONS
INSTALL IN ACCORDANCE WITH THE MANUFACTURER'S INSTRUCTIONS is damaged
ONLY USE ATTACHMENTS/ACCESSORIES SPECIFIED BY THE MANUFACTURER.
Protect the power cord from being walked on or pinched particularly at plugs, convenience
receptacles, and the point where they exit from the apparatus.
1
Advertisement
Table of Contents

Summary of Contents for Fortem Technologies TrueView R20
- Page 1 SAFETY WARNING The symbols shown above are internationally accepted symbols that warn of potential hazards with electrical products. The lightning flash with arrowpoint in an equilateral triangle means that there are dangerous voltages present within the unit. The exclamation point in an equilateral triangle indicates that it is necessary for the user to refer to the owner’s manual.
- Page 2 Refer all servicing to qualified service personnel. Servicing is required when the apparatus has been damaged in any way, such as power-supply cord or plug is damaged, does not operate normally, or has been dropped. “Changes or modifications not expressly approved by the manufacturer could void the user’s authority to operate the equipment”.
- Page 3 Fortem TrueView Radar Model R20 Quick Start Guide Version 2.2.3 4/03/2018...
-
Page 4: Table Of Contents
Table of Contents Overview Audience Related Reference Documents End User License Agreement Package Contents Required Materials (Not Supplied) Physical Set Up Fortem TrueView Radar Graphical User Interface Connecting to your radar Connecting to the Static IPv4 Address Connecting to the Static IPv6 address Connecting to a DHCP address Connecting to the radar web interface Radar Configuration and Data Collection... -
Page 5: Overview
1 Overview 1.1 Audience For customers and partners who are using the Fortem TrueView Radar for the first time. This guide will walk users through initial setup and configuration. 1.2 Related Reference Documents API Documentation: T his document describes the API, how to use it to connect to the radar, receive data, send data to the radar, and how to parse the data output formats. -
Page 7: Package Contents
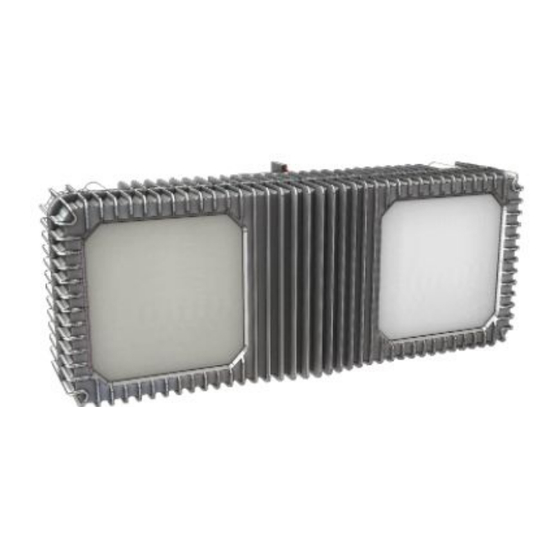
Package Contents The Fortem TrueView Radar evaluation unit ships with the following components: 1. The TrueView Radar unit 2. Power Cable (Herosi to Barrel Connector) a. Note: This cable has a pigtail to connect to the INS unit on the back of the radar b. -
Page 8: Physical Set Up
2 Physical Set Up The following steps will walk you through the initial setup of your radar for bench testing: 1. Attach the supplied Ethernet and power cables to the back of the radar unit a. Be sure to line up the arrows on the connectors as shown: b. -
Page 9: Fortem Trueview Radar Graphical User Interface
1. The radar unit will begin boot up when connected to power via the DC power connector. 4. Connect the Ethernet cable by plugging in the Hirosi end into the radar and the RJ-45 end of the ethernet cable directly to your computer/laptop or to a DHCP enabled router. (See the ... -
Page 10: Connecting To The Static Ipv6 Address
Connecting to the Static IPv6 address Your Fortem TrueView Radar is also configured with a static IPv6 address on the following network: IP Address Range: fd46:6f72:746d::1:0:<serial number> Prefix Length: Connecting to a DHCP address To connect to your TrueView radar via DCHP, you will need the following: ●... - Page 11 When you initially connect to the TrueView GUI, you will be brought to the E ULA p age, as shown below: You must accept the End User License Agreement before the radar will be able to function. After you accept the End User License Agreement , you will be brought to the V iew p age, as shown below:...
- Page 12 NOTE : The Radar GUI defaults to display in dark blue. You can easily toggle to “day mode” (shown above) by pressing the ‘d’ key on your keyboard. When the TrueView radar is off the screen will remain blank. If the unit is in Transmit mode, radar detections can be seen on this screen.
-
Page 13: Radar Configuration And Data Collection
4 Radar Configuration and Data Collection The TrueView Graphical User Interface Guide document details how to configure the radar and start collecting radar data. As a quick start, to begin transmitting, simply click on the toggle button that is labeled “Transmit”... -
Page 14: Faq
5 FAQ 5.1 Where do I point the unit? Which side is up? The blue labels on the back panel of the radar can help you easily orient the device. For more detailed information, please see the radar Mechanical and Electrical ICD. 5.2 Is it safe to stand near the radar? It is always safe to stand near and handle the TrueView radar when NOT in transmit mode. - Page 15 The FCC has provided guidelines for Maximum Permissible Exposure limits to RF signals (See Table Below). The Fortem TrueView Radar operates between 15-16 Ghz (15000 Mhz). For General Population/Uncontrolled Exposure, The FCC recommends not exceed a power f or up to 30 minutes . In order to ensure you are not exceeding this 2...
Need help?
Do you have a question about the TrueView R20 and is the answer not in the manual?
Questions and answers