Table of Contents

Summary of Contents for Shiseido Handy Skin Sensor II
-
Page 1: Table Of Contents
Instruction Manual Contents ◆ For your safety …2 ◆ Notes on use/Cleaning instructions …4 1. Components …9 2. Setting up (Sensor Stand) …12 3. Charging Sensor …14 4. Charging Rechargeable battery …15 5. Changing Rechargeable battery (Sensor) …16 ◆ Troubleshooting …18 ◆... -
Page 2: For Your Safety
◆ For your safety The precautions described in this manual are to ensure safe use of the unit and to prevent harm or injury to you and others. The manufacturer and vendor of this product take no responsibility for any personal injury or other accidental damage that may occur as a result of incorrect or inappropriate use of the product. - Page 3 ◆ For your safety Failure to follow the instructions may result in Caution personal injury or physical damage to equipment and surroundings. If liquid crystal leaks from the screen, do not handle with bare hands. Doing so may cause skin irritation. Should hands or clothing come in contact, wash immediately with water.
-
Page 4: Notes On Use/Cleaning Instructions
◆ Notes on use Do not use this unit for purposes other than skin analysis. This unit is precision equipment. Do not drop or knock it against other objects. If this unit is subjected to any strong shocks, it may result in malfunction. ... - Page 5 IEEE802.11b,IEEE802.11g,IEEE802.11n) If the radio equipment uses the above listed 2.4GHz band channels, you can use all the bandwidth and avoid channels used by radio-frequency identification readers. It employs DSSS modulation method and OFDM modulation method, and the interference range is 40m. ...
- Page 6 Thus, when the HSS products are disposed of within E.U., please contact Europe of SHISEIDO. When you need the “Product Data Sheet” related to the internal batteries (issued by battery manufacturer), please ask for it to Europa of SHISEIDO.
- Page 7 ◆ FCC / IC Compliment statement Note : This equipment has been tested and found to comply with the limits for a Class B digital device, pursuant to part 15 of the FCC Rules. These limits are designed to provide reasonable protection against harmful interference in a residential installation.
- Page 8 - Connecter l'équipement à une prise sur un circuit différent de celui auquel le récepteur est connecté. - Consulter le revendeur ou un technicien radio/télévision expérimenté. Operation is subject to the following two conditions: (1) this device may not cause interference, and (2) this device must accept any interference, including interference that may cause undesired operation of the device.
-
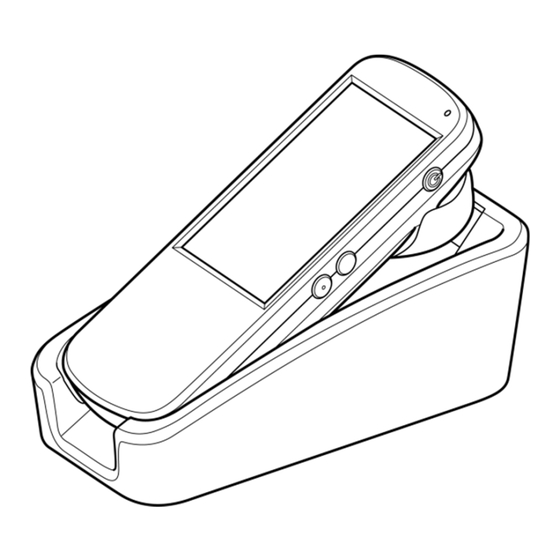
Page 9: Components
1. Components Sensor (Back) (Front) LED lamp Tip of Sensor Power switch Mode select button Measurement button Battery compartment cover Strap hole (With Battery compartment cover open) (Side) Connector cover Close-up Serial number *It is printed on the inside. Cable hole cover (With Connector cover open) (With Cable hole cover open) Cable hole cover... - Page 10 1. Components Sensor stand (Front) (Back) Cable guide Skin tone calibration plate Serial number Close-up Skin tone calibration plate RGB Value *Serial number and USB connector the value shown here are an example. (With Skin tone calibration plate cover open) (Seen from the top) Serial number Battery slot...
- Page 11 1. Components USB cable, miscellaneous AC adapter (for Sensor stand) Ⓐ Connector for Sensor stand Ⓑ Connector for AC adopter *Use when you connect the cable to Sensor AC – USB adopter stand. USB cable (for Sensor, with a bushing) Ⓐ...
-
Page 12: Setting Up (Sensor Stand)
2. Setting up (Sensor stand) 1. Connect AC adapter (for Sensor stand) to Sensor stand. USB connector 2. Loosen Locking screw, secure USB connector with Connector stopper, and then tighten Locking screw. Locking screw Connector stopper... - Page 13 2. Setting up (Sensor stand) 3. Insert the cable on AC adapter (for Sensor stand) through Cable guide. *Handle with care and do not damage the cable. Cable guide 4. Place Sensor stand on a flat surface. Plug AC adapter into an electrical outlet. Electrical outlet Caution Only use included AC adopter (for Sensor stand).
-
Page 14: Charging Sensor
3. Charging Sensor 1. Slide Sensor in from the top of Sensor stand to place it properly. Caution Sensor will not charge if it is placed in a wrong direction or not set in place properly. 2. Sensor stand will charge the battery inside Sensor. LED lamp LED lamp indication Charging... -
Page 15: Charging Rechargeable Battery
4. Charging Rechargeable battery 1. Insert Rechargeable battery into Sensor stand in the correct direction. Follow the direction indicated by the triangle. The indentation on the left Caution It will not charge if it is inserted in a wrong direction. 2. -
Page 16: Changing Rechargeable Battery (Sensor)
5. Changing Rechargeable battery (Sensor) Warning Never use Rechargeable battery if it is inflated. It may cause overheating, fire or explosion. 1. Remove Battery compartment cover. Push the corners of Battery compartment cover with your fingers and slide until a gap opens at the bottom. - Page 17 5. Changing rechargeable battery (Sensor) 2. Insert fully charged Rechargeable battery. Be sure to insert rechargeable battery to the battery compartment with triangle mark on battery matches to the same mark in the housing as shown. Also, you may find slotted groove on the left side on the battery.
-
Page 18: Troubleshooting
◆ Troubleshooting Sensor Symptom Solution Check • Is Rechargeable battery correctly inserted to Sensor? • Is it charged? It does not turn Solution • Change to charged Rechargeable battery. • When you turn it on, press down on Power switch for 2-3 seconds. - Page 19 ◆ Troubleshooting Sensor Symptom Solution Check • Is the brightness of the screen set too low? • Is there a strong source of light nearby? The display is dark. Solution • Change the brightness. (For instructions on how to change the setup, refer to Counter Utilization Manual.) •...
- Page 20 ◆ Troubleshooting Sensor Symptom Solution Check The result value • Do the serial number for Sensor and the serial number for of Skin Tone Sensor stand match? analysis is displayed on an Solution extreme position • Make sure to pair Sensor and Sensor stand by the serial like corners of the number and calibrate skin tone from the setup screen.
-
Page 21: Usb Connection With The Designated Device
◆ USB connection with the designated device 1. To connect the designated device, use USB cable (for Sensor, with a bushing). 2. Remove Battery compartment cover, and remove Rechargeable battery and Cable hole cover. 3. Connect the correct end of USB cable (for Sensor, with a bushing). -
Page 22: Specifications
◆ Specifications Sensor Measure mode Texture / Polarized / Skin Tone Screen size Approx. 43 times (With 14-inch monitor) Imaging element ¼ inch CMOS camera sensor CMOS Camera Pixel size 5.55 × 5.55 μ m Pixel count 640 (H) × 480 (V) pixel Element 3 group/ 4 element Optical lens... - Page 23 ◆ Specifications Sensor stand LED off Not connected to power Charging the battery in Sensor stand LED lamp indication Green Connected to power Blinking in green Charging Sensor Blinking in red Abnormal (Overloaded current/Overheating) Power source Via AC adapter Weight Approx.
- Page 24 ◆ Specifications Equipment Name: Handy Skin Sensor Ⅱ Model Name: HSSⅡ U.S.A FCC ID: 2AO35-HSS2 Canada IC: 23766-HSS2...
Need help?
Do you have a question about the Handy Skin Sensor II and is the answer not in the manual?
Questions and answers
cuanto vale esta maquina la quiero comprar