Table of Contents
Advertisement
HomeAssure 4G
Quick Start Guide
In-Home Cellular Personal
Emergency Response System (PERS)
Table of Contents
Items in your Box . ........................................................... 3
Step 1: Reading the Directions ....................................... 5
Step 2: Preparing your System ....................................... 6
Step 3: Activating your System . ...................................... 7
Step 4: Talking to the Call Center ................................... 8
Step 5: Wearable Accessories ........................................ 9
Step 6: Setting up your Wearable .................................. 10
Step 7: Care4Mom App .................................................. 11
Step 8: Receiving Messages . ........................................... 12
Step 9: Using the Call Out Button . .................................. 13
Quick Reference: Battery Life . ........................................ 16
Quick Reference: LED Indicators .................................... 17
Important Tips and Reminders . ...................................... 19
Regulatory Compliance: FCC/IC . ..................................... 20
2
Advertisement
Table of Contents

Summary of Contents for Anelto HomeAssure 4G
-
Page 1: Table Of Contents
Table of Contents HomeAssure 4G Items in your Box ............3 Step 1: Reading the Directions ........5 Step 2: Preparing your System ........6 Step 3: Activating your System ........7 Quick Start Guide Step 4: Talking to the Call Center ........8 Step 5: Wearable Accessories ........9 Step 6: Setting up your Wearable ........10 Step 7: Care4Mom App ..........11 Step 8: Receiving Messages ..........12 Step 9: Using the Call Out Button ........13 Quick Reference: Battery Life ......... 16 Quick Reference: LED Indicators ........17 Important Tips and Reminders ........19 Regulatory Compliance: FCC/IC ........20 In-Home Cellular Personal Emergency Response System (PERS) -
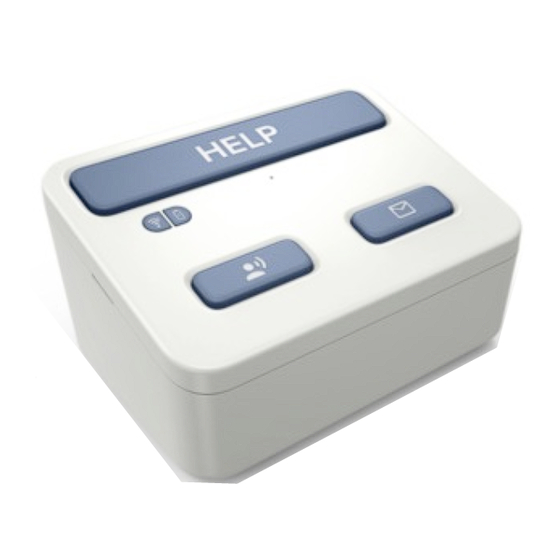
Page 2: Items In Your Box
Items in your Box Items in your Box On/Off Switch (on bottom) Power Cord (not shown) HELP Button Cellular LED Microphone Power LED HomeAssure 4G with Integral Power Cord Call Out Button Message Button Speaker (on bottom) LED Call Indicator 1 Wearable (Green or Red) (with Pendant and Wristband Accessories) Page... -
Page 3: Step 1: Reading The Directions
Step 1: Reading the Directions Step 2: Preparing your System 1) Locate a place in your home that is near an available standard wall outlet. You may wish to place it near your bed or 1) Please take a few minutes to read through this quick in a central location. It should be easy to access for daily and/or start guide so you will be familiar with the steps emergency use. required to set up your HomeAssure 4G System. 2) Plug the Power Cord into a wall socket not controlled by a switch. 2) Please make sure someone is with you while you are setting up and testing your system. Plug into Wall 3) The HomeAssure 4G System is programmed with Socket multiple audio prompts to make it easier to use. Please follow the audio prompts if they occur. 3) There is a small on/off switch on the bottom of your HomeAssure 4G System. The unit is turned off prior to shipment. Please turn the unit over and slide the switch to turn your system ON. 4) The HomeAssure 4G System will take a few moments to wake up. The Network LED will blink GREEN while it is attempting to find your network and will be solid GREEN when your HomeAssure 4G System is connected to the network and is ready to make emergency calls. 5) Should the power to the HomeAssure 4G System ever be interrupted it will announce, “No Power Available” and the Power LED will turn RED. It will begin to blink RED if the backup battery gets low. When power is again available it will announce, “Power Restored” and the Power LED will go off. -
Page 4: Step 3: Activating Your System
Step 4: Talking to the Call Center Step 3: Activating your System 1) Your HomeAssure 4G System will prompt you and 1) The operator should have your name from your guide you through the remaining setup. original order form, as well as the address where your 2) When your HomeAssure 4G System is ready it will say, HomeAssure 4G System will be located. The operator “Your device is now ready. Hello, it’s time to test your will confirm: system to make sure it is working properly. Please a. Your name press and release the HELP Bar now to allow us to b. Your HomeAssure 4G System address ** confirm that your system is working properly.” c. The quality of your call 3) Press and then release the 2) The HomeAssure 4G System will automatically end HELP Bar. the call when the operator hangs up. You will hear a tone and the 3) The HomeAssure 4G System will announce, “Your RED light on the HELP bar will call has ended. Thank you.” turn on. At this point the HomeAssure 4G System will announce, “Dialing the ** Please note that the location of the HomeAssure 4G Emergency Response Center now. To cancel this call, System as your call center registered address is a key please press the HELP Bar now.” part of identifying your location should you need 4) If the call is not cancelled, you will hear a ring-back emergency help. PLEASE DO NOT MOVE THE sound from your HomeAssure 4G System and an... -
Page 5: Step 5: Wearable Accessories
Step 5: Wearable Accessories Step 6: Setting up your Wearable 1) The Wearable Button can be exchanged between the 1) The Wearable is ready to use. Please make sure someone is near your HomeAssure 4G System when testing your Wearable. Wristband and Pendant. Locate your Wearable Button 2) Press the center of the Wearable (this is where the call in the box. button is located). a. Turn the Wristband or Pendant accessory so the 3) You will feel the click of the Button when you first push it. front is resting on a solid surface. You are now Push the Button down firmly and then RELEASE it. You will see looking at the back of the accessory. You will the LED at the top of the button start to flash. A insert the Wearable Button into the Wristband green LED flash indicates that you are initiating a call from your HomeAssure 4G System to the or Pendant accessory from the back. With the call center. While the green LED is flashing, you grey button side facing down, push the button may cancel the call by pressing and holding the into the accessory. Please use sufficient force to Button for three seconds. The LED will stop push and lock the Wearable Button into the flashing and the call will be cancelled. Wristband or Pendant accessory. 4) A red LED flash indicates that your Wearable b. Remove the Wearable Button from the is unable to initiate a call from your HomeAssure 4G System. Please move closer to your Wristband or Pendant accessory by pressing on HomeAssure 4G System and try again. the outside edge of the front of the Wearable 5) Whenever a call is initiated, the HomeAssure while holding the outside bracket. Sufficient... -
Page 6: Step 7: Care4Mom App
Step 7: Care4Mom App Step 8: Receiving Messages 1) Your loved ones can keep in touch with 1) Your loved ones may send you messages using the you using the Care4Mom app. It may be Care4Mom app. They may wish to remind you of a downloaded from the Apple or Google app doctor’s appointment or just wish you a good day. store. You may also use this app yourself if you have an Android or iOS smartphone. 2) Your HomeAssure 4G System may also 2) This is part of your service and offers the automatically send you reminder messages when capability to send a reminder, view vital needed. signs, and to see if your system is ready to 3) When you see the blue LED blinking on the use. 3) Once the app is installed and opened, you Message Button, push the button and listen to the will need to complete the Caregiver message. You may wish to have a notepad and pencil profile. If you are using the app yourself, ready in case you need to jot down any information. this will be your information. If you wish 4) The blue LED will go off when the message is no to have someone else use the app, they longer available. will be entering their information. When requested, your Account Number can be found on the barcoded sticker on the bottom of the HomeAssure 4G System. Please be sure the email address and XXX0000 telephone number information is entered correctly. We use some of this... -
Page 7: Step 9: Using The Call Out Button
Step 9: Using the Call Out Button Quick Reference: Battery Life 1) The Call Out Button allows you to call out for various services from your HomeAssure 4G System based on your service plan. These could include calls to test your system, 1) The backup battery on the HomeAssure 4G System is reach a designated phone number, and other functions. designed to last up to 36 hours from a full charge if 2) Press the Call Out Button to place a call. You will be given removed from power. The Wearable battery is designed audio prompts to guide you to the services you need. to last two years, at which time a new Wearable will be 3) The LED on the Call Out Button will flash green while your required to replace the old one. call is being connected and then turn solid green during 2) If your HomeAssure 4G System backup battery has a the call. When the call is completed your system will charge of less than 20% the system will announce, “No announce, “Your call has ended. Thank you.” and the call power available; please check system”. It is important that will disconnect. you charge your HomeAssure 4G System by plugging it in 4) The green LED will go off when your call has ended. to a wall socket as soon as possible. 3) If you do not plug in the HomeAssure 4G System, then the blue Message Button LED will light. Push the Message Button and the HomeAssure 4G System will remind you, “No power available; please check system”. If you do not Call Out charge your HomeAssure 4G System backup battery, it will Button remind you again 30 minutes later. Message Button Page... -
Page 8: Quick Reference: Led Indicators
Quick Reference: LED Indicators Quick Reference: LED Indicators The following is a guide to the LED indicators on the HomeAssure 4G System and Wearable: 1) HELP BAR RED LED – Blinking red: Emergency call is being made. Solid red: Emergency call is in progress. No LED: No call is in progress. 2) ICON LEDs – a. The Power LED will be solid RED when power is unavailable; it will blink RED when backup battery is getting low and must be charged; it will be OFF when plugged in. b. The Network LED will blink GREEN while it is attempting to find your cellular network and will be solid GREEN when your HomeAssure 4G System is connected to the cellular network and is ready to make emergency calls. 3) CALL OUT BUTTON GREEN LED – Blinking green: Connecting your call. Solid green: Call in progress. No LED: No call is in progress. 4) MESSAGE BUTTON BLUE LED – Solid Blue: You have a voice message telling you to charge the HomeAssure 4G System. Blinking Blue: You will also hear a tone letting you know that a new message is available. Push the Message Button to play the message. No LED: All messages have been played. 5) WEARABLE LED – Blinking Red: Wearable is NOT in communication with HomeAssure 4G System and NO CALL can be made. Blinking Green: Call is being initiated from Wearable (will cease blinking after seven seconds). Solid Green for seven seconds when the call is connected. Page... -
Page 9: Important Tips And Reminders
Important Tips and Reminders Regulatory Compliance: FCC/IC The user’s manual or instruction manual for an intentional or unintentional radiator shall caution the user that changes or modifications not expressly approved by the party 1) Important: Your HomeAssure 4G System requires power (or adequate responsible for compliance could void the user's authority to operate the equipment. battery charge) and cellular signal to make an emergency call. This device complies with Part 15 of the United States FCC regulations and has an Industry Canada registration (IC ID). Operation is subject to the following two conditions: (1) This 2) The BLUE LED Message Button allows us to keep in touch with you device may not cause harmful interference, and (2) this device must accept any interference and provide you with important information. Please press the received, including interference that may cause undesired operation. Message Button whenever it is lit to listen to these messages. NOTE: This equipment has been tested and found to comply with the limits for a Class B digital device, pursuant to the FCC and IC rules. These limits are designed to provide 3) The Wearable Button is water resistant and designed to be worn in reasonable protection against harmful interference in a residential installation. This the shower or bath. You should always wear your wearable device. equipment generates, uses and can radiate radio frequency energy and, if not installed and 4) Your HomeAssure 4G System is not water or splash resistant. used in accordance with the instructions, may cause harmful interference to radio communications. However, there is no guarantee that interference will not occur in a 5) Your account number is located on the bottom of your HomeAssure particular installation. If this equipment does cause harmful interference to radio or 4G System. television reception, which can be determined by turning the equipment off and on, the user is encouraged to try to correct the interference by one or more of the following measures: 6) Please test your system at least once a month. • Reorient or relocate the receiving antenna. 7) By activating the product, User agrees to allow Call Center and their • Increase the separation between the equipment and receiver. affiliates to use the home address on file to provide services in the •... - Page 10 HAVE QUESTIONS? Please refer to the more detailed information at www.anelto.com or contact your Dealer. Page...
Need help?
Do you have a question about the HomeAssure 4G and is the answer not in the manual?
Questions and answers