Advertisement
Quick Links
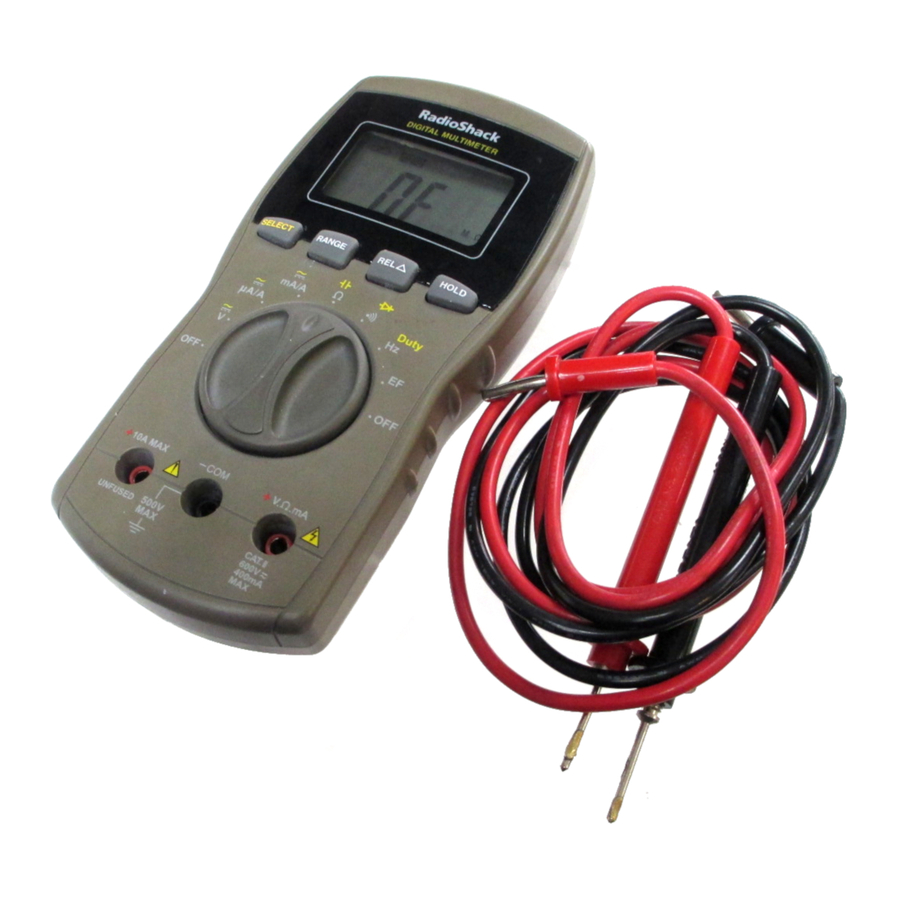
64/4CPIG"&KIKVCN"/GVGT
22-811
%106'065
Introduction ....................................................... 1
A Word About Safety ........................................ 1
Special Panel Markings .................................... 2
Specifications .................................................... 2
A Quick Look at Your Meter ............................. 3
Preparation ........................................................ 3
Installing a Battery ............................................ 3
Connecting the Test Leads ............................... 3
Using the Meter ................................................. 3
Turning the Meter On/Off/Testing the Display .. 3
Before You Start ............................................... 3
Holding a Measurement ................................... 4
Using Relative Measurement ........................... 4
Automatic Power Off ........................................ 4
Using Power Lock ............................................ 4
Making Measurements ...................................... 4
Measuring DC/AC Voltage ............................... 4
Measuring AC Voltage Riding On a DC Source
Bias 5
Measuring Three-Phase AC Voltage 5
Measuring DC/AC Current ............................... 5
Measuring Resistance ...................................... 5
Measuring Capacitance ................................... 6
Checking Continuity ......................................... 6
Checking Diodes .............................................. 6
Checking Diode Polarity 6
Measuring Frequency/Duty Cycle .................... 7
Measuring an Electric Field .............................. 7
Care .................................................................... 7
Cleaning ........................................................... 7
Replacing the Fuse .......................................... 7
+0641&7%6+10
Your RadioShack 42-Range Digital Meter is a
portable, compact, auto-ranging, digital
multimeter. It is ideally suited for field, lab,
shop, and home applications. The multimeter
provides precise measurements and is built
to provide the highest possible reliability. The
meter measures DC and AC voltage up to
600V, DC and AC current up to 10A,
resistance up to 40MΩ, capacitance from
0.5nF to 40µF, and frequency from 10Hz to
4MHz. Its 3
3
/
-digit digital display can display
4
up to 4,000 units.
Important:
• Completely read this manual before you
use this meter.
• If you are not familiar with meters and
testing procedures, we suggest you read
Using Your Meter (Cat. No. 62-2039, not
supplied) before you use this meter.
Auto-Ranging with Manual-Ranging
Override — the meter automatically selects
a range when you measure voltage, current,
resistance, capacitance, and frequency. You
can also manually set the range when
measuring values you know are within a
certain range.
Diode Check Function — the meter safely
checks semiconductor junctions for open,
short, or normal.
Electric Field Detection — Lets you detect
the presence of AC voltage.
Data Hold Function — the meter holds the
displayed value, so you can see the reading
even after you disconnect the probes.
Auto-Polarity Operation — protects your
meter and gives valid measurements when
you connect the leads in reverse polarity.
Auto Power Off — the meter turns itself off
after about 30 minutes if you do not change
any setting, helping conserve battery power.
UL Listed — your meter has passed the
stringent safety tests required by
Underwriters Laboratories.
Note: The UL mark does not indicate that this
product has been evaluated by Underwriters
Laboratories for the accuracy of its readings.
Latest IC and Display Technology —
ensures reliability, accuracy, stability, and
ease of operation.
Overload and Transient Protection —
helps protect the meter from accidental
overload in most ranges.
Note: Your multimeter requires one 9V
battery (not supplied).
#"914&"#$176"5#('6;
We have taken every precaution in designing
this meter to ensure that it is as safe as we
can make it. But safe operation depends on
you, the operator. We recommend that you
follow these simple safety rules:
• Never apply voltages to the meter that
exceed the limits given in the
specifications. Never apply more than
600V DC and AC between the input
jacks and ground.
• Use extreme caution when working with
voltages above 100V. Always disconnect
©
RadioShack and RadioShack.com are trademarks
used by RadioShack Corporation.
OWNER'S MANUAL — Please read before using this equipment.
power from the circuit you are measuring
before you connect test leads to high-
voltage points.
• Never connect the test leads to a source
of voltage when you select the diode
check, resistance measurement,
capacitance measurement, continuity
function, frequency function, and electric
field detection function, or any of the
current measurement functions.
• Always discharge any capacitors of the
circuit under test before you attach test
leads.
• Always turn off power and disconnect
the test leads from the circuit you are
testing before you replace the meter's
battery or fuse.
• Never operate the meter unless its back
cover and battery cover are in place and
fully closed.
• This equipment is rated for installation
category II (maximum 3600VA).
• Because many AC/DC sets have a
potentially hot chassis, be sure the top of
your workbench and the floor
underneath it are made of non-
conductive materials.
This meter is fully calibrated and tested,
Under normal use, no further adjustment
should be necessary except as noted in this
Owner's Manual. If the meter requires repair,
do not try to adjust it yourself. Take it to your
local RadioShack store.
WARNINGS:
• Use extreme caution in the use of this
device, improper use of this device
can result in injury or death. Follow
all safeguards suggested in this
owner's manual, in addition to normal
safety precautions, in dealing with
electrical circuits. Do not use this
device if you are unfamiliar with
electrical circuits and testing
procedures.
• Never try to probe with both test
leads at the same time or hold both
test leads in one hand.
• Use extreme care while using the
meter to measure current and voltage
in commercial electrical panels.
Unlike a home AC outlet, a
commercial electrical panel has
2001 RadioShack Corporation.
All Rights Reserved.
Advertisement

Related Manuals for Radio Shack 22-811


Summary of Contents for Radio Shack 22-811
- Page 1 64/4CPIG"&KIKVCN"/GVGT 22-811 OWNER’S MANUAL — Please read before using this equipment. %106'065 a range when you measure voltage, current, power from the circuit you are measuring resistance, capacitance, and frequency. You before you connect test leads to high- Introduction ............1 can also manually set the range when voltage points.
- Page 2 52'%+(+%#6+105 tremendous current surge potential. Sensitivity This is especially true for three-phase 400Hz–4k–40kHz ......... 50 mVrms (Accuracies at 73.4 ° F (23 ° C) ±5 ° C, <75% RH) industrial electrical panels. A small 400kHz ..........100 mVrms spark from one of these panels can 4MHz ..........
- Page 3 #"37+%-".11-"#6" " "6 ". 100'%6+0) '#&5 Warning: Always turn off power to the circuit ;174"/'6'4 you are about to measure before you probe The test leads (black and red) supplied with the test leads into high-voltage points. your meter are rated for 1000 volts. Use only •...
- Page 4 " "/ 1.&+0) '#574'/'06 3. To select manual range mode, press –3.500 volts as a reference, then while the meter is in auto-range measure +3.500 volts, the meter might RANGE Press to hold all indications on the HOLD 7KJE 7KJE 7KJE 7KJE mode.
- Page 5 /GCUWTKPI"6JTGG/2JCUG"#%" 5. Touch the probes to the circuit you want 5. Connect the meter’s test leads in series 8QNVCIG to test. with the circuit. Your multimeter is designed primarily to When you measure DC voltage, – appears 6. Apply power and read the current. measure household AC voltages.
- Page 6 Note: With no resistance connected 4. Attach the red test lead to the positive ohms (meaning the circuit is not across the test leads (meaning side of the capacitor and attach the continuous). E$< E$< E$< E$< resistance is infinite), appears when black test lead to the negative side of the "&...
- Page 7 Do not try to remove the back cover. 5. To remove the fuse, gently pull the red ribbon holding it. The fuse pops out. 22-811 AO0070AAA1 RadioShack Corporation 12A01 Fort Worth, Texas 76102...
Need help?
Do you have a question about the 22-811 and is the answer not in the manual?
Questions and answers