Table of Contents
Advertisement
Quick Links
Getting Started
Introduction and Safe Operation............................................. 2-3
General Description................................................................ 4-5
Battery Information ................................................................. 6-8
Quick Start with Viper™ LS6 .....................................................9
Ribbon Loading & Selection .....................................................10
Label Loading...........................................................................11
Keyboard ............................................................................ 12-13
Working with the Viper™ LS6
Using the Viper™ LS6 ....................................................... 14-16
Tools for Building Labels
Text Tool .......................................................................17
Serialization Tool ..................................................... 18-19
Symbol Tool...................................................................20
Line Tool .......................................................................22
Box Tool ........................................................................23
Data Tool ................................................................. 24-25
Bar Code Tool.......................................................... 26-27
Date / Time Tool ............................................................28
Setting Up the Viper™ LS6................................................ 29-30
Saving Files ............................................................ 31-32
..................................................... 33-34
Cleaning Instructions ................................................................36
Troubleshooting.................................................................. 37-41
Warranty Information ..... .........................................................42
General Specifications..............................................................43
Replacement Parts and Accessories........................................44
INDEX
.................35
..............
1
Advertisement
Table of Contents

Related Manuals for Panduit Viper LS6

Summary of Contents for Panduit Viper LS6
-
Page 1: Table Of Contents
INDEX Getting Started Introduction and Safe Operation..........2-3 General Description..............4-5 Battery Information ..............6-8 Quick Start with Viper™ LS6 .............9 Ribbon Loading & Selection .............10 Label Loading................11 Keyboard ................12-13 Working with the Viper™ LS6 Using the Viper™ LS6 ............14-16 Tools for Building Labels Text Tool ...............17 Serialization Tool ............. - Page 2 ™ Operator’s Manual Panduit Corp. 1819 Atlanta Highway Cumming, GA 30040 Attention: Labeling Systems Department Printers & Software – 866-871-4571 www.panduit.com/eg/ls6 email: id-support@panduit.com LS6-MAN-A REV. 3 – 12/07/01...
-
Page 3: Introduction And Safe Operation
This manual will guide you step by step through the set-up, operation, and troubleshooting of the Viper™ LS6 Printer. If you have problems not covered herein, contact your local Panduit Sales Representative or call Panduit Technical Support at 888-506-5400, ext 7470. -
Page 4: Introduction And Safe Operation
INTRODUCTION & SAFE OPERATION WARNING: When the printer has been in use for an extended period of time, the printer motor may become hot. DO NOT touch the printer motor with bare hands. Information to USA Users NOTE: This printer has been tested and found to comply with the limits for a Class A digital device, pursuant to Part 15 of FCC rules. -
Page 5: General Description
GENERAL DESCRIPTION Cutter Knob LCD Display RS232 Serial Port Label Door Ribbon Door PCMCIA Slot AC Adapter Plug (Future) - Page 6 GENERAL DESCRIPTION Print Technology The Viper™ LS6 prints labels using thermal transfer printing technology. The print head melts ink contained on a thin web of material, allowing the ink to transfer to the label material. The print head operates at 203 dots per inch. Smart Label Roll –...
-
Page 7: Battery Information
BATTERY INFORMATION A 12 volt NiMH (Nickel-Metal Hydride) battery comes with the Viper LS6 printer PARTIALLY CHARGED with a recommended 15 HOURS OF CHARGING PRIOR TO USE. Charging of the Viper LS6 battery should be accomplished ONLY with Panduit Model LS6 AC Adapter/Battery Chargers (Part No. - Page 8 BATTERY INFORMATION Battery Removal 1. Remove battery door by using a coin to depress the tab. 2. Remove battery by unplugging and lifting out of battery compartment. 3. Re-install the battery by reversing steps 1 and 2 ensuring that the battery is firmly plugged into the plug connection on the printer.
- Page 9 BATTERY INFORMATION Replacing the Lithium Cell 1. Plug-in the AC Adapter to preserve the stored settings and files during the battery replacement. 2. Remove the main battery pack to gain access to the lithium cell. 3. Peel away the lithium cell warning label to expose the lithium cell in a plastic holder.
-
Page 10: Quick Start With Viper™ Ls6
The following tool selection screen will appear: 8. Select the Icon or press [T] to select a Text Tool. 9. Type in up to 4 lines of up to 16 characters. Example: “PANDUIT” 10. When complete, press the key to return to the HOME Screen. -
Page 11: Ribbon Loading & Selection
RIBBON LOADING & SELECTION Ribbon Lock Knob Ribbon Cartridge Ribbon Door The Viper™ LS6 uses a cartridge based ribbon (wax or resin) to form legends on labels. The ribbon is loaded into the printer by the following steps: Printer must be turned OFF. 1. -
Page 12: Label Loading
LABEL LOADING Label Door Label Roll Label Roll Socket Label Mandrel Feed Path Width Guide (Push Down to Adjust) Cutter Knob (Pull Forward for Cutting) Each roll of labels or tape used in the Viper™ LS6 is uniquely identified by the mandrel holding the labels. -
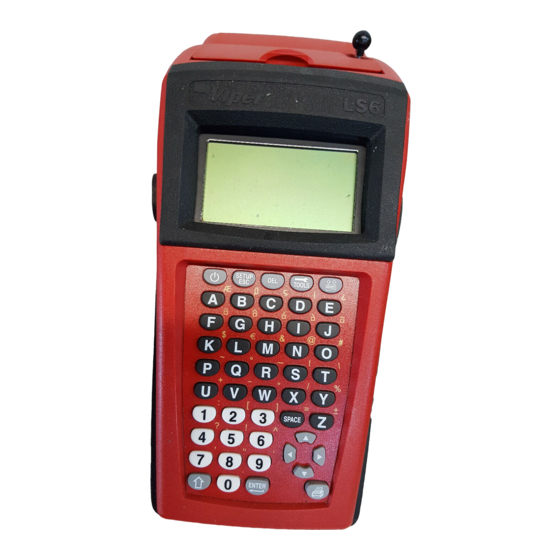
Page 13: Keyboard
KEYBOARD Delete Setup / Tools Escape Key Label Power Ribbon On / Off Feed Space Directional Arrows Print Key Shift Enter Key... -
Page 14: Keyboard
KEYBOARD KEY / SYMBOL COMMON FUNCTIONS POWER Turns the printer ON, then turns the printer OFF. SETUP/ Activates the Setup Menu for printer functionality, escape key to back out of ESCAPE menus . DELETE Deletes tools or characters. TOOLS Used for selecting Text, Serial, Symbol, Line, Box, Data, Barcode, and Date/Time tools. -
Page 15: Using The Viper™ Ls6
USING THE Viper ™ LS6 The Home Screen The Home Screen is where the user creates or builds his label. Available tools are text, serialization, bar code, symbol, line, box, time/date, and Data. See the tools for building labels below. The Home Screen consists of the following elements: Label Preview The left side of the screen is where the user builds the label by placing tools... - Page 16 USING THE Viper ™ LS6 Key Mode Indicator The key mode indicator is located in the lower left corner. The key mode is indicated as follows: • Blank for Normal - The character on the key will be selected when pressed.
-
Page 17: Using The Viper™ Ls6
USING THE Viper ™ LS6 TOOL Key key is used to activate the tool selection function. The Viper™ LS6 provides 8 tools for building labels and wire markers; text - serialization - , line - , symbol - , box - , data - , bar code - date/time - . -
Page 18: Text Tool
TEXT TOOL The Text Tool is used to add up to 4 lines of 16 characters each (maximum) to a label. The following are the steps for building a Text Tool. Step 1: Press from the home screen . Step 2: Select from the Tools buttons using the arrow keys, then or by selecting Quik-Key... -
Page 19: Serialization Tool
SERIALIZATION TOOL The Serialization Tool is used to automatically number labels sequentially either with numeric or alphanumeric characters. Up to four (4) serializations can be defined for one text string and serializations can be printed as text or as a bar code. The Serialization Tool is used in the following progression of steps in building labels: Step 1: Press from the home screen. - Page 20 SERIALIZATION TOOL Step 8: Prompt Screen 6 – Next serialization / Options Press [N] for next serialization or to complete and return to HOME screen. Viper™ allows up to four (4) serializations per line per tool. Press [O] for Options – Included options are: a) Span [L]ine –...
-
Page 21: Symbol Tool
SYMBOL TOOL The Symbol Tool is most used for building facility identification markers using continuous tape. Symbols can also be used on any other labels but their size will be restricted by the physical size of the labels. The Symbol Tool is used in the following progression of steps in building labels: Step 1: Press from the home screen. - Page 22 SYMBOL TOOL Available Symbols and their assigned library number are listed below:...
-
Page 23: Line Tool
LINE TOOL The Line Tool is used to display a solid line either horizontally or vertically on the label. The line can be ¼, ½ or the full length (or width) of the label. The following are steps to building a Line Tool: Step 1: Press from the home screen. -
Page 24: Box Tool
BOX TOOL The Box Tool is used to display a box on the label. The box can be ¼, ½, or full length (or width) of the label. The box can be a frame only, filled, clear, or reverse. Reverse will invert (white on black) the text or symbols contained within the borders of the box. -
Page 25: Data Tool
DATA TOOL The Data Tool is used to link a list of label legends to a label. The Data Tool also defines how to place the label legends on the label. The list can consist of up to 100 legends, where each legend can be up to 4 lines of up to 16 characters. - Page 26 DATA TOOL Step 7: Prompt Screen 5 – Tool Name Allows user to give a descriptive name to the tool. Default is “No Name”. Press to continue. Step 8: Prompt Screen 6 – Data List [E]dit – Allows user to create or revise the internal data list. Press to continue.
-
Page 27: Bar Code Tool
BAR CODE TOOL The Bar Code Tool can be used for bin labeling or component identification and can be used in combination with other tools for effective identification of property or components. The Bar Code Tool can be printed with and without a checksum or human readable text. - Page 28 BAR CODE TOOL SERIALIZED BAR CODES For serialized bar codes, please see the Section entitled “Serial Tool”. A serialization is first built and then the options are set to print as a Bar Code. BAR CODE HELP Help can be accessed at any time while in the Bar Code Tool by pressing Note: If the Bar Code Tool is chosen and no characters are entered, the printer default is to set up a blank tool on the screen.
-
Page 29: Date/Time Tool
DATE/TIME TOOL The Date/Time Tool allows the user to apply a time stamp to labels. The time and date applied to the label will be defined per the internal clock of the Viper™ LS6. Please see section Setting up the Viper™ LS6 page 29. Setting Time, Date, Alarm on the LS6 1. -
Page 30: Setting Up The Viper™ Ls6
SETTING UP THE VIPER™ LS6 Activate the setup screens by pressing the key. The setup screens allow the user to set the default operating parameters for the printer, and the initial settings for the tools. Working in the Setup Screens: •... -
Page 31: Setting Up The Viper™ Ls6
SETTING UP THE VIPER™ LS6 Mode Printer Component Automatic Power Down Wire Marker Contrast Terminal Peel or Cut Position Tape Sound Effects Strip Feed Control Notches Low Battery Setting Print Quality Setting Set Time, Date, and Alarm Utility Label Battery Charging Left Margin Games Right Margin... -
Page 32: Saving Files
SAVING FILES The Viper™ LS6 has the ability to save and retrieve label files and data files. The operating system uses a portion of memory for a label work area, and another portion to store the internal data list. The user creates a label in the label work area. -
Page 33: Saving Files
SAVING FILES 5. Press after completion of folder name which will activate the file naming prompt screen to scroll Files Select [N]ame to name the label file that has been defined. Use up to 8 characters are allowed for the name. 6. -
Page 34: Retrieving Files
RETRIEVING FILES Retrieving a Label File 1. Press to show SETUP menu 2. Select [F]ile – Activates folder selection prompt: to scroll Folders 3. Select the folder where the label file is located. Press 4. Select the label file. Press to Accept to scroll Files 5. -
Page 35: Retrieving Files
RETRIEVING FILES 7. Pressing [I]nfo will prompt the following screen. [P]rotect – Toggles between [Yes/No] to define file as Read Only. [L]ocked – Toggles between [Yes/No] to protect file from deletion. Warning – Pressing [C]lear All will result in loss of Printer Memory (Label Files) and is irreversible! 8. -
Page 36: Interfacing To A Computer - Viperlink
The website also has other pertinent information related to the LS6. It will be required for the user to download a operating system upgrade via the Panduit website to his personal computer then use the ViperLink™ software to upload the revised operating system to the LS6 Printer. -
Page 37: Cleaning Instructions
CLEANING INSTRUCTIONS Cleaning the Print Head and Drive Roller The print head should be cleaned regularly, and more often in harsh environments. The drive roller should be cleaned whenever foreign matter, such as dust or adhesive, is present. 1. Turn off power to printer. 2. -
Page 38: Troubleshooting
TROUBLESHOOTING This section helps identify printer conditions and problems that can often be solved by the user. If you are unable to correct the problem contact Panduit Technical Service at 866-871-4571. SYMPTOM ACTION POWER • Printer does not To turn printer ON, depress the power button. - Page 39 TROUBLESHOOTING SYMPTOM ACTION PRINTING Continued 6. Carefully remove any labels caught in the printer. • Ensure that labels are properly positioned in label path and that width guides are in contact with both sides of the label. • End of label roll reached. Detach end of label roll from core.
- Page 40 TROUBLESHOOTING SYMPTOM ACTION PRINTING • Streaks or “dead Ribbon is wrinkled. See ribbon wrinkling. spots” in printed • image. Poor coating quality on tag or label surface. Contact media supplier for assistance. • Clean print head with pre-saturated cleaning card (LS6-CLN), or soft-stemmed swab and isopropyl alcohol.
- Page 41 TROUBLESHOOTING SYMPTOM ACTION LABELS • Labels not Make sure that label mandrel is firmly seated in registering socket • Width guide loose. Make sure the width guide is properly placed and fixed in place. Per specific label. • Printer not reset for new label format. Turn printer OFF, then ON again.
- Page 42 TROUBLESHOOTING SYMPTOM ACTION BAR CODES Continued • Bars too thick. Reduce print head energy setting. • Insufficient print Print head energy setting is too low. Increase contrast: Bars are print head energy setting. not dark enough, spaces are not light enough.
-
Page 43: Warranty Information
(for product) or 90 days (for printers) from the date of delivery. Printer warranty is void if Panduit printers are modified, altered or misused in any way. Use of Panduit printers with any product other than the specified Panduit products for which the printer was designed, constitutes misuse. -
Page 44: General Specifications
Display: 128 x 64 dots graphic LCD LCD Contrast Control: Adjustable via keypad Operating System: Panduit proprietary – user upgradeable. User Memory: 128 Kbytes of RAM available for label storage. Memory Card: Future - PCMCIA Type I and Type II memory cards. -
Page 45: Replacement Parts And Accessories
REPLACEMENT PARTS AND ACCESSORIES DESCRIPTION PART NUMBER Wax Ribbon – Black LS6-RWBLK Resin Ribbon – Black LS6-RRBLK Resin Ribbon – White LS6-RRWHT Hybrid Ribbon – Black (Future) LS6-RHBLK Battery Pack LS6-BP LS6 ViperLink™ Software w/ LS6-PCKIT Computer Connection Cable LS6 AC Adapter/Battery Charger LS6-ACS Carrying Case LS6-CASE...
Need help?
Do you have a question about the Viper LS6 and is the answer not in the manual?
Questions and answers