
Subscribe to Our Youtube Channel
Summary of Contents for Briggs & Stratton Snapper XD
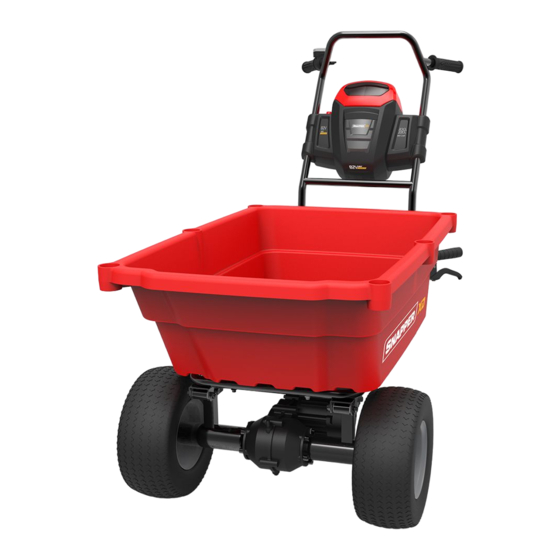
- Page 1 82V Snapper Utility Cart 1696858(SXDUC82) Owner’s Manual TOLL-FREE HELPLINE: 1-800-317-7833 www.snapper.com Read all safety rules and instructions carefully before operating this tool.
-
Page 2: Table Of Contents
CONTENTS Product Specifications ..................... 2 Safety Information ....................3 Symbols ........................6 Features and Controls ..................... 7 Assembly ......................... 8 Operation ........................ 9 Battery & Charger ....................13 Maintenance ......................15 Environmentally Safe Battery Disposal..............16 Troubleshooting ......................17 Limited Warranty ....................18 PRODUCT SPECIFICATIONS 82V UTILITY CART Rating .............................. -
Page 3: Safety Information
SAFETY INFORMATION W A R N I N G Read all safety warnings and all instructions. Failure to follow the warnings and instructions may result in electric shock, fire, and/or serious injuries. Save all warnings and instructions for future reference. GENERAL OPERATION •... - Page 4 SAFETY INFORMATION • Do not operate in explosive atmospheres such as in the presence of flammable liquids, gasses or flammable dust. If in doubt, wait for dust to settle before using. • Be sure the area is clear of other people before moving. Do not allow children, bystanders, or pets in your work area when your utility cart is being moved.
- Page 5 SAFETY INFORMATION W A R N I N G Never stand in the bucket to activate the utility cart. MOVING ON SLOPES W A R N I N G Slopes are a major factor related to slip-and-fall accidents, which can result in severe injury. All slopes require caution. If you feel uneasy on a slope, do not drive on it.
-
Page 6: Symbols
SYMBOLS Some of the following symbols may be used on this product. Please study them and learn their meaning. Proper interpretation of these symbols will allow you to operate the product better and safer. SYMBOL DESIGNATION/EXPLANATION Voltage Current Power Time Type of current Type or a characteristic of current Do not expose to rain or use in damp locations. -
Page 7: Features And Controls
FEATURES AND CONTROLS Read this operator's manual and safety rules before operating your self-propelled utility cart. Compare the illustration in Figure 1 to your utility cart in order to familiarize yourself with the location of various controls and adjustments. Save this manual for future reference. -
Page 8: Assembly
ASSEMBLY UNPACKING • Carefully remove the product and any accessories from the box. Make sure that all items listed in the packing list are included. • Inspect the product carefully to make sure no breakage or damage occurred during shipping. •... -
Page 9: Operation
OPERATION W A R N I N G You are responsible for controlling and steering the utility cart once it is moving. Grasp the handle securely before moving. Make sure you are ready to move with the utility cart before pressing the on-off button and lock-out button. Keep a firm grip on the handle once you are moving. - Page 10 OPERATION LOCK/UNLOCK THE BRAKE (See Figure 4) • Step on the brake, the brake will be locked, and the utility cart will stop. • Step on the brake again, the brake will be unlocked. STARTING (See Figure 5) • To utilize your utility cart set the power switch (4) to the ON position. Brake Fig.
- Page 11 OPERATION W A R N I N G When moving in reverse. Be careful - Step back and be prepared to walk backwards. Consider standing to the side of the utility cart until you get used to moving backwards. STOPPING (See Figure 7) •...
- Page 12 OPERATION USING DRAWBAR (See Figure 9) W A R N I N G Never use drawbar on highway. Never turn on the cart when using drawbar. W A R N I N G Please follow the tractor or ZTR manual for those towing recommendations. Install the drawbar (See Figure 9) 1.
-
Page 13: Battery & Charger
BATTERY & CHARGER CHARGING PROCEDURE NOTE: The battery is not shipped fully charged. It is recommended to fully charge before first use to ensure that maximum run time can be achieved. This lithium-ion battery will not develop a memory and may be charged at any time. Low voltage charging: If the battery has been stored with little to no charge for a long period of time, the charger will go into recovery mode, which will take 20 hrs to fully charge the battery. - Page 14 BATTERY & CHARGER CHARGER MOUNTING 1. This charger can be installed hanging on a wall using two #8 screws (not included). 2. Locate the placement for the charger to be wall mounted. 3. If fastening to wood studs use 2 wood screws (not included). 4.
-
Page 15: Maintenance
MAINTENANCE Like any machine, maintaining your utility cart ensures its best performance and extends its life. Follow these procedures to keep your utility cart working at peak efficiency. • Check all screws and nuts regularly; tighten them as needed. Regularly check the plastic parts for cracks or broken pieces. -
Page 16: Environmentally Safe Battery Disposal
ENVIRONMENTALLY SAFE BATTERY DISPOSAL The following toxic and corrosive materials are in the batteries used in this tool battery pack: Lithium-Ion, a toxic material. W A R N I N G Toxic materials must be disposed of in a specified manner in order to prevent contamination of the environment. Before disposing of damaged or worn out Lithium-Ion battery packs, contact your local waste disposal agency for information and specific instructions. -
Page 17: Troubleshooting
TROUBLESHOOTING PROBLEM POSSIBLE CAUSE SOLUTION The battery is not properly To secure the battery pack, make sure the latch on bottom of the installed. battery pack snaps into place. Press and hold the lock-out button, and then thumb paddle within Lock-out button has timed out. -
Page 18: Limited Warranty
LIMITED WARRANTY Briggs & Stratton warrants that, during the warranty period specified below, it will repair or replace, free of charge, any part that is defective in material or workmanship or both. Transportation charges on product submitted for repair or replacement under this warranty must be borne by purchaser. - Page 19 LIMITED WARRANTY Normal We are and Tear - Like most mechanical devices, your unit is subject to wear even when properly maintained. This warranty does not cover repairs when normal use has exhausted the life of a part or the equipment. Maintenance and wear items such as filters, belts, cutting blades, and brake pads (except engine brake pads) are not covered by warranty due to wear characteristics alone, unless the cause is due to defects in material or workmanship.
- Page 20 Briggs & Stratton Corporation P.O. Box 702 Milwaukee, WI 53201 TOLL-FREE HELPLINE: 1-800-317-7833 388001696 Rev: 00 (08-09-17)
- Page 21 Chariot utilitaire Snapper de 82 V 1696858(SXDUC82) Manuel d’instructions ASSISTANCE TÉLÉPHONIQUE SANS FRAIS: 1-800-317-7833 www.snapper.com Veuillez lire attentivement tous les avis et instructions de sécurité avant d’utiliser ce produit.
- Page 22 TABLE DES MATIÈRES Spécifications du produit ..................2 Informations de sécurité ..................3 Symboles ........................ 6 Présentation des commandes et des fonctionnalités ..........7 Assemblage ......................8 Utilisation ........................ 9 Entretien de la batterie et du chargeur ..............13 Entretien ........................15 Mise au rebut de la batterie sans danger pour l’environnement ......
-
Page 23: Informations De Sécurité
INFORMATIONS DE SÉCURITÉ A V E R T I S S E M E N T Lisez tous les avertissements de sécurité et toutes les instructions. Le non-respect des avertissements et des instructions peut entraîner des chocs électriques, des incendies et / ou des blessures graves. Conservez ce manuel pour consultation future. - Page 24 INFORMATIONS DE SÉCURITÉ • Ne jamais transporter de passagers. • Ne l’utilisez pas si le bouton d’avance/arrière, le commutateur ou le bouton de sécurité ne fonctionne pas correctement. • Portez attention en opérant dans des conditions humides. • Ne l’opérez pas dans des atmosphères explosibles telles que la présence des liquides, gaz inflammables ou poussière inflammable.
- Page 25 INFORMATIONS DE SÉCURITÉ • N’exposez pas la batterie ou l'outil à des sources de flammes ou une température excessive. • Suivez toutes les instructions de charge et ne chargez pas le bloc-batterie ou l'outil dans un environnement où la température ambiante excède la plage de températures spécifiée dans les instructions. •...
-
Page 26: Symboles
SYMBOLES Certains de ces symboles suivants peuvent être utilisés pour ce produit. Veuillez les étudier et apprendre leur signification. L’interprète de ces symboles vous permettra d’opérer le produit au mieux et plus sûr. SYMBOLE DESIGNATION/EXPLICATION Tension Courant Puissance Temps Type de courant Type ou caractéristique de courant N’exposez pas la machine à... -
Page 27: Présentation Des Commandes Et Des Fonctionnalités
PRÉSENTATION DES COMMANDES ET DES FONCTIONNALITÉS Veuillez lire ce Manuel d’Instructions et les règles de sécurité avant d’utiliser votre chariot de jardin. Comparez l’illustration en Figure 1 avec votre chariot de jardin afin de vous familiariser avec les emplacements de divers contrôles et réglages. Veuillez conserver ce manuel pour la référence future. -
Page 28: Assemblage
ASSEMBLAGE DÉBALLAGE • Retirez soigneusement le produit et les accessoires de la boîte. Assurez-vous que toutes les pièces figurant sur la liste de contrôle sont incluse. • Examinez soigneusement le produit afin de vous assurer qu’il n y a aucune casse ou dommage survenue pendant l’expédition. -
Page 29: Utilisation
UTILISATION A V E R T I S S E M E N T Vous êtes responsable pour contrôler et piloter le chariot une fois qu’il commence son déplacement. Saisissez la poignée fermement avant le déplacement. Assurez-vous que vous êtes prêt à vous déplacer avec le chariot avant d’appuyer sur le bouton “On/Marche- Off/Arrêt”... - Page 30 UTILISATION LVERROUILLEZ /DÉVERROUILLEZ LE FREIN (Voir Figure 4) • Appuyez sur la pédale de frein, le frein sera bloqué et la Brouette s’arrêtera. • Appuyez sur la pédale de frein à nouveau et le frein sera débloqué. DEMARRAGE (Voir Figure 5) •...
- Page 31 UTILISATION A V E R T I S S E M E N T Lorsque vous vous déplacez en sens inverse. Soyez prudent.- Reculez et préparez-vous à marcher vers l'arrière. Vous pouvez rester sur le côté de la brouette jusqu'à ce que vous vous soyez habitué à la contrôler en marche arrière. ARRÊT (Voir Figure 7) •...
- Page 32 UTILISATION INSTRUCTIONS D’UTILISATION DE LA BARRE D’ATTELAGE (Voir Figure 9) A V E R T I S S E M E N T N’utilisez jamais la barre d’attelage sur la route. N’allumez jamais le chariot lors de l’utilisation de la barre. A V E R T I S S E M E N T Veuillez suivre le tracteur ou le manuel de la tondeuse à...
-
Page 33: Entretien De La Batterie Et Du Chargeur
ENTRETIEN DE LA BATTERIE ET DU CHARGEUR PROCÉDURE DE CHARGE REMARQUE: La batterie n’est pas livrée totalement chargée. Il est recommandé de la recharger totalement avant utilisation pour lui assurer une autonomie maximale. Cette batterie lithium-ion est exempte d’effet mémoire et peut être rechargée à... - Page 34 ENTRETIEN DE LA BATTERIE ET DU CHARGEUR MONTAGE DU CHARGEUR 1. Ce chargeur peut être installé au mur au moyen de #8 vis (non incluses). 2. Repérez l’endroit où vous désirez effectuer le montage mural du chargeur. 3. Si l’endroit choisi comporte des montants de bois, utilisez 2 vis à bois (non incluses). 4.
-
Page 35: Entretien
ENTRETIEN Comme toute autre machine, l’entretien de votre Chariot assure sa meilleure performance et augmente sa vie. Suivez ces procédures afin d’assurer que votre Chariot travaille à son efficacité de pointe. • Examiner tous les vis et écrous de temps en temps ; les serrez comme requis. Vérifiez les pièces en plastique régulièrement pour des fissures ou des pièces cassées. -
Page 36: Mise Au Rebut De La Batterie Sans Danger Pour L'environnement
MISE AU REBUT DE LA BATTERIE SANS DANGER POUR L’ENVIRONNEMENT Les cellules du bloc-batterie de cet outil comportent la ou les matières toxiques et corrosives suivantes : le LITHIUM-ION, une matière toxique. A V E R T I S S E M E N T Aoutes les substances toxiques doivent être éliminées d’une manière permettant d’éviter la contamination de l’environnement. -
Page 37: Dépannage
DÉPANNAGE PROBLÈME CAUSE POSSIBLE SOLUTION Pour sécuriser le bloc de batteries, assurez-vous que le loquet au La batterie est mal installée. fond du bloc de batteries se ferme avec un bruit sec. Le bouton de verrouillage est Pressez et maintenez enfoncé le bouton de verrouillage puis la relevé. -
Page 38: Garantie Limitée
GARANTIE LIMITÉE Briggs & Stratton garantit la réparation ou le remplacement gratuit, pendant la période de garantie spécifiée ci-dessous, de toute pièce présentant des vices de matériaux ou de fabrication. Les frais de transport du produit à réparer ou remplacer seront, dans le cadre de cette garantie, réglés par l’acheteur. - Page 39 LIMITED WARRANTY Réparation ou entretien inapproprié – Ce produit doit être entretenu selon les procédures et les programmes d’entretien décrits dans le manuel de l’utilisateur. En outre, il doit être dépanné ou réparé en utilisant des pièces d’origine Briggs & Stratton ou des pièces équivalentes.
- Page 40 Briggs & Stratton Corporation P.O. Box 702 Milwaukee, WI 53201 SERVICE D’ASSISTANCE TÉLÉPHONIQUE SANS FRAIS: 1-800-317-7833 388001696 Rev: 00 (08-09-17)
- Page 41 Carro de servicio Snapper de 82 V 1696858(SXDUC82) Manual Del Propietario LÍNEA GRATUITA LÍNEA DE AYUDA: 1-800-317-7833 www.snapper.com Leer todas las normas de seguridad y las instrucciones cuidadosaantes de utilizar esta herramienta.
-
Page 42: Especificaciones Del Producto
ÍNDICE Especificaciones del producto.................. 2 Información sobre seguridad..................3 Símbolos ......................... 6 Funciones y controles ....................7 Instrucciones de ensamblado .................. 8 Instrucciones de uso ....................9 Mantenimiento de la batería y el cargador ............. 13 Mantenimiento .......................15 Eliminación de la batería que no daña el medio ambiente ........16 Solución de problemas ...................17 Garantía Limitada ....................18 ESPECIFICACIONES DEL PRODUCTO... -
Page 43: Información Sobre Seguridad
INFORMACIÓN SOBRE SEGURIDAD A D V E R T E N C I A Lea y comprenda todas las instrucciones. El incumplimiento de las instrucciones señaladas abajo puede causar descargas eléctricas, incendios y lesiones serias. Guarde este manual para referencia futura. FUNCIONAMIENTO GENERAL •... - Page 44 INFORMACIÓN SOBRE SEGURIDAD • No utilizar si el botón de avance/retroceso, el interruptor de encendido/ apagado o el botón de seguridad no funcionan correctamente. • Tenga cuidado al operar la carretilla en condiciones húmedas. • No opere la carretilla en atmósferas explosivas como en presencia de líquidos, gases o polvos inflamables. En caso de duda, espere que el polvo se asiente antes de usarla.
- Page 45 INFORMACIÓN SOBRE SEGURIDAD • No exponga el módulo de la batería ni la herramienta al fuego o a temperaturas excesivas. • Siga todas las instrucciones de carga, y absténgase de cargar el módulo de la batería o la herramienta fuera de los intervalos de temperatura especificados en las instrucciones.
-
Page 46: Símbolos
SÍMBOLOS Algunos de los siguientes símbolos pueden ser usados en este producto. Obsérvelos y aprenda su signifi cado. Una correcta interpretación de estos símbolos le permitirá utilizar el producto mejor y de una forma más segura. SÍMBOLO DENOMINACIÓN/EXPLICACIÓN Voltage Current Power Time Type of current... -
Page 47: Funciones Y Controles
FEATURES AND CONTROLS Antes de hacer funcionar su carro de transporte, lea este manual del operador y las reglas de seguridad. Fig. 1 con su carro de transporte para familiarizarse con la ubicación de los distintos controles y sistemas de ajuste. Guarde este manual para usarlo como referencia futura. -
Page 48: Instrucciones De Ensamblado
INSTRUCCIONES DE ENSAMBLADO DESEMPAQUETADO • Saque cuidadosamente la herramienta y los accesorios de la caja. Asegúrese de encontrar todos los artículos mencionados en la lista de empaque. • Revise la herramienta cuidadosamente para asegurarse de que no se quebró o dañó durante el envío. •... -
Page 49: Instrucciones De Uso
INSTRUCCIONES DE USO A D V E R T E N C I A Usted es el responsable de controlar y dirigir la carretilla una vez que está en movimiento. Agarre el mango con seguridad antes de moverse. Asegúrese de que está listo para moverse con la carretilla antes de pulsar el botón de encendido/ apagado y el botón de seguridad. - Page 50 INSTRUCCIONES DE USO BLOQUEO/DESBLOQUEO DEL FRENO (Véase la figura 4) • Pise el freno , estará bloqueado, y la carretilla se parará. • Pise el freno otra vez y se desbloqueará. NICIO (Véase la figura 5) • Para utilizar el camión, gire el interruptor de encendido (4) a la posición ON. Freno Fig.
- Page 51 INSTRUCCIONES DE USO A D V E R T E N C I A Cuando se mueva marcha atrás, esté atento para moverse rápido por si la carretilla se tambalea dirigiéndose a usted. Tenga cuidado; échese atrás y prepárese para caminar hacia atrás. DETENER (Véase la figura 7) •...
- Page 52 INSTRUCCIONES DE USO USO DE LA BARRA DE TRACCIÓN (véase la Figura 9) A D V E R T E N C I A Nunca utilice la barra de tracción en una carretera. Nunca ponga en marcha el carro cuando utilice la barra de tracción. W A R N I N G Siga las instrucciones de remolque en el manual del tractor o del cortacésped ZTR.
-
Page 53: Mantenimiento De La Batería Y El Cargador
MANTENIMIENTO DE LA BATERÍA Y EL CARGADOR PROCEDIMIENTO DE CARGA NOTA: La batería no se envía completamente cargada. Se recomienda cargarla completamente antes de usarla por primera vez para garantizar que se pueda obtener el máximo tiempo de funcionamiento. Esta batería de ión de litio no desarrolla memoria y se le puede cargar en cualquier momento. - Page 54 MANTENIMIENTO DE LA BATERÍA Y EL CARGADOR MONTAJE DEL CARGADOR 1. Este cargador se puede instalar en una pared atornillándolo con dos #8 tornillos (no incluidos). 2. Localice el lugar en el que quiere colgar el cargador. 3. Si la pared es de madera, utilice dos tornillos especiales para madera (no incluidos). 4.
-
Page 55: Mantenimiento
MANTENIMIENTO Como ocurre con cualquier máquina, el mantenimiento de la carretilla garantiza su mejor rendimiento y amplía su vida útil. Siga estos procedimientos para que la carretilla siga funcionando con la mayor eficiencia. • Revise todos los tornillos y tuercas con regularidad cuando sea necesario. Compruebe si las piezas de plástico tienen grietas o roturas con regularidad. -
Page 56: Eliminación De La Batería Que No Daña El Medio Ambiente
ELIMINACIÓN DE LA BATERÍA QUE NO DAÑA EL MEDIO AMBIENTE Las baterías utilizadas en este cortasetos contienen los siguientes materiales tóxicos y corrosivos: Litio-ión, un material tóxico. A D V E R T E N C I A Se debe desechar los materiales tóxicos de la forma especificada para evitar contaminar el medio ambiente. Antes de desechar los paquetes de baterías de ión de litio dañados o desgastados, póngase en contacto con su agencia local para eliminación de desechos para obtener información e instrucciones específicas. -
Page 57: Solución De Problemas
SOLUCIÓN DE PROBLEMAS PROBLEMA CAUSAS POSIBLES SOLUCIONES The battery is not properly Para asegurar la batería, asegúrese de que los pestillos del fondo installed. del pack de la batería encajan en su lugar. Se ha agotado el tiempo de Pulse el botón de bloqueo y, sin soltarlo, mueva el accionador de espera del botón de bloqueo. -
Page 58: Garantía Limitada
GARANTÍA LIMITADA Briggs & Stratton se compromete a que, durante el período de garantía especificado a continuación, reparará o sustituirá, de manera gratuita, cualquier pieza con defectos de material o fabricación, o de ambos. El comprador deberá correr con los gastos de transporte del producto que envíe para reparación o reemplazo al amparo de esta garantía. - Page 59 LIMITED WARRANTY por ejemplo, daños producidos por un impacto o daños producidos por corrosión química/agua. Mantenimiento o reparaciones inadecuadas: el producto debe someterse a labores de mantenimiento de acuerdo con los procedimientos y plazos establecidos en el manual del usuario, y para el mantenimiento y las reparaciones se deben utilizar piezas Briggs &...
- Page 60 Briggs & Stratton Corporation P.O. Box 702 Milwaukee, WI 53201 LÍNEA GRATUITA LÍNEA DE AYUDA: 1-800-317-7833 388001696 Rev: 00 (08-09-17)
Need help?
Do you have a question about the Snapper XD and is the answer not in the manual?
Questions and answers
I live in Gaylord MI and need repair for my snapper . Battery is good charger great, but the wagon will no longer operate. Where can I go to have it fix.