Advertisement
Advertisement
Table of Contents

Subscribe to Our Youtube Channel
Summary of Contents for Tecmen Freflow V3
- Page 1 Purifying Respirator Read all instructions and warnings before use. Users must understand this booklet prior to use. Keep these User Instructions for future reference. If you have questions regarding these products, just feel free to let Tecmen know. Produced by...
- Page 2 • Don’t remove the respirator until you are in a safe area. • Operating temperature range between -5°C and +55°C. • The TECMEN Freflow PAPR system is not intrinsically safe. Keep away from flammable, or explosive atmosphere. • At very high work rates the pressure in the device may become negative at peak inhalation flow.
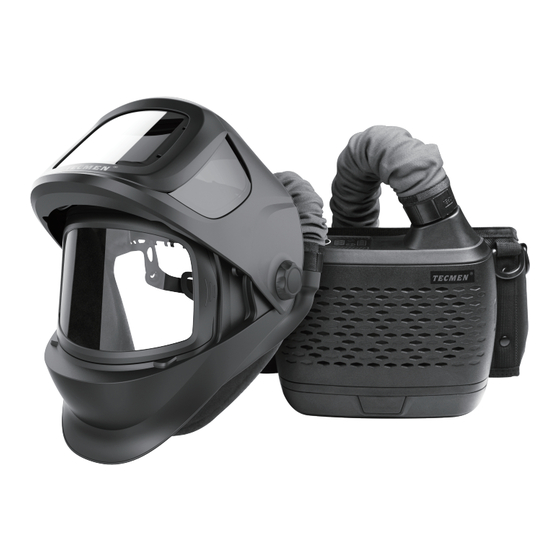
- Page 3 DESCRIPTION & SPECIFICATION A complete Tecmen PAPR System includes a blower, filtration unit, breathing tube assembly, battery, and a welding helmet with auto darkening filter. The blower assembly draws surrounding air through its filter and supplies purified air to the facial via a breathing tube.
- Page 4 RESPIRATOR SPECIFICATIONS Manufacturer’s minimum design flow rate: 165+lpm (5.8+cfm) Airflow Rate Low speed: 170+lpm (6+cfm) High speed: 210+lpm(7.4+cfm) Battery type: Rechargeable Li-ion Battery Standard Battery Battery duration: 9h-low speed(170+lpm); 5h-high speed(210+lpm) Battery charge time: 3 hours Battery life: 550 charges Filter Filter efficiency: 99.97% Alarms: Visible, Audible and Vibrate...
-
Page 5: Particulate Filter
PARTICULATE FILTER WARNING Never use the respirator without the spark screen, pre-filter, and the HE particulate filter (HEPA) installed. Always replace filter when damaged or blocked. Do not try to wash, clean or reuse dirty ones. Stored at a temperature between 14°F to 131°F (-10°C to 55°C),in a clean environment without direct light. Remember not confuse the markings on a filter relating to any standard other than EN 12941 with the classification of this device when used with this filter. - Page 6 BATTERY WARNING The battery should be charged in a place that is electrically safe. The charging time of different types of battery is different. Actual charging time depends on the remaining battery capacity. Please check out the voltage of the charger (AC 110V~220V). Please separate the battery from the body before charging.
- Page 7 Disassembling the Battery Push the button, take the battery out as fig.3a / 3b / 3c shown direction. Separate it from the body. Push Pull fig.3a fig.3b fig.3c Assembling the Battery Fitting the battery to the blower body, push until hearing ‘Click’ sound. (see fig.4a / 4b) Push Push fig.4a...
-
Page 8: Breathing Tube
Notice of battery use • Do not put PAPR unit with power-on in the package. It’s better to remove the battery from the body when put in the package. • Do not keep PAPR unit inside the car in hot summer season. •... -
Page 9: Air Flow Control
SHOULDER STRAP & BELT CUSHION Connect hooks to belt (See fig.9a). Connect with the blower by screw locking (See fig.9b). Hook fig.9a fig.9b AIR FLOW CONTROL Two indicator lights on display (See fig.10a). Low Speed-170+lpm; High Speed-210+lpm. When turn on the PAPR, default setting is low speed airflow; Switch the airflow by short press the Button (See fig.10b). - Page 10 Always exit the contaminated area immediately if any of the following conditions occur: • IF some problem is shown in any part of the product, for example, the air supply is stopped or its amount is decreased; • IF it gets hard to breathe, feeling dizzy or headache, feeling the smell or taste of the contaminants and its stimulus occurred;...
- Page 11 Airflow rate test Take airflow test always before using this product. Make sure all the components are fully assembled before testing. Connect the end of hose to the bottom of airflow indicator and then start the Button. Keep the Flow Indicator vertical.(see fig.12) If the ball inside the pipe floating above the limited line in low speed mode, it proves normal function.
-
Page 12: Troubleshooting Guide
STORAGE The TECMEN Freflow PAPR system is not intrinsically safe. Keep away from flammable, or explosive atmosphere. Storage should be in a clean, dry, cool place with filter. Blower storage Stored at a temperature between 14°F to 131°F (-10°C to 55°C),in a clean environment without direct light. - Page 13 WELDING HELMET OPERATING INSTRUCTION WARNING Auto-Darkening welding helmets are designed to protect the eye and face from sparks, spatter and harmful radiation under normal welding conditions. This auto darkening filter will automatically turn on when pick it up. The filter automatically changes from a light state to a dark state when an arc is struck, and it returns to the light state when welding stops.
- Page 14 CARTRIDGE OPERATION • BATTERY INSTALLATION Slide the battery holder out of the auto darkening filter, (remove the used battery when replacing battery), put new CR2450 batteries inside the battery holder, and put fig.13 the battery holder back into the auto darkening filter. Please make sure the anode and cathode of the battery are installed correctly (See fig.13).
- Page 15 • VARIABLE SHADE CONTROL After turn on the lens, short press “FUNC” button to choose “SHADE”, and adjust the lens shade number. Use “ ” and “ ” buttons to select the lens shade in the dark state. The shade range for each mode are as follows: Cutting Mode −...
- Page 16 • Face the helmet in the direction of use, exposing it to the surrounding light conditions. • Press “ ” button repeatedly until the lens darkens, then press “ ” button until lens clears. Helmet is ready for use. Slight readjustment may be necessary for certain applications or if lens is flashing on and off.
-
Page 17: Maintenance
• ADJUSTING VIEW ANGLE POSITION Tilt adjustment is located on right side of helmet. Loosen the right headgear tension knob and adjust the lever forward or back to the proper position. Re-tighten the right headgear tension knob (See fig.19c). fig.19c ‘W’... - Page 18 REPLACING THE OUTSIDE COVER LENS Replace the outside cover lens if it is damaged. Place your fingernail in recess above filter view window and flex lens upwards until it releases from edges of filter view window (See fig.22a). When installing new outside cover lens, align one side of lens into the slot, and then insert into the other side.
- Page 19 fig.24a fig.24b fig.24c fig.24d CLEANING Clean helmet by wiping with a soft cloth. Clean the filter surfaces regularly. Do not use strong cleaning solutions. Clean sensors and solar cells with methylated spirit and a clean cloth and wipe dry with a lint-free cloth.
- Page 20 SHADE GUIDE TABLE GUIDE FOR SHADE NUMBERS OPERATION ELECTRODE SIZE MINIMUM SUGGESTED 1/32 in. (mm) CURRENT (A) PROTECTIVE SHADE NO. SHADE (COMFORT) Shielded metal arc Less than 3 (2.5) Less than 60 — welding 3-5 (2.5–4) 60-160 5-8 (4–6.4) 160-250 More than 8 (6.4) 250-550 Less than 60...
-
Page 21: Technical Specifications
TECHNICAL SPECIFICATIONS Optical Class: 1 / 1 / 1 / 1 Viewing Area: 107 x 75 mm (4.21" x 2.95") Cartridge Size: 156 x 123 x 33 mm (6.14" x 4.84" x 1.30") Arc Sensor: Light State: DIN 3.5 Grind State: DIN 4 Cutting Shade: Shade No. -
Page 22: Part List
PART LIST The part with * means it is not included in the product, which need to be purchased seperately. - Page 23 PART LIST ITEM PART NO. DESCRIPTION A.Tecmen PAPR Helmet Assembly V3SC TM26 00 Shell cover FC TM26 00 Outside cover lens ADF950S IEXP Auto darkening filter IC TM950S 00 Inside cover lens V3LC TM26 00 Grinding lens cover V3GL TM26 00...
-
Page 24: Warranty
WARRANTY Tecmen’s only obligation shall be repair, replace or refund the purchase price of such parts or products material and fabrication defects free of charge within the warranty period. This warranty does not cover to cause by improper handling abuse or application other than recommended in the user instruction.
Need help?
Do you have a question about the Freflow V3 and is the answer not in the manual?
Questions and answers