Table of Contents
Advertisement
Quick Links
- 1 Charge & Install Batteries Chargez et Installation des Piles
- 2 Install Radios & Pair Controller Installez Radios & Pair Contrôleur
- 3 Connecting Smart Devices Connexion de Périphériques Intelligents
- 4 Autopilot Program
- 5 Firmware Update & Programming Mise à Jour du Firmware et de Programmation
- Download this manual
Advertisement
Table of Contents

Related Manuals for Vex IQ

Summary of Contents for Vex IQ
- Page 1 Control System User Guide Guide d’Utilisation du Systèm...
-
Page 2: Table Of Contents
Table of contents Table des Matières Charge & Install Batteries Chargez et Installation des Piles..............4 Robot Battery Charging & Usage Chargement de la Batterie du Robot et D’utilisation.................4 Controller Battery Charging & Usage Contrôleur de batterie Charge et utilisation....................7 Install Radios & Pair Controller Installez Radios &... - Page 3 Je m’appelle Quey, je suis votre assistant personnel and I’ll be with you every step of the de VEX IQ et je vous aiderai dans chaque étape de way as you learn how use VEX IQ! votre apprentissage d’utilisation de VEX IQ! Watch for me on the sidelines - I’ll try to...
-
Page 4: Charge & Install Batteries Chargez Et Installation Des Piles
Charge & Install Batteries Chargez et Installation des Piles 1.1 Robot Battery Charging & Usage 1.1 Chargement et Utilisation de la Pile du Robot There are two options for powering the Robot Brain – the Robot Il y a deux options pour alimenter le Cerveau du Robot-la Pile du Battery and the Robot AA Battery Holder Robot... - Page 5 Robot AA Battery Holder Usage Utilisation du Porte-pile AA du Robot The Robot AA Battery Holder uses six (6x) 1.5v AA battery cells Le Porte-pile AA du Robot AA nécessite six cellules de piles AA (not included) to power the Robot Brain .
- Page 6 Installing Robot Battery Installation des Piles du Robot Orient the Robot Battery or Robot AA Battery Holder to match the Orientez la Pile du Robot ou la Pile AA du robot afin de la faire corre- illustration image below and slide the Robot Battery into the Robot spondre aux illustrations ci-dessous et faire glisser la pile dans le Brain - listen for a click to ensure the Robot Battery is fully inserted.
-
Page 7: Controller Battery Charging & Usage
1.2 Controller Battery Charging & Usage 1.2 Chargement & Utilisation de la pile de la Télécommande The Controller is powered by the Controller Battery (228-2530) (228-2779) The Controller Battery is a rechargeable 3.7v 800 mAh Li-Ion La Télécommande est alimentée par la Pile de la Télécom- (228-2530) battery cell, and is charged inside the Controller. - Page 8 Charging Controller Battery Optional Charging Method Plug the Controller into a USB port on your computer using the The Controller Battery will also charge when it is connected to the Robot USB Cable. The Controller will immediately begin charging. Brain using the Tether Cable and the Robot Brain is powered on. Méthode de Chargement Facultative The recommended method for fully charging the Controller Battery La Batterie de la Télécommande se recharge également quand elle est...
-
Page 9: Install Radios & Pair Controller Installez Radios & Pair Contrôleur
Install Radios & Pair Controller Installez Radios & Pair Contrôleur 2.1 Radio Installation and Removal 2.1 Installation et Enlèvement de la Radio The Controller and Robot Brain wirelessly communicate with each other La Télécommande et le Cerveau du Robot communiquent entre eux using a pair of either 900 MHz Radio, 2.4 GHz Radio or Smart Radio grâce au réseau sans fil en utilisant une fréquence radios de soit 900 (228-3530). -
Page 10: Pairing Robot Brain & Controller
2.2 Pairing Robot Brain and Controller 2.2 Couplage du Robot Cerveau et de la Télécommande Before first use, the Robot Brain and Controller must be paired to Avant la première utilisation, le cerveau du robot et la télécommande each other to enable wireless communication. doivent être branché... -
Page 11: Connecting Smart Devices Connexion De Périphériques Intelligents
Connecting Smart Devices Connexion de Périphériques Intelligents 3.1 Smart Device Ports 3.1 Ports de Périphériques Intelligents Any Smart Motor or Sensor can be plugged into any port. For more information on which Smart Device should be plugged into which port for the Built In Programs please see section 6 N’importe quel Moteur ou Capteur Intelligent peut être branché... -
Page 12: Smart Device Overview
3.2 Smart Device Overview Bumper Switch 3.2 Présentation d’un Appareil Intelligent Capteur de Contact Not every sensor is in every kit. Les kits ne contiennent pas tous les capteurs. Press to Activate Smart Motor Appuyez pour Activer Moteur Inteligent Motor Output Sortie de Moteur 228-2677 Bumper Switches give the Robot Brain a signal when they are... -
Page 13: Using The Robot Brain En Utilisant Le Cerveau Du Robot
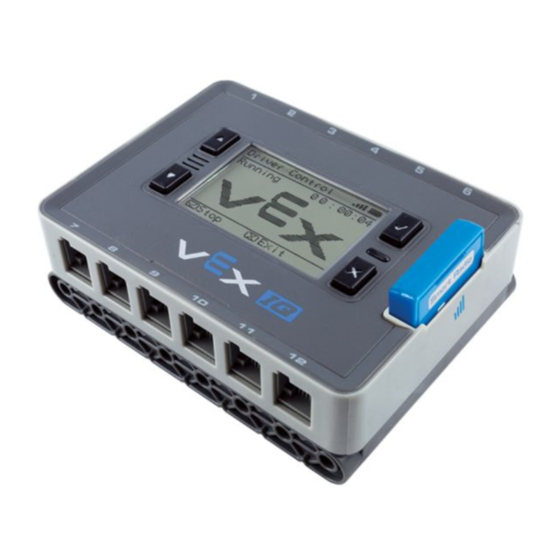
Using the Robot Brain En Utilisant le Cerveau du Robot 4.1 Robot Brain and LED Lights Overview 4.1 Cerveau du Robot & présentation des lumières LED Battery low BLINKING Radio Slot with radio link Check Button Créneau Radio Niveau de bat- Bouton de Contrôle CLINGNEMENT terie faible avec... -
Page 14: Using The Controller Utilisation De La Télécommande
Using the Controller Utilisation de la Télécommande 5.1 Controller and LED Lights Overview The farther the joysticks are moved in one direction, the faster the motor will spin. 5.1 Vue d’Ensemble du Cerveau du Robot Plus les manettes de jeux sont déplacés loin dans une direction, plus le &... -
Page 15: Using Built In Programs Aide Intégrée Dans Les Programmes
La configuration du programme de Contrôle vous permet de pilot- Standard Drive Base, as well as robots and mechanisms of your own er le Clawbot IQ et la Base de Conduite Standard, tout comme vos creation, using the Controller. There are several options to configure propres robots et mécanismes de votre propre création, utilisant la... - Page 16 The Driver Control program contains sample behavior for all advanced Le Driver Control contient des exemples de comportement pour tous sensors used on Clawbot IQ with Sensors. les capteurs utilisées sur Clawbot IQ avec capteurs. Color Sensor Touch LED Détecteur de Couleur...
-
Page 17: Autopilot Program
6.2 Autopilot Program Gyro Sensor Color Sensor Capteur Gyroscopique Capteur de Couleur 6.2 Configuration de Pilote Touch LED Distance Sensor Automatique Touche LED Détecteur de Distance Right Drive Motor Left Drive Motor Moteur de Conduite à Droite Moteur de Conduite à gauche The Autopilot program works only with the Autopilot robot. -
Page 18: Robot Brain Screen Menus
6.3 Robot Brain Screen Menus 6.3 Menus de l’écran du Cerveau du Robot “Driver Control” “Run” Status Up/Down Screen 1 Button “Settings” “Configure” Haut/bas Statut Écran 1 Bouton Status Up/Down Screen 2 Button “System Info” This screen allows you to reverse motors Haut/bas Statut in the Driver Control Program. -
Page 19: Firmware Update & Programming Mise À Jour Du Firmware Et De Programmation
The best way to ensure your VEX IQ system is functioning properly le Logiciel gratuit VEX IQ Utilitaire de Mise à jour sur votre PC ou Mac. is to keep your firmware up to date. You can update the firmware on all of these devices by downloading the free VEX IQ Firmware Update Utility to your PC or Mac. -
Page 20: Appendix A: Battery Safety Information Annexe A: Batterie Informations Sur La Sécurité
-Ne pas laisser les enfants enlever la batterie du robot VEX IQ (Part- - Avoid letting children take the battery out of the VEX IQ Ro-... - Page 21 Avoid letting children take battery out of VEX IQ Robot Brain ment la pile durant toutes les utilisations. Éviter que les enfants (Part #228-2540) so as to play with battery.
-
Page 22: Appendix B Compliance Statements Déclarations De Conformité Annexe B
Custom manufactured in China for Innovation First Trading SARL. Distributed in the U.S.A, Mexico, Caribbean, Central & South America by VEX Robotics, Inc., 6725 W. FM 1570, Greenville, TX 75402, U.S.A. Distributed in China by Innovation First International (Shenzhen), Ltd., Suite 1906, Excellence Tower, 98 Fuhua Yi Road, Futian, Shenzhen, Guandong, China 518048. - Page 23 Sensor Calibration Calibrage Capteur 0° 180° 100%...
- Page 24 228-3427-750 Rev19 Custom manufactured in China for Innovation First Trading SARL. Distributed in the U.S.A, Mexico, Caribbean, Central & South America by VEX Robotics, Inc., 6725 W. FM 1570, Greenville, TX 75402, U.S.A. Distributed in China by Innovation First International (Shenzhen), Ltd., Suite 1906, Excellence Tower, 98 Fuhua Yi Road, Futian, Shenzhen,...
Need help?
Do you have a question about the IQ and is the answer not in the manual?
Questions and answers