Table of Contents
Advertisement
Advertisement
Table of Contents

Subscribe to Our Youtube Channel
Summary of Contents for Altomed Microwash Q-Rinse
- Page 1 Microwash Q-Rinse System...
- Page 2 Page 2 altomed.com...
-
Page 3: Table Of Contents
6. Maintenance ................................28 7. Warranty ..................................29 8. Specifications ................................30 9. Supplies and Ordering ............................32 10. Special Instructions / Notes regarding the Microwash Q-Rinse and Electromagnetic compatibility (EMC) testing to EN 60601-1-2:2015 ..................33 11. Customer and Technical Support ........................37 ALT I076 Issue 03/0418... -
Page 4: Introduction
The Microwash Q-Rinse System is built by Altomed in the UK. • The Microwash Q-Rinse system will help you standardise the rinsing procedure of reusable surgical instruments and tubing after surgery and prior to processing. • Its time saving design is an efficient alternative to the manual syringe rinsing method. -
Page 5: Warning, Cautions And Symbols
Limited Repairs Department or approved Distributor for repair information. A list of Approved Distributors is available from Altomed. • DO NOT aim the tubing at any part of the body while the Microwash Q-Rinse System is plugged in. The Microwash Q-Rinse operates under pressure. - Page 6 • The Microwash Q-Rinse System must only be connected to a grounded electrical receptacle. • Use of the Microwash Q-Rinse System does not absolve user from following your facility’s policies and procedures for cleaning or decontamination of surgical instruments. All items rinsed with the Microwash Q-Rinse should be inspected for cleanliness and integrity prior to further processing.
-
Page 7: Description
3. Description The Microwash Q-Rinse system provides a consistent method for rinsing patient fluids and debris from surgical tubing and instruments. A pressurised stream of air follows the rinse cycle to make sure that the majority of rinsing fluid is cleared from the inner channels. The contaminated surgical tubing or instruments should be rinsed immediately after use to prevent debris drying inside the lumen, preferably no later than 30 minutes. -
Page 8: Key Components
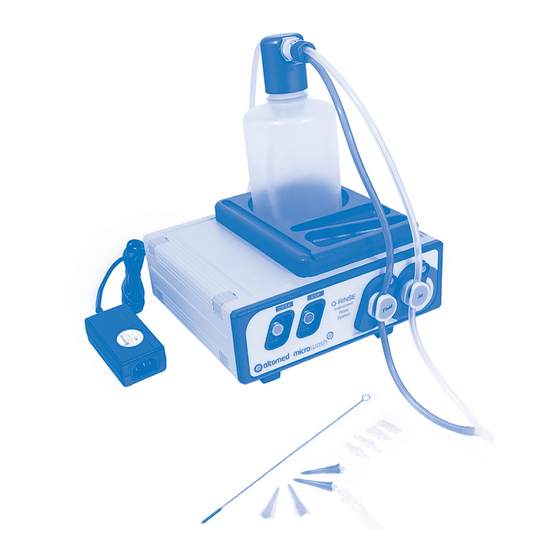
3.3 Key Components Microwash Q-Rinse System: Key Components Figure 1 1. Bottle cap 10. Power supply 2. Quick disconnect (dual) 11. Power lead 3. Quick disconnect (single) 12. Cycle switch (on) 4. 1 litre bottle for fluid 13. Stop switch 5. -
Page 9: Front Control Panel
3.4 Front Control Panel Front Control Panel Figure 2 The front control panel contains both the automatic and manual control (cycle) switches in addition to the Fluid and Air Valves. The front panel functions are described in the order indicated in Figure 2, from left to right: Cycles: Automatic Cycle... - Page 10 Push the stop button to interrupt the current operation and reset the system. Fluid Valve/ air Valve: These valves open and close in response to the Microwash Q-Rinse system’s timing circuits. The blue tubing segment between the bottle and the “Y” connection is to be placed in the Fluid Valve.
-
Page 11: Back Panel
Foot Pedal: The Foot Pedal connection is for the optional Foot Pedal. Power In: Connect the Microwash Q-Rinse Machine to a regulated 12-volt supply by using the Altomed Power supply REF: A11074 (see Section 9). ALT I076 Issue 03/0418 Page 11... -
Page 12: Top Panel
Top Panel The top panel features storage compartments for the wire brush and various connectors used to adapt the Microwash Q-Rinse system to various instruments and tubing. See Figure 4. A deep well is provided to hold the 1000ml bottle. -
Page 13: Set Up And Operation
First Use • Unpack the Microwash Q-Rinse System, place all the parts on a clean flat surface and check to make sure all the items as in Figure 1 (page 8 above) are present and correct; the Foot Pedal is an optional extra and is not supplied as part of the System. - Page 14 If damaged replace. Bottle Cap 1, 2 and 3 Ensure the male and female connectors are fastened together Complete and secure. If unable to secure replace bottle cap. Page 14 altomed.com...
- Page 15 Part Item Checks to be carried out Description Numbers* Bottle Ensure there is no physical damage to the bottle, cracks, splits, holes etc., and that the threads are not damaged and that the structure is not deformed. Dispose of any failed bottles and replace with new ones.
-
Page 16: Set Up
Plug in the A11047 Altomed power supply (Item 10) into the hospital grade power cord (Item 11) supplied, (this may differ from the picture in Figure 1 depending upon which country you are in.) Ensure the machine is not pushed up against a wall or other solid surface causing the power... - Page 17 At the back of the unit, click the white elbow connector on the air supply tubing (Item 6) into place (Figure 5b). The elbow connector will “click” when secure. The air supply tubing (Item 6) MUST be in place before operating the Microwash Q-Rinse System otherwise the pressure will not build in the container.
- Page 18 BLUE tubing line MUST run through the Fluid valve. The CLEAR line MUST run through the Air valve. Installing Fluid and Air Lines Figure 5c STEP 5 (Optional footpedal) Only use an Altomed footpedal. Connection of Optional Footpedal Figure 5d Page 18 altomed.com...
- Page 19 At the back of the Microwash Q-Rinse System, plug in the Foot Pedal connector (see Figure 5d). Place the Foot Pedal on the floor in a location which is convenient for use. Be constantly aware of a possible trip hazard.
-
Page 20: Operation: Automated Cycle
This completes the automated cycle. See Table 2 (page 26 below) for Troubleshooting if necessary. STEP 3 Repeat Steps 1 and 2 for any further lumen on the device. STEP 4 Inspect the rinsed device for cleanliness and function prior to further processing, e.g. disinfection or sterilization. Page 20 altomed.com... -
Page 21: Operation: Manual Cycle
Cycle button (Item 12) a second time to enter the manual mode. After pressing the Cycle button (Item 12) a second time, the Microwash Q-Rinse System will be in the manual mode and the Cycle button (Item 12) will begin to flash. -
Page 22: Operation: Foot Pedal Operation
4.4 Operation: Foot pedal Operation The Foot Pedal is an optional accessory. Only use an Altomed Foot Pedal. STEP 1 See Caution #1 and complete all pre use checks as advised in Table 1 (see page 14 above). Connect the instrument interface tube (Item 17) to the item to be rinsed (Figure 6), use the adaptor pack (Item 15) and/or “A11047 “Y”... -
Page 23: Operation: Refilling Bottle
4.5 Operation: Refilling bottle STEP 1 Slide back the quick disconnect single connector (Item 3) to separate the green air supply tubing (Item 6) from the bottle cap (Item 1). This is done first to release any remaining pressure in the system and to avoid spilling excess fluid. -
Page 24: Operation: Disinfection And Sterilization
4.6 Operation: Disinfection and Sterilization As required after inspection or as recommended in your Risk Assessment, disinfect and/or sterilize the Microwash Q-Rinse system as described below. STEP 1 – Disinfection a. Wear the correct PPE (personal protective equipment) gloves, apron, sleeves and visor or protective eyewear) or as recommended in your Risk Assessment. - Page 25 l. Wipe exterior of console and the Foot Pedal (if applicable) to remove any visible soil/fluids using a soft cloth moistened with the disinfectant of choice. m. Once the bottle assembly has been exposed to the disinfectant for the required time, remove all parts from the disinfectant bath and rinse in sterile water for irrigation (or similar) to remove any chemical residues.
-
Page 26: Troubleshooting
1. Cycle not completed from last 1. Press STOP to reset the unit. mode. sequence. Fluid is backing up 1. The incorrect cycle is being 1. Control the flow of fluid by the interface tubing used switching to the manual mode Page 26 altomed.com... - Page 27 SYMPTOM PROBABLE CAUSE CORRECTIVE ACTION Unit fails to operate. 1. Unit not plugged in. 1. Check Power connection (figure 2. Unit plugged in. 2. Check Power outlet. 3. Internal parts have failed Check Power switch (figure 5e). Check green pressure line for secure connection at back of unit (figure 5b).
-
Page 28: Maintenance
If this does not result in proper operation of the unit, try to isolate the problem to a major area. Try the checks indicated on the Troubleshooting Chart in Section 6. If the problem still cannot be resolved, contact the Quality Department at Altomed for assistance on +44 (0) 191 519 0111 or your Approved Distributor. -
Page 29: Warranty
The Microwash Q-Rinse system in all material respects shall be free from defects in material and workmanship for a period of one (1) year from date of delivery when properly installed, maintained, and used for the intended purpose. -
Page 30: Specifications
Power supply REF: SL Power and AULT 12 Volt DC 1.5A A11074 MENB1020A1203F01 Plug fuse 5 Amp, 240 Volts AC, Size: 25.4mm long x Breaking capacity: operating speed f. 6.3mm diameter. 6000A, 264VAC, 50 HZ, p.f. 0.3-0.4. Page 30 altomed.com... - Page 31 Pump type Diaphragm Pressure output Fluid 6-15 in /min. 100-250 cc/min auto cycle Air 10-30 psi Bottle description 32 fl.oz. 1000ml Fully Autoclavable Tubing Sets Medical grade silicone fully autoclavable Fluids to be used Sterile water for irrigation (or similar) Fluid output Automatic cycle >140ml and <260ml...
-
Page 32: Supplies And Ordering
Microwash Q-Rinse bottle cap complete - Includes tubing, no bottle A11044B Microwash Q-Rinse bottle cap only - No tubing or bottle A11044E Microwash Q-Rinse tubing set - All air/fluid and air input tubing A11042 Microwash Q-Rinse spare interface tubing pack of 4 A11044C... -
Page 33: Special Instructions / Notes Regarding The Microwash Q-Rinse And Electromagnetic Compatibility (Emc) Testing To En 60601-1-2:2015
10. Special Instructions / Notes regarding the Microwash Q-Rinse and Electromagnetic compatibility (EMC) testing to EN 60601-1-2:2015 The Q-Rinse has been tested to EN 60601-1-2:2015, regarding its ability to operate in an environment containing other electrical/electronic equipment (including other medical devices). - Page 34 30 cm (12 inches) to any part of the Q-Rinse system, including cables specified by the manufacturer. Otherwise, degradation of the performance of this equipment could result. Page 34 altomed.com...
- Page 35 Table 5. EN 60601-1-2:2015 Electromagnetic immunity Guidance and manufacturer’s declaration – electromagnetic immunity Required Test 60601 test level for Compliance level equipment used in a professional healthcare facility only Electrostatic discharge (ESD) ± 8 kV contact ± 8 kV contact IEC61000-4-2 ±...
- Page 36 (30 % dip in UT) for 25/30 cycles for 25/30 cycles 0% UT 0% UT (100 % dip in UT) (100 % dip in UT) For 250/300 cycles For 250/300 cycles 30 A/m Power frequency (50/60Hz) 30 A/m Magnetic field IEC61000-4-8 Page 36 altomed.com...
-
Page 37: Customer And Technical Support
All servicing and repairs are done at Altomed Limited or at the Authorised Distributor. Area Sales Managers are available to help you set up and operate your Microwash Q-Rinse System if needed. If you have any questions that require any Technical Support, please call the Quality Department... - Page 38 Page 38 altomed.com...
- Page 39 ALT I076 Issue 03/0418 Page 39...
- Page 40 Microwash Q-Rinse System Altomed Limited 2 Witney Way Boldon Tyne and Wear England. NE35 9PE...
Need help?
Do you have a question about the Microwash Q-Rinse and is the answer not in the manual?
Questions and answers