Table of Contents
Advertisement
Advertisement
Table of Contents

Summary of Contents for CAML-TOMLIN FLOW48-2W
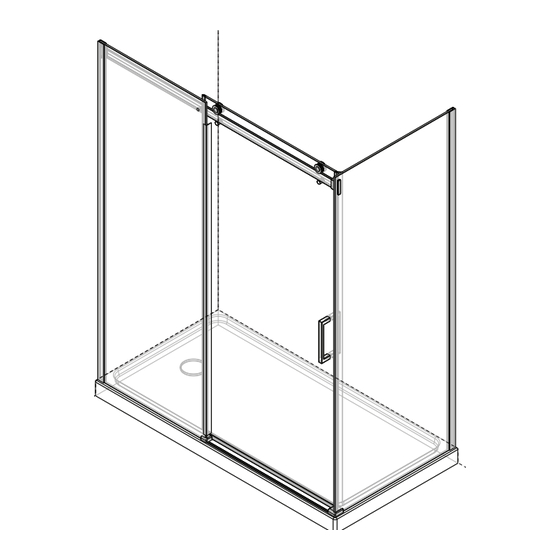
- Page 1 FLOW SHOWER DOORS - INSTALLATION MANUAL CORNER (2W) THIS MANUAL APPPLIES TO ALL 48” AND 60” CORNER FLOW SERIES SHOWER DOORS FLOW48-2W, AND FLOW60-2W. CAML-TOMLIN 145 Northfield Drive West Waterloo, ON Canada N2L 5J3 t: 866.884.5290 f: 519.746.3114 www.camltomlin.com...
- Page 2 Use wood reinforcement where the threshold of your base meets the tile; this is where your shower doors will mount to the wall. If you are building a custom base, please contact CAML-TOMLIN (1.866.884.5290) for details and base specifications in order to ensure that the doors and base will work together.
- Page 3 COMPONENT LIST FLOW INSTALLATION - CORNER www.camltomlin.com...
- Page 4 COMPONENT LIST Fixed Panel Door Bumper Door Panel Vertical Water Guard Wall Jamb Wall Jamb Seal Rail Wall Anchor - Small Wall Mount Assembly Wall Anchor - Large Rail Mount Assembly Screw - Wall Jamb Wheel Assembly Small Screw - Wall Mount Safety Pin Assembly Large Screw - Wall Mount Handle Assembly...
- Page 5 Install the wheel assemblies to the door panel Set your door panel (2) in the unit and rest it against the wall (this will ease installation in later steps). Ensure that the handle side of the door panel is located on the proper side (for a left hand door the holes will be located on the left side, for a right hand door, the holes will be located on the right side).
- Page 6 Install wall jamb On the side where your fixed panel will be mounted, measure 1/2” from the edge of the base and mark a line as shown. Place the wall jamb (3) against the wall and centre it with the mark on the base. Using a level, adjust the wall jamb until it is plumb.
- Page 7 Install wall jamb (continued) Using a 1/4” ceramic drill bit, drill four holes into your wall through the centre marks drawn earlier. Insert the plastic wall anchors (18) into the holes and mount the wall jamb using the provided screws (20). 1/4”...
- Page 8 Install fixed panel Carefully slide the fixed panel (1) into the wall jamb as shown. Ensure that the panel is parallel to the edge of the base. CAUTION: Since the panel sits close to the edge of the base, use extreme caution to ensure that the panel stays in place and does not get knocked off of the base until it is firmly fastened.
- Page 9 Assemble rail components Set the wall mount brackets fully onto each end of the rail and fix in place by tightening the inner set screws (see below) with an Allen key. The finished (flat) side of the rail should be facing the outside of the shower unit. Ensure that the hole in the rail lines up roughly with the hole in the fixed panel.
- Page 10 Adjust fixed panel Hold up the rail assembly so that the hole in the rail roughly aligns with the hole in the fixed panel. Adjust the fixed panel by sliding it in or out of the wall jamb until the hole in the panel lines up with the hole in the rail. Measure the gap (if any) between the end of the rail assembly and the wall and take note.
- Page 11 Remove the bracket, and drill a hole into the base through the centre mark using a 1/8” drill bit. Apply a small bead of silicone into the hole, reposition the bracket, and fasten it to the base using the provided countersunk screw (25). Caml-Tomlin recommends using clear 100% silicone. 1/8”...
- Page 12 Mount rail assembly to fixed panel Hold the rail in place behind the fixed panel so that the holes are lined up. Fix the rail to the fixed panel using the rail mount assembly (6) as shown below. Ensure that the rail is well secured by tightening the bolt using an Allen key. FLOW INSTALLATION - CORNER www.camltomlin.com...
- Page 13 Level rail assembly Place a level on top of the rail and adjust the rail by gently rotating it until the assembly is horizontal. Ensure that the rail is perfectly level, as this will keep your door from opening or closing on its own. Mark the two holes in the wall mount onto the tiled wall using a pen or pencil.
- Page 14 Install wall mounts to wall Using an Allen Key, loosen the set screw on the wall mount bracket against the tiled wall only. Slide the bracket inwards towards the centre and re-tighten the set screw to keep it in place. Carefully rotate the rail about the rail mount so that you can access the markings drawn on the wall.
- Page 15 Install wall mounts to wall (continued) Carefully rotate the rail back into position so that the holes in the wall mount bracket align with the anchors in the wall. Loosen the set screws in the wall mount bracket against the wall and slide the bracket up to the wall on the end of the rail. Check the rail to see that it sits level.
- Page 16 Mark return panel position NOTE: The centre line of your return panel should ideally fall anywhere from the centre of the threshold to no less than 0.5” from the edge of the base. The opening on a 48“ unit (from finished wall to return panel) is 45.00” to 47 .50“ . The opening on a 60“...
- Page 17 Install return panel wall jamb On the side where your fixed panel will be mounted, place and centre the wall jamb on the line drawn in step 12 B. Using a level, adjust the wall jamb until it is plumb. Mark the three holes (located inside the wall jamb) onto the wall using a pen or pencil.
- Page 18 Install return panel wall jamb (continued) Using a 1/4” drill bit, drill four holes into your wall through the centre marks drawn earlier. Use a bit appropriate to your wall finish. Insert the plastic wall anchors (18) into the holes and mount the wall jamb and wall jamb extension. using the provided screws (20).
- Page 19 Install return panel Carefully slide the return panel (26) into the wall jamb as shown. Ensure that the panel is parallel to the edge of the base. Adjust the return panel by sliding it in or out of the wall jamb until the hole in the panel lines up exactly with the hole in the rail.
- Page 20 Fix rail end to return panel Fix the end of the rail to the fixed panel with the second wall mount and the wall mount end cap (27). Tighten the screw securely using an Allen key and install the cap. FLOW INSTALLATION - CORNER www.camltomlin.com...
- Page 21 Remove the bracket, and drill a hole into the base through the centre mark using a 1/8” drill bit. Apply a small bead of silicone into the hole, reposition the bracket, and fasten it to the base using the provided countersunk screw (25). Caml-Tomlin recommends using clear 100% silicone. 1/8”...
- Page 22 Mount door assembly onto rail Using a hack saw, cut the door bumper and bumper seal to length and install onto glass. The bumper seal with the angled lip must be applied to the handle side of the door panel with the flange facing inward. Cut the bottom water guard to length so that it fits between the two vertical gaskets and install onto the bottom edge.
- Page 23 Complete door assembly Mount the two safety pins (8) below the rail (see Step 1B). Mount the handle (9) to the door panel so that the set screws are located on the inside of the shower door. FLOW INSTALLATION - CORNER www.camltomlin.com...
- Page 24 Install threshold Measure the distance between the fixed panel bracket and catching bracket and take note. Add 1/4” to the dimension from step 20A; the total is the length to which you should cut your threshold. Slide the cut threshold into the slot of one bracket and then into the other. You may use a few small beads of silicone on the underside of the threshold to hold it in place.
- Page 25 Install remaining seals Install the wall jamb seal (17). Insert the wedged end in between the fixed panel and the outer edge of the wall jamb. Start at the bottom and work your way up to the top, trimming off any excess with a utility knife. Measure the distance between the top of the fixed panel bracket and the underside of the safety pins.
- Page 26 Put the cover caps onto the wheels. A bit of silicone is necessary for the inside covers. Apply silicone along all outside edges of your unit, as shown below. Do not silicone on the inside of your unit. Caml-Tomlin recommends using clear 100% silicone.
- Page 27 5-YEAR GUARANTEE On shower door and hardware while a 2 year warranty applies to the protective repellent film. CAML-TOMLIN warrants acrylic units (shower base) to be free from defects in workmanship and materials under normal use and service for a period of five (5) years from the initial date of purchase by the owner/end-user, contractor or builder from an authorized dealer.
Need help?
Do you have a question about the FLOW48-2W and is the answer not in the manual?
Questions and answers