Table of Contents
Advertisement
Quick Links
Advertisement
Table of Contents

Summary of Contents for Teleorigin RBMTX-Lite
-
Page 2: Table Of Contents
Index 1 Document history..........................5 2 Package..............................6 2.1 Box...............................6 2.2 Package contents........................6 2.3 Router versions...........................7 3 General presentation.........................8 3.1 Front panel..........................8 3.2 Back panel...........................8 3.3 External connections........................9 3.3.1 GSM/UMTS/LTE antenna connector..................9 3.3.2 Modem serial port, either full RS232/RS485...............9 3.3.3 LAN connector........................9 3.3.4 Power supply connector.....................10 3.3.5 SIM card holders.........................10 3.4 Product sticker..........................10... - Page 3 5.2.9 VLAN...........................23 5.2.10 Static routes........................24 5.2.11 Dynamic DNS........................25 5.2.12 Access control........................26 5.2.13 Open VPN.........................27 5.2.14 Ipsec static/Ipsec mobile....................29 5.2.15 Generating SSL certificates....................32 5.2.16 NTRIP configuration page....................34 5.2.17 SMS Actions........................35 5.2.18 Time..........................36 5.2.19 Syslog..........................37 5.2.20 User files...........................38 5.2.21 Backup and restore......................39 5.2.22 Discard changes........................39 5.2.23 Save settings ........................39 5.3 System logs description......................40...
- Page 4 9.1 General Safety...........................47 9.2 Care and Maintenance ......................47 9.3 Responsibility ...........................47 10 Accessories............................48 Power cable – open end.........................48 RS232/485 cable..........................48 DIN rail holder:..........................49 Velctro:............................49 11 Safety Recommendations......................50 12 Certifications..........................52 12.1 Conformity Assessment Issues....................52 12.2 Declatarions of conformity.....................52 12.3 National restrictions........................52 13 List of Acronyms..........................53 14 On-line support..........................55...
-
Page 5: Document History
1 Document history Revision Date Changes #0.6 8.03.2018 - Preliminary version #0.8 21.05.2018 - New screenshots #0.9 13.09.2018 - LED description... -
Page 6: Package
User can find product sticker on the box which matches sticker placed on the device - it proves that your modem is an original product. More information about stickers are in chapter Product sticker 2.2 Package contents Complete package contains: 1. RBMTX-Lite router 2. Antenna GSM (SMA connector) 3. Power adapter 4. Wall holder... -
Page 7: Router Versions
2.3 Router versions There are many ways to upgrade your RBMTX-Lite router. List below shows typical configuration and different combinations (variants) of this terminal. Option Typical Option Power supply 9-30V 256MB RAM, 512MB MicroSD card Memory (part used for Linux system, the size of... -
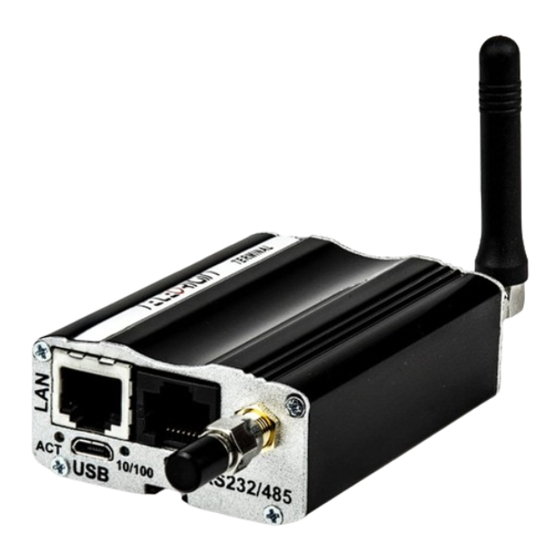
Page 8: General Presentation
3 General presentation 3.1 Front panel 3.2 Back panel... -
Page 9: External Connections
3.3 External connections 3.3.1 GSM/UMTS/LTE antenna connector SMA antenna connector placed on front panel is used to connect external GSM/UMTS/LTE. It must be connected to establish a connection with GSM/UMTS/LTE network. In good circumstances (good coverage, level of received signal is high) use antenna which is included in package. -
Page 10: Power Supply Connector
3.3.4 Power supply connector Please use power adapter which is included in package. It ensures “clean” power supply input and avoids short transients on power supply lines originating from inductive load switching. Power supply range of RBMTX-Lite router is 9-30V. -
Page 11: Sim Card Holders
3.3.5 SIM card holders One SIM card holder is placed in front panel of RBMTX-Lite and the second one is located inside the device. To insert SIM card into the extractable holder push yellow button and take SIM drawer out as show in the picture and place SIM card. To operate the module in a GSM network, it is necessary to insert at least one active SIM card. - Page 12 Diode Color Description Green User controlled Yellow Network indicator: RBMTX-Lite 3G: • Flicker slowly (200ms ON, 1800ms OFF) – Network searching • Flicker slowly (1800ms ON, 200ms OFF) – Idle/Data transfer • Always ON – Voice/CSD calling RBMTX-Lite 4G: •...
-
Page 13: Basic Features And Services
4 Basic features and services Basic features and available services are contained in table below. Feature / Description service Supported UMTS/HSPA variant: • GSM 900/1800 MHz bands • UMTS 900/2100 MHz LTE variant: • GSM 900/1800 MHz • WCDMA FDD B1, B8 Class 3 •... -
Page 14: Using The Modem
5 Using the modem 5.1 Setting up the modem To set the modem, do the following steps: 5.1.1 Inserting SIM card(s) Push yellow button placed on front panel and take SIM drawer out. Place SIM card in the holder as shown in the picture: Router is available with one or two SIM card slots. -
Page 15: Connecting Antenna
5.1.2 Connecting antenna Connect GSM/UMTS/LTE antenna to SMA connector... -
Page 16: Connecting Power Supply Cable
5.1.3 Connecting power supply cable Connect power supply cable into power supply connector 5.1.4 Connecting LAN cable with RJ-45 Plug LAN cable into RJ-45 plug. -
Page 17: Router Configuration
5.2 Router configuration Router is configured via web browser. Modem settings are divided into sections which allows user to easily find needed option. If you need to save new settings please apply them using “Save settings”. You can also discard changes by choosing appropriate option from menu. - Page 18 In table below you can find the description of each field in “Device status” tab: Field Example Description Model, firm. ver. GMM: LE910-C1 (19.01.522) GSM module info IMEI 359852050093104 device serial number READY SIM card status: SIM PIN - PIN lock (please set right PIN number in “GSM network”...
- Page 19 packets:12 errors:0 dropped:0 overruns:0 frame:0 collisions:0 txqueuelen:1000 packets:20 errors:0 dropped:0 overruns:0 carrier:0...
- Page 20 5.2.3 WAN config WAN config page is shown in the illustration below.
-
Page 21: Local Network
GSM or DHCP. Modem can also works as DHCP server - you can define its range and set list of IP-MAC binds. “Wireless configuration” field is available only in RBMTX-Lite with WiFi option. You can set there a parameters of your WiFi connection. To scan all available networks please use “Scanning”... - Page 23 5.2.5 Modem settings On “Modem settings” page you can define internet connection parameters (APN, username, password, CSD, ISP IP and Modem band) for one or two SIM cards (depending on modem version). To use internet you should know those parameters - they are essential for getting access to internet.
-
Page 24: Connection Control
5.2.6 Connection control Here you can set parameters of switching between two SIM cards. You can define time for ping and ping counter for 4 IP addresses you choose. In example (picture) here after 3 pings that take 10 seconds each card will change from Master to Slave or opposite. -
Page 25: Ports Configuration
5.2.7 Ports configuration User is able to set port settings under RS232/RS485 port configuration page. There are 3 configurable ports: /dev/ttyS0, /dev/ttyACM0 and /dev/ttyS1 or /dev/ttyUSB0 (depending on modem version). Every port can be set to different mode. On /dev/ttyS0 you can set terminal, ModBus gateway or NTRIP mode. -
Page 26: Tcp/Ip Forwarding
5.2.8 TCP/IP forwarding You can forward single port or port ranges onto certain IP address. To add new rule for single port, enter TCP/IP Forwarding tab. In “Single port rules” section click button “New” and enter all necessary informations: Identifier, check “Enabled” field, enter external and internal port, choose protocol (TCP or UDP) and enter IP address. -
Page 29: Vlan
5.2.9 VLAN VLAN tab enables user to create virtual IP addresses. You can define IP, netmask and identifier from range 0-4095. If you enable IEEE 802.1Q tagging Virtual IP becomes part of VLAN. -
Page 30: Static Routes
5.2.10 Static routes Under static routes tab you can define your own routings. Please click Add new button to add new routing. Enter identifier (used only to distinguish routings in www configuration), choose interface, enter destination network, netmask and gateway. -
Page 31: Dynamic Dns
IP changes. In order to do that you must create an account on one of web pages that are supported by RBMTX-Lite modem (currently DynDNS.org or No-IP.com). After creating account, please enter necessary information in Dynamic DNS tab of www configuration: your service provider, in case of DynDNS its type, username, password, host name and two intervals. -
Page 32: Access Control
5.2.12 Access control First section of Access Control tab allows you to configure SSH protocol. You can turn it on or off, set on which port and interfaces (also OpenVPN and IPsec tunnels) it should be accessible. You can also toggle logging via SSH as root and change/delete passwords/keys for root and service user. -
Page 34: Open Vpn
You can generate necessary keys directly on modem. Press the Generate button and wait for a while-the process can take few minutes. You should not change settings or switch tabs then. After the generation the message will be displayed. Public key will be automatically pasted into the keys field (if the field wasn't empty before pressing the button, its contents will be saved, the newly generated key will appear first on the list). -
Page 36: Ipsec Static/Ipsec Mobile
IPsec is group of internet protocols that enables user to create safe connection between devices. To configure such connection on RBMTX-Lite modem you need to go through three tabs of configuration: Tunnels, Mobile Clients, Keys and Certificates. First of all, you need to enable IPsec under Tunnels tab. -
Page 37: Generating Ssl Certificates
In the second phase of proposal please specify the protocol (ESP is authentication with encryption, AH is authentication only), encryption algorithm, hash algorithm and PFS key group. Please note that you can choose multiple algorithms, but at least one should match on both sides of the connection. - Page 39 Certificate authority signs the certificate: openssl ca -notext -in device1req.pem -out device1cert.pem If certificate will be used on RBMTX-Lite modem, password on private key has to be disabled: openssl rsa -in private/device1key.pem -out private/device1key.pem_nopass The whole process is repeated for every device (unique common names and filenames have to be unique for different devices!).
-
Page 41: Ntrip Configuration Page
5.2.16 NTRIP configuration page One of /dev/ttyS0 port modes is communication with external device using NTRIP protocol. If you decide to use it, it is necessary to set the mode under RS232 Port configuration page. Then, enter settings in NTRIP page. Server address, port and initial position fields are necessary. -
Page 42: Sms Actions
5.2.17 Text messages actions Text messages (SMS) actions tab allows user to define shell scripts that will be executed every time modem receives SMS with specified content. To enable this option ensure that global SMS Actions checkbox is enabled and you have set one of available ports into SMS receiving mode under Ports configuration tab. - Page 43 5.2.18 E-mail actions In the “E-mail Actions” section, the user can set up an e-mail account for sending messages (set the parameters: recipient, sender, server address, port, user and password). It is also possible to set up a script that will be launched automatically (messages can be sent with attachments or not, it is possible to compress the file before sending).
- Page 45 5.2.19 SNMP...
-
Page 46: Time
5.2.20 Time Here you can manually set hardware clock or input IP of NTP server to synchronize time automatically... -
Page 47: Syslog
5.2.21 Syslog Here you can define how modem should save your logs. Modem has internal memory that get overwritten when it reaches its end. You can also save logs on your computer by clicking download (manually). It is also possible to get remote access to logs by enabling Remote service and setting SYSLOG host. -
Page 48: User Files
5.2.22 User files You can upload to the modem your own scripts and executable files and set them to be used in certain situations (e.x. when the VPN connection is established or at modem startup). Under User files tab there is a list of user files. It is refreshed automatically after selecting tab, it can be also manually refreshed by pressing Refresh button. -
Page 49: Backup And Restore
5.2.23 Backup and restore Under backup and restore tab user can: Save/load alternative configurations Configure FTP client to periodically check FTP server for latest configuration Download/Upload backup configuration... -
Page 50: Discard Changes
5.2.24 Discard changes Discard current changes in configuration which were not saved yet. 5.2.25 Save settings To save your settings click save setting and wait until message will show up to confirm your configuration data was saved. -
Page 51: System Logs Description
This paragraph shows structure of typical System log with some basic errors: 01/01/0000:00:30 rbmtx-lite syslogd 1.4.1: restart. 01/01/0000:00:31 rbmtx Start: RBMTX-Lite - FIRM:171026 – modem and firmware info 01/01/0000:00:35 rbmtx supervisor[560]: SIM Holder open/closed – SIM holder open/closed by software 01/01/0000:00:36 rbmtx supervisor[560]: Modem init 1 –... -
Page 52: Elproma Device Manager
5.4 Elproma Device Manager Elproma Device Manager is an application which allows you to find RBMTX-Lite modems in local area network (LAN) and then restore factory settings by entering their IMEI number. It is particularly useful when you forgot IP number of device and you can't access it by terminal on serial port. - Page 53 When the scan is complete you can see list of available devices in the table. You can review information like IP address, MAC address, device name, firmware version and uptime. If you want to restore factory settings on any device on the list, click the Reset button and enter IMEI.
-
Page 54: Troubleshooting
6 Troubleshooting 6.1 No communication with the modem If there is no communication with the modem do the following steps: Check all external connections of the modem Verify if power supply is correct Check if TCP/IP parameters are correct ... -
Page 55: Technical Characteristics
7 Technical characteristics 7.1 Mechanical characteristic Max. dimensions 72 x 53.5 x 26 mm (w/o connectors) Weight ≈90 g (only modem w/o any external connection) Volume ≈100 cm3 (w/o connectors) 7.2 Housing (dimension diagram) 7.3 Electrical characteristic 7.3.1 Power supply ... -
Page 56: Rf Characteristics
7.3.2 RF characteristics 7.3.2.1 Frequency ranges – UMTS/HSPA variant... -
Page 57: Frequency Ranges - Lte Variant
7.3.2.2 Frequency ranges - LTE variant... -
Page 58: Wifi Characteristics
7.3.2.3 WiFi characteristics Standards 802.11b/g/n Frequency band 2.4 Ghz Output power 13 dBm@11n 17 dBm@11b 15 dBm@11g tolerance ±2 dBm. Data rates: up to 150Mbps 7.3.2.4 External antenna The external antenna is connected to the modem via SMA connector. Antenna must have parameters as shown below in table. Antenna frequency range Supporting GSM, UMTS or LTE frequencies for GSM or ISM 2.4 GHz for WIFI... -
Page 59: Environmental Characteristic
7.4 Environmental characteristic Attention! Exceeding the values may result in permanent damage to the module. Parameter Unit Ambient Operating °C Temperature... -
Page 60: Router Architecture
8 Router architecture Diagram below shows simplified architecture of RBMTX-Lite. Features marked with dotted lines are available as option... -
Page 61: Safety Recommendations
9.2 Care and Maintenance The RBMTX-Lite terminal is a electronic product that should be treated with care. Please follow suggestions shown below due to using modem for many years. Do not expose terminal to any extreme circumstances like high temperature or high humidity ... -
Page 62: Accessories
10Accessories The tables below shows recommended accessories for RBMTX-Lite terminal. Part No. Name Description RB-PS12VP2L15 12V power adaptor <1,5m> 2 PIN Supply cable RB-PSCP2L15 2PIN <1,5m> open end GSM/UMTS/LTE antenna RB-904G 2J011 RB-89MSH SIM drawer MOLEX 0912360001 RB-MDI DIN Holder... -
Page 63: Din Rail Holder
DIN rail holder: Velctro:... -
Page 64: Safety Recommendations
11Safety Recommendations READ CAREFULLY Be sure the use of this product is allowed in the country and in the environment required. The use of this product may be dangerous and has to be avoided in the following areas: Where it can interfere with other electronic devices in environments such as hospitals, •... - Page 65 the pins because electrostatic discharges may damage the product itself. Same cautions have to be taken for the SIM, checking carefully the instruction for its use. Do not insert or remove the SIM when the product is in power saving mode. The system integrator is responsible of the functioning of the final product;...
-
Page 66: Certifications
Certifications 12.1 Conformity Assessment Issues The RBMTX-Lite has been assessed in order to satisfy the essential requirements of the RED Directive 2014/53/EU (Radio Equipment Directive) to demonstrate the conformity against the harmonised standards with the final involvement of a Notified Body. -
Page 67: List Of Acronyms
13List of Acronyms Accumulated Call Meter ASCII American Standard Code for Information Interchange Attention commands Cell Broadcast Cell Broadcasting Service Call Control Meter CLIP Calling Line Identification Presentation CLIR Calling Line Identification Restriction CMOS Complementary Metal-Oxide Semiconductor Carriage Return Circuit Switched Data Clear To Send Digital Audio Interface Data Carrier Detected... - Page 68 Light Emitting Diode Linefeed Mobile Equipment Man Machine Interface Mobile Originated Mobile Station Mobile Terminated Other Equipment Manufacturer Phone Book Protocol Data Unit Packet Handler Personal Identity Number PLMN Public Land Mobile Network PUCT Price per Unit Currency Table PIN Unblocking Code RACH Random Access Channel Radio Link Protocol...
-
Page 69: On-Line Support
14 On-line support Elproma provides a range on on-line support which includes: • the latest version of this document • the latest drivers for RBMTX-Lite • technical support This information can be found on our websites at: www.elpromaelectronics.com www.teleorigin.com For further information You can contact us at: email: info@teleorigin.com...
Need help?
Do you have a question about the RBMTX-Lite and is the answer not in the manual?
Questions and answers