Table of Contents
Advertisement
Walk-in Bathtub
Installation Manual
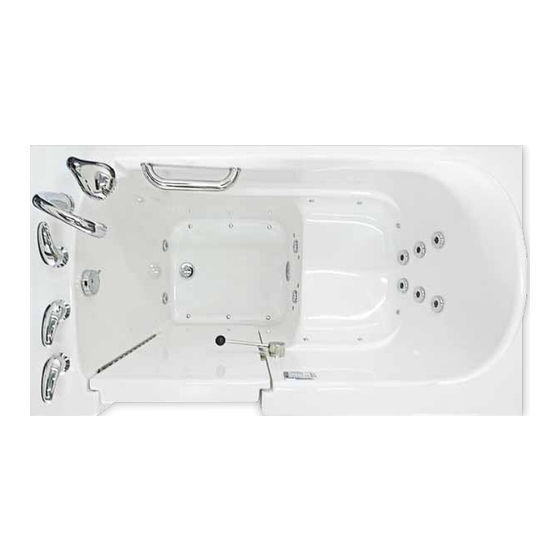
Image shown is a dual system tub. This manual also covers Bliss Walk-in
Tubs with air or water jets only, or without jets.
questIons?
Please call your dealer first:
Telephone:
save these instructions
© 2015 - 2017 Bliss Walk-in Bathtubs. All Rights Reserved.
Models
B2645
B2651
B2848
B2851
B3048
B3052
B3150
B3153
B3060
B3260
B3052HC
B3252HC
B3355
B3555
B305546
B315546
B2653
B2948
B3054
B3237
B306022
Advertisement
Table of Contents

Related Manuals for Bliss Tubs B2645

Summary of Contents for Bliss Tubs B2645
- Page 1 Walk-in Bathtub Installation Manual Image shown is a dual system tub. This manual also covers Bliss Walk-in Tubs with air or water jets only, or without jets. Models B2645 B2651 B2653 questIons? B2848 B2851 B2948 B3048 B3052 B3054 Please call your dealer first:...
-
Page 2: Table Of Contents
BLiss tuBs taBLe oF contents introDuction ......2 Post instaLLation ....20 A. Clean Up saFetY anD WarninGs .... 3 B. Functional Review with Customer Pre-instaLLation ....4 C. Final Checklist A. Receiving the tub D. Warranty Card 1. Initial Inspection aPPenDices ...... - Page 3 Bliss tub purchase! Bliss Tubs is committed to providing walk-in bathtubs known in the industry for high quality backed up by excellent service. Our team of expert technicians created this manual to help the installation go as smoothly as possible providing step by step instructions.
- Page 4 BLiss tuBs saFetY & WarninGs iMPortant saFetY instructions instructions PertaininG to risK oF Fire, eLectric shocK, or inJurY to Persons WarninG... When using this unit, basic precautions should be followed, including the following: reaD anD FoLLoW aLL instructions to reDuce the risK oF inJurY: to reduce the risk of injury, do not permit children to use this unit DanGer...
-
Page 5: Receiving The Tub
It is the consignee’s sole responsibility to ensure that the shipment is complete and undamaged prior to signing for the shipment or releasing the driver. Bliss Tubs will not be liable for the cost of repairing damage to the tub, replacing missing product or for any related freight or parcel shipping costs if the required inspection and reporting steps are not followed. -
Page 6: Water Test
BLiss tuBs Pre-instaLLation Water test All Bliss walk-in baths are water tested and operated in our factory prior to shipment. However, rough handling may cause leaks which can be detected if water tested again prior to installation. caution... NEVER LIFT THE TUB BY ANY PORTION OF THE HYDRO MASSAGE SYSTEM, AIR MASSAGE SYSTEM OR PLUMBING. -
Page 7: Demolition
Before installing any walk-in bathtub make sure the floor in the desired new tub location is adequate to bear the load of the tub, water, and user. Bliss Tubs vary in weight between 150-300 pounds depending on the model. Their operating capacities range from 38 to 100 gallons depending on the model and size of the user. An average expected total weight during normal operation is roughly 750 lbs. Reinforce the subfloor as necessary and required... -
Page 8: Electrical
7. electrical (if so equipped) All electrical work should be done by a licensed professional contractor. Bliss Tubs does not warranty any part of the installation and is not responsible for any incidental damages due to improper installation. • Check electrical requirements for tub systems (see Appendix D [page 32]). -
Page 9: Additional Service Access
Never lift the bathtub by any portion on the integral plumbing or electrical systems. Bliss Tubs does not warranty any damage to the tub or its plumbing or electrical system due to improper handling or care. - Page 10 BLiss tuBs instaLLation *Orientation for a left-hand tub is illustrated below. A right-hand tub would require orientation in the order shown in the picture at the very bottom of this page. Diverter Detail Hand Shower (for reference) Hot Valve Diverter...
- Page 11 © copyright Bliss Tubs 2015 needs to be cut to the appropriate length once the drain shoe is affixed to the tub. Cut © copyright Bliss Tubs 2015 | © copyright Bliss Tubs 2015 | © copyright Bliss Tubs 2015 the tubing so that there is a downward slope in the ⅜" tubing from the door drain fitting to 1½”...
-
Page 12: Bath Drain And Overflow Kit / Door Drain
DOOR DRAIN TO DRAIN PROPERLY INTO THE DOOR DRAIN TIE-IN. SAGS IN THE DOOR DRAIN TUBING WILL CAUSE WATER TO BE TRAPPED AT THE LOW POINTS. Frame Tub Drain Door Drain © copyright Bliss Tubs 2015 Check Valve Subfloor Sanitary Tee Note: Door Drain Tie-In should be installed with the door drain tubing coming out at a 90o angle parallel with the subfloor. -
Page 13: Extension Kit Pre-Fit
BLiss tuBs instaLLation 3. extension Panel Kit Pre-Fit Bliss Tubs’ two-piece extension panel kits are designed to bring our different size tubs out to a total length of 60 inches (or 5 feet), the standard stud to stud dimension for a bathtub/shower space. But tub spaces are rarely either square or exactly 60 inches long if and when tile, cement, backer board, wall panel, or sheet rock are added. - Page 14 BLiss tuBs instaLLation extension Panel Kit Pre-Fit (continued) Prefitting the extension panel clips: Install the clips on the flange of the tub behind the seat. Depending on the tub model being installed, the panel may have clips that are either pre-attached (seen on previous page) or come separately with the packaging (see below). If they work for the given application then use them. If they do not fit for a particular situation then screws or bolts can be used to join the extension panel to the tub flange. iMPortant... DO NOT ATTACH THE PANEL YET, JUST GET EVERYTHING PRE-FIT.
-
Page 15: Tub Install
TO BACK AND SIDE TO SIDE AND TO HAVE ALL OF THE TUB FEET TOUCHING THE GROUND. FAILURE TO DO SO MAY RESULT IN DOOR LEAKS, FLOODING AND/OR BOWING OF THE TUB FRAME AND SHELL. BLISS TUBS DOES NOT WARRANTY ANY INSTALLATION OR COVER ANY DAMAGES RESULTING FROM AN IMPROPER INSTALLATION. -
Page 16: Secure To Walls / Floor
BLiss tuBs instaLLation • Once the tub is in the correct position, the frame is level side to side and front to back, and all feet are touching the ground, lock down the locking nuts on the bolts holding the feet. - Page 17 Thinset Cement Tile Board Drywall Silicone Moisture Barrier Wall Stud Detail © copyright Bliss Tubs 2015 | © copyright Bliss Tubs 2015 | © copyright Bliss Tubs 2015 Stainless Steel Screw Body Mastic or Construction Adhesive Molding Tub Tile Flange...
- Page 18 BLiss tuBs instaLLation Flange up, existing tile / surround (refer to Detail a on Previous Page) Moldings can be used to cover the flange. These moldings are available at Home Depot, Lowe’s and similar outlets. • Prefinished in bone white and ready to install • Moisture-, termite- and rot-resistant for a long lasting accent • Easily installs using nails or construction adhesive iMPortant... BE SURE TO USE QUALITY GRADE CAULKING. YOU SHOULD SEAL THREE TIMES: 1.
-
Page 19: Supply / Drain Plumbing Connection
BLiss tuBs instaLLation 3. supply & Drain Plumbing connection The final connection needed for the supply plumbing are the two stainless steel flex hoses that connect from the wall shut off valves to the hot and cold valves on the deck of the tub. 1. Make sure the shut off valves at the tub are shut off. 2. Turn the water supply to the house back on. 3. Connect the supply flex hoses to the wall valves. Although the supply hoses have integrated washers, it is still recommended that teflon tape or thread sealant be used on the threads to ensure a complete seal 4. DO NOT CONNECT the supply lines to the tub yet. Be sure to flush the lines of any debris that may have been loosed by shutting house supply on and off. Place the other end of the supply hose in the drain and slowly open the wall valve. Let it run for a couple minutes to clear out air and debris. Once there is a clean and constant flow, turn the wall valve off and connect the supply flex hose to the valve on the tub deck. These... -
Page 20: Test
BLiss tuBs instaLLation 5. test Now that the tub is in place and everything is hooked up, run the tub and test all the features before installing the surround and extension kit. 1. Clean the door seal and jamb of any dust or debris by wiping with a soft cloth and shut the door. -
Page 21: Trim
Warranty Card & Voluntary testimonial Instruct the customer to fill out the warranty card located on page 1 (one) of the Operating Manual and mail it to Bliss Tubs in order to activate their warranty and prove ownership of the tub. The Operating Manual is located in the Customer Welcome Box. Encourage them to complete and return the Voluntary Testimonial form as well. -
Page 22: Bliss Walk-In Bathtubs. All Rights Reserved
Appendix F (page 38) before contacting Bliss Tubs technical support at (800) 398-9639 or support@blisstubs.com. Bliss Tubs acknowledges that no matter how stellar the quality of our product is, the installation of the product still plays a paramount role in the satisfaction of the customer. We appreciate the hard and honest work of each and every installer of our tubs. - Page 23 Bliss Tubs will not be responsible for any water damage to structures or property for any reason including but not limited to manufacturer defects or improper installation. Bliss Tubs will assume no responsibility for the loss of the system, inconvenience due to loss, damage to real or personal property or any other consequential damage.
- Page 24 BLiss tuBs aPPenDix B1: DiMensions save these instructions © 2015 - 2017 Bliss Walk-in Bathtubs. All Rights Reserved.
- Page 25 BLiss tuBs aPPenDix B2: DiMensions B2651 B2653 Top Diagonal Dimension: 57⅛” Top Diagonal Dimension: 58¼” Water Needed to Fill Tub: Water Needed to Fill Tub: Occupant: 120lbs. 200lbs. 250lbs. Occupant: 120lbs. 200lbs. 250lbs. Gallons: 46gal. 42gal. 39gal. Gallons: 46gal. 42gal. 39gal. B2848 B2851 Top Diagonal Dimension: 55⅛” Top Diagonal Dimension: 58¼” Water Needed to Fill Tub: Water Needed to Fill Tub: Occupant: 120lbs. 200lbs. 250lbs. Occupant: 120lbs. 200lbs. 250lbs.
- Page 26 BLiss tuBs aPPenDix B2: DiMensions B2948 B3048 11-7/8” 11-7/8” 48” 48” 47 7/8 47 7/8 8” 8” 8” 11 3/4 11 3/4 13-3/4” 13-3/4” 13-3/4” 19-1/2” 19-1/2” 20-1/2” 20-1/2” 29-1/8” 29-1/8” 23 1/2” 23 1/2” 23 7/8 23 7/8 23 7/8 15-3/8”...
- Page 27 BLiss tuBs aPPenDix B2: DiMensions B3060 B3150 Top Diagonal Dimension: 58¾” Top Diagonal Dimension: 66½” Water Needed to Fill Tub: Water Needed to Fill Tub: Occupant: 120lbs. 200lbs. 250lbs. Occupant: 120lbs. 200lbs. 250lbs. Gallons: 53gal. 48gal. 45gal. Gallons: 56gal. 51gal. 48gal. B3260 B3153 Top Diagonal Dimension: 68” Top Diagonal Dimension: 61½” Water Needed to Fill Tub: Water Needed to Fill Tub: Occupant: 120lbs. 200lbs. 250lbs. Occupant: 120lbs. 200lbs. 250lbs.
- Page 28 BLiss tuBs aPPenDix B2: DiMensions B3355 B305546 ¾ ¾ ½ ½ ⁄ 1 ⁄ 1 Top Diagonal Dimension: 63¾” Top Diagonal Dimension: 62½” Water Needed to Fill Tub: Water Needed to Fill Tub: Occupant: 250lbs. 300lbs. 350lbs. Occupant: 120lbs. 200lbs. 250lbs. Gallons: 70gal. 67gal. 64gal. Gallons: 100gal. 95gal. 90gal. B3555 B315546 Top Diagonal Dimension: 65” Top Diagonal Dimension: 63” Water Needed to Fill Tub: Water Needed to Fill Tub: Occupant: 300lbs.
- Page 29 BLiss tuBs aPPenDix B2: DiMensions B3052hc B3252hc Top Diagonal Dimension: 60” Top Diagonal Dimension: 60½” Water Needed to Fill Tub: Water Needed to Fill Tub: Occupant: 120lbs. 200lbs. 250lbs. Occupant: 120lbs. 200lbs. 250lbs. Gallons: 63gal. 58gal. 55gal. Gallons: 65gal. 60gal. 57gal. Note: Model dimensions are calculated as closely as possible, but as with any handmade product, can vary slightly from those shown. Please take tile flanges carefully into consideration. save these instructions © 2015 - 2017 Bliss Walk-in Bathtubs. All Rights Reserved.
- Page 30 BLiss tuBs aPPenDix B2: DiMensions B2645 B306022 Top Diagonal Dimension: 66½” Top Diagonal Dimension: 52⅜” Water Needed to Fill Tub: Water Needed to Fill Tub: Occupant: 120lbs. 200lbs. 250lbs. Occupant: 120lbs. 200lbs. 250lbs. Gallons: 44gal. 40gal. 38gal. Gallons: 45gal. 41gal. 38gal. B3237 Top Diagonal Dimension: 49” Water Needed to Fill Tub: Occupant: 120lbs. 200lbs. 250lbs. Gallons: 46gal. 42gal. 39gal. Note: Model dimensions are calculated as closely as possible, but as with any handmade product, can vary slightly from those shown. Please take tile flanges carefully into consideration.
-
Page 31: Reverse Drain Installation Instructions
Drain instaLLation instructions All plumbing work should be done by a licensed professional contractor. Bliss Tubs does not warranty any part of the installation and is not responsible for any damages due to improper installation. It is the installer’s responsibility to ensure that the installation will conform to all applicable state and local codes. -
Page 32: Overflow
BLiss tuBs aPPenDix c: reverse Drain PLuMBinG The street 45 ell section of the “reverse drain fitting” should be pointing towards the faucet section of the tub. The inlet of the street 45 should be connected to another section of 1½” PVC pipe leading to the faucet end of the tub. The end of this section of pipe will be connected to a 90 degree elbow (not included) and then to the down pipe of the overflow shoe. -
Page 33: Air System
BLiss tuBs aPPenDix D1: air / hYDro air sYsteM AIR SYSTEM KEYPAD FUNCTIONS 3: INCREASES THE 1: ON/OFF BLOWER 1: ON/OFF BLOWER BLOWER SPEED Press: The blower starts Press: The blower stops AIR CONTROLS 2: PULSE CYCLES ON/OFF FAST Press: Wave - Speed will vary gradually from BLINK maximum to minimum. - Page 34 BLiss tuBs aPPenDix D2: DuaL incLuDinG oZonator DUAL MASSAGE SYSTEM KEYPAD FUNCTIONS 1: ON/OFF BLOWER 3: INCREASES THE Press: The blower starts BLOWER SPEED Press: The blower stops AIR CONTROLS 2: PULSE CYCLES FAST Press: Wave - Speed will vary gradually from...
- Page 35 BLiss tuBs aPPenDix D3: aroMa & chroMatheraPY aroMatheraPY AROMATHERAPY SYSTEM KEYPAD FUNCTIONS 1: AROMATHERAPY Press: The aromatherapy starts 1: AROMATHERAPY ON/OFF MAIN BREAKER Press: The aromatherapy stops PANEL 120V-240V/60Hz AROMA CONTROL AUTOMATIC FUNCTIONS UP/HAUT INTEGRATED 20 MINUTE AUTOMATIC TIMER Integrated 20 minute automatic shut o timer on the system.
- Page 36 BLiss tuBs aPPenDix D4: eLectricaL reQuireMents save these instructions © 2015 - 2017 Bliss Walk-in Bathtubs. All Rights Reserved.
- Page 37 BLiss tuBs aPPenDix e: Maintenance & cLeaninG GuiDe Maintenance anD cLeaninG Regular care of your walk-in tub will keep it clean and working at its best. This care should include the tub, the trim and fittings and the internal water-carrying part of the pipe system. Because of the detrimental effects that mineral deposits, soap scum and bacteria have on finished surfaces, it is important to clean your bathtub and the fixtures (fittings) on a regular basis. DO NOT USE HARSH ABRASIVES OR SOLVENTS FOR CLEANING caution...
- Page 38 Pumps and other integral plumbing components damaged by occasional or frequent use of bath additives are not covered under warranty. Just like other standard hydromassage bathtubs, Bliss Tubs’ hydro system may require more specialized • cleaners to flush buildup from the water lines. The use of the following products or an equivalent cleaner is recommended twice yearly: SeaKlear Spa System Flush, Oh Yuk Jetted Tub System Cleaner, Ahh-...
-
Page 39: Troubleshooting Guide
BLiss tuBs aPPenDix F: trouBLeshootinG GuiDe DanGer... ALWAYS TURN OFF POWER AT MAIN ELECTRICAL SERVICE PANEL WHEN SERVICING THE WALK-IN BATHTUB. caution... ALWAYS TURN OFF WATER SUPPLY BEFORE SERVICING THE WALK-IN BATHTUB. ProBLeM PotentiaL cause soLutions Faucet set Handspray is weak/... - Page 40 BLiss tuBs aPPenDix F: trouBLeshootinG GuiDe ProBLeM PotentiaL cause soLutions Drain sYsteM (cont.) Tub drains slowly/not Stopper height adjusted too low Remove stopper/back out screw a little/tighten nut/ at all retest, if still not coming up enough then re-adjust Home plumbing backed up/clogged...
Need help?
Do you have a question about the B2645 and is the answer not in the manual?
Questions and answers