Table of Contents
Advertisement
Quick Links
Advertisement
Table of Contents

Subscribe to Our Youtube Channel
Related Manuals for IR Robot Marubot Football League 2 Players

Summary of Contents for IR Robot Marubot Football League 2 Players
- Page 1 Marubot Football League (2 players) Instruction Manual (Score Bar Version) Important ▶ Please read the manual carefully before using this machine. ▶ Keep this manual for your reference at anytime. ★ Specifications including design and color are subjected to change without notice. www.irrobot.com...
-
Page 2: Table Of Contents
Table of Contents Table of Contents Precautions for use 1. Introduction 1.1 Product Information 1.2 Components 1.3 Product Specifications 1.3.1 Machine 1.3.2 Robot 2. Installation Instructions 2.1 General Instructions 2.2 Installations 2.3 Handling the robot 2.4 How to set the robot speed 3. -
Page 3: Precautions For Use
☞PRECAUTIONS FOR USE The following safety precautions are given throughout this manual. They must be strictly followed to protect those who install, use or maintain this product as well as to prevent other people’s injuries and property damages. Be sure to read the following People's injuries and property damages. - Page 4 Setting Up WARNING Be sure to consult your nearest dealer when setting up, moving or transporting this product. • This product should not be set up, moved or transported by any one other than an industry specialist. Doing so could result in injury or product damage. •...
- Page 5 Operating WARNING If there is any abnormality such as smoke, bad smell or abnormal noise being emitted from the machine, immediately turn OFF the main power switch and unplug the power cord from the receptacle to stop operating it. • Using the machine in abnormal conditions could result in fire or accidents. In case of abnormality 1.
- Page 6 • Otherwise, a fire, malfunction or trouble may result. In case of any trouble, ask your nearest dealer for repairs and other services. IR ROBOT will not resume any responsibility for the damage to the product attributable to disassembly and repair of parts which are not indicated in this manual, as well as settings and remodeling.
-
Page 7: Introduction
1. Introduction Welcome! Thank you for purchasing our Marubot Football League game machine. It is brand-new model of the robot game machines that we have developed this category since 2003. The basic techniques under patent pending are stable power supplying method without any power cable or battery and Zigbee wireless communication control system. -
Page 8: Product Information
1.1 Product Information ■ Name of Game : Marubot Football League (2 Players) ■ Main Features Game for one or two players ● No additional battery charging or changing and continuous playing game possible ● Joysticks and specially equipped steering make easy robot controlling ●... -
Page 9: Components
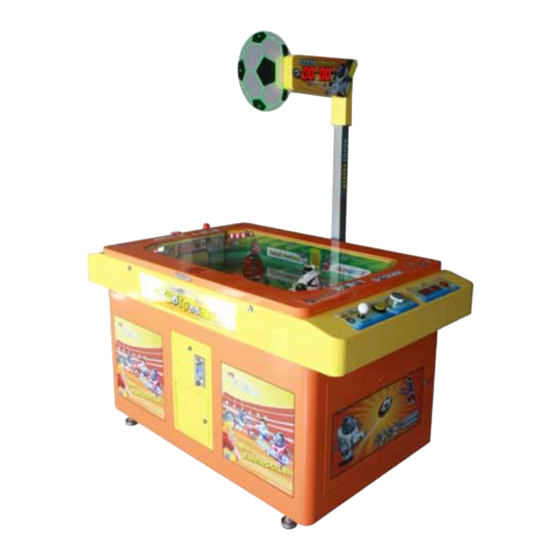
1.2 Components < Score Bar : 1> < Game Machine > < Robots > “Stadium” Red : 1, White : 1 <Key : 2 sets> <AC Power Cable : 1> (1 for glass cover , 1 for Main Body) < 2 Balls > <... -
Page 10: Product Specifications
1.3 Product Specifications • Size : 1500 * 965 * 1790 mm (W x D x H) 1.3.1 Machine • Weight : 192kg • Power : AC 110/220~230V, 50~60 Hz www.irrobot.com... - Page 11 1.3.1.1 Parts Name of the Machine SCORE Score FND Robot Control Glass Cover Robot part 1 Control LED lamp Ball Outlet part 2 Coin Selector Wireless Robot Turbo button Coin Collect box Speaker Wheel / Stoper Time Credit Display Display Start button www.irrobot.com...
- Page 12 1) Function of Parts Name Functions Joystick, Turbo button, and Steering included. ① Control Part 1, 2 Controls the robot ② Turbo Button Increasing robot speed momentarily ③ Speaker Speaker ④ Time Display Displays game time ⑤ Credit Display Displays remaining credits ⑥...
- Page 13 1.3.1.2 Inner Parts Name of the Machine Blow Up Pipe Main Board LED Board Score FND Air Blower User Board Speaker SMPS Coin Box Assy Multi-outlet socket Control panel www.irrobot.com...
- Page 14 1) Function of Inner Parts Name Functions ① Main Board Controls all parts of the machine ② Score FND Shows goal scores ③ LED Board 4 LED boards in each corner illuminate the playground. ④ Air Blower Discharges the ball to the playground with air Controls joystick, turbo button, steering, start button, and ⑤...
- Page 15 1.3.2 Parts Name of the Robot • Size : 135 * 99 * 116 mm (W x D x H) • Weight : 0.6kg • Power : DC 12V Head cover Tire Body part Front wheel Magnetic Ball guide Ball Holder [MARUBOT(game robot)] LED Light Rear...
- Page 16 1) Function of Parts Name Functions ① Head Cover Head cover. Protects inside electric board ② Body Part Robot body ③ Ball Guide Guides the ball as human feet Magnetic Ball ④ Holds the ball to be able to dribble with a magnetic Holder ⑤...
-
Page 17: Robot
1.3.2.1 Inner Parts Name of the Robot Robot Body Right wheel Left wheel Robot Robot Power Main Board Board Bottom Cover Motor Ass’y < Snap Ring for Wheel> Rechargeable Battery Screws Magnetic Ball Guide Ball Holder www.irrobot.com... -
Page 18: Installation Instructions
2. Installation Instructions 2.1 General Instructions 1) Consider to avoid the place such as humid, dusty or any possibility to damage the machine during transportation or storing the machine, otherwise it can be major reason to damage the machine. 2) Do not disassemble, repair, or remodeling the machine except authorized expert. 3) Avoid direct sunlight or placing the machine beside heating appliances. - Page 19 3) Score Bar Installation Please check whether below components of score bar are on the playfield. < Score Bar display assay with cable : 1 > < Score Bar post with connection cable : 1 > < Screw-1 : 4ea > <...
- Page 20 Connect the score bar cable (from main board) and score bar post connection cable. Connect cables. Assemble the side panel and score bar post by using Screw-1 and attach the score bar post to the side body of the machine by using Screw-2. <...
- Page 21 4) Installing Robots and Ball - Open the locks located on the side of cover then pull up the cover. - Put the robots and ball in the playground. Read page 20, “2.3 Handling the robot” first before put the robots in. - Then, pull down the cover carefully.
- Page 22 6) Turn on the main switch - Open the front door, and turn on the switch located in control panel. ① Open the front door using ② Turn on the switch on the Main Power switch a key control box 7) Checking the proper workability - Insert coin and play game to check its workability.
-
Page 23: Handling The Robot
2.3 Handling the robot 1) Position the power switch to "On" which is located on the bottom of the robot and lay down it on the playground. ♣ Remark : On/Off switch of the robot The switch is Off LED lamp is off The switch is On LED lamp is on 2) Since very sensitive electronic parts are used for the machine and the robot, avoid any shock. -
Page 24: How To Set The Robot Speed
2.4 How to Set Robot Speed. * The operator can adjust speed of robot. < The location of Robot Speed Control Dip Switch> Moving Turning Speed Speed Control Control ON ON ON * All dip switches are “On” position from the factory. SLOW SLOW NORMAL... -
Page 25: How To Play
3. How to play ? 1) Insert designated coin. - When you insert coin, the start button is lighted on. - The FND shows Credit number. If one coin permits one credit of game, the FND shows “1”. 2) Push the “Start” button on both display panel. - The both side “Start”... - Page 26 5) After making a goal - After making a goal, the ball will be on the floor automatically by the air blow system built-in. - Number of goal will be shown on the score FND display. - The team who make a goal, their robots will do goal ceremony. - The team who lose a goal, their robots will show sad expression.
-
Page 27: Game Setting
4. Game Setting 4.1 Control panel The Control panel is located inside of the door. Open a lock with a key. ① Sound Volume ⑥ Blow ② Service Coin ③ Mode ⑤ Enter ④Set 4.2 ① Sound Volume The sound can be controlled lower and higher. 4.3 ②... -
Page 28: Mode, Set, And Enter Button
4.5 Mode, Set, and Enter Button You can set time, coin, count, and credit by using these buttons. (TIME) This mode is to set playing time per game. Push the “Mode” button to initialize it and “30” will be shown on the display. -
Page 29: Coin Setting
4.5.1 Coin Setting ◈ Set the coin number for a game “Set” button (Push 2~3 Sec), shows. Push “Mode” button (1 time), shows. Push “Enter” button and display shows Push “Set” button to put the number. The number will be increased by 1 up to . -
Page 30: Attracting Sound Time Setting
4.5.4 Attracting sound time setting ◈ When the game is not playing, to attract the people, sound comes out and robot do ceremony. It can be set time interval of this attracting mode. ◈ It can be adjusted from 0 to 240 by 30. If you set “0”, the function does not work. “Set”... -
Page 31: Ticket Dispenser Setting
4.5.5 Ticket Dispenser Setting * Below setting depend on attaching ticket dispenser. ◈ Tickets for Looser Push the “Set” button for 2~3 Seconds. Display shows Push the “Mode” button 6 times. The display show Push the “Enter” button 1 time The display shows or any number set before... -
Page 32: Coin Selector
4.6 Coin Selector Photos Setting Up Setting Module Pull out the module slowly as shown. Put the coin into the coin setting hole and adjust module width for the coin that you want to use. Push the module into the original position, then setting-up is finished. -
Page 33: Cleaning
5. Cleaning 5.1 Machine The periodic cleaning helps smooth moving of the robot and its life time. It needs at least once a month. If it is under dusty condition, it may need once a week 1) Turn off the main switch before cleaning. 2) Open the cover. -
Page 34: Trouble Shooting
6. Trouble shooting 6.1 Power out The machine is designed to use AC and DC electricity together according to parts specifications. So, if the trouble seems on the power, consider the power source first and fix it as below. A. Power Sources 1) AC : Main Power, Fluorescent lightings, SMPS, Fans, and Air Blower 2) DC : Other Parts B. -
Page 35: The Robot Is Not Moving
6.2 The robot is not moving 6.2.1 All Robots are not moving. 1) Check the main power is on. If all powers are on, but robots are still not moving, go to next step. 2) Even all powers are on, but FND and LED are out, there are conductors on the playground. -
Page 36: The Ball Does Not Come Out
6.2.3 The Robot do not go straight 1) Check 6 power supplying pins on the bottom of the robot whether all pins are in the same height and same tension by pushing the pin one by one. Disordered supplying pin effects in motion of a robot and replace supplying pins that don't push it easily. -
Page 37: New Robot Replacement
7. New Robot Replacement To replace new robot, each new robot ID must be registered to each machine as below. 7-1. New robot ID registration 1) Before entering the process, check whether the label number(1,2 or A, B) that is stuck on the back of a robot is the same of the number(1,2 or A, B) that is stuck on the Robot Control Board (Joystick, Turbo button, and Steering). - Page 38 6) Registration is finished when robot facial express turn into wink. Since it makes wink only once, fix your eye on the robot face. 7) in any case, the robot is newly registered, the main power should be “Off” and “On”...
- Page 39 ● Channel Index Channel 11 CH 12 CH 13 CH 14 CH 15 CH 16 CH 17 CH 18 CH 19 CH 20 CH 21 CH 22 CH 23 CH 24 CH 25 CH 26 CH * List of robot channels is attached to the door that the control box is located. www.irrobot.com...
-
Page 40: Parts Replacement
8. Parts Replacement 8.1 Robot 8.1.1 Power Supplying Pins The power supplying pins are key component to get the power from the power supplying board and it is essential to check its state periodically. If the tip of pin is worn out, it needs to change with new one.(Every 500 plays) There are 6 extra pins in the package for replacing. -
Page 41: Tires
8.1.2 Tires 1) Disentangle the snap ring with a snap ring pliers or a pinsette and disassemble the wheel A Snap ring Pliers A Pincette (2) Remove the damaged tire on the wheel and set new tire. www.irrobot.com... -
Page 42: Magnetic Ball Holder
8.1.3 Magnetic Ball Holder How to change Magnetic Ball Holder in front of a robot when it damages 1. Use(+) driver, loosen the screw. 2. Separate the ball guide Carefully. 4. Lift the Magnetic ball holder. 3. After separating the ball guide 6. -
Page 43: Machine
8.2 Machine 8.2.1 Lights Open the Acrylic Cover with the hexagon socket screw key, 2.5”. 3. Turn a light bulb to the left. Uncover the acrylic panel then you can find a compact fluorescent lamp. * You must power off the machine before replacement. Separate a lamp from body. -
Page 44: Leds
8.2.2 LEDs in the each corner of the playground. * Notice : You must power off the machine before replacement. 1) Pull up the cover and check the LED location. Unscrew 2 bolt s fixing the LED board. 2) Replace the LED board in reverse way. <... -
Page 45: Customer Service
10. Customer Service If you have questions concerning this product, please contact your local dealer. IR ROBOT CO., LTD. Head Office : #1302-2, 401-dong, Bucheon TechnoPark, 193 Yakdae-dong, Wonmi-gu, Bucheon-si, Gyeonggi-do, 420-734, Korea Tel.+82-32-326-3466 / Fax.+82-32-326-3468 E-mail : sales@irrobot.com Homepage : www.irrobot.com... - Page 46 FCC Compliance Statement. This device complies with part 15 of the FCC Rules. Operation is subject to the following two conditions : (1) This device may not cause harmful interference, and (2) This device must accept any interference received, including interference that may cause undesired operation.
Need help?
Do you have a question about the Marubot Football League 2 Players and is the answer not in the manual?
Questions and answers