Table of Contents
Advertisement
Available languages
Available languages
Quick Links
- 1 Remote Sensor (Transmitter) Features
- 2 Weather Station Features
- 3 Initial Operation
- 4 Automatic Time/Date Setting
- 5 Automatic Time and Calendar Setting
- 6 Manual Time / Date Setting
- 7 Temp / Humidity / Air Pressure Info 7.1 °C/°F Temperature Display
- 8 Connecting the Wireless Sensor
- Download this manual
Advertisement
Chapters
Table of Contents

Related Manuals for THINK GIZMOS TG672


Summary of Contents for THINK GIZMOS TG672
- Page 1 TG672 WEATHER STATION WITH REMOTE SENSORS User Manual English CONGRATULATIONS ON PURCHASING THE THINK GIZMOS WIRELESS WEATHER STATION. Español p 15 BY FOLLOWING THESE INSTRUCTIONS CAREFULLY IT WILL BE A GREAT ASSET IN YOUR LOCAL WEATHER FORCASTING NEEDS.
-
Page 2: Table Of Contents
ENGLISH MANUAL - CONTENTS WEATHER STATION FEATURES 1.1 Weather Station Features ...................3 1.2 Remote Sensor (Transmitter) Features .............3 WEATHER STATION FEATURES CONTINUED 2.1 Weather Station Appearance ................4 IMPORTANT INFORMATION 3.1 Important Information ..................5 3.2 Battery Safety ....................... 5 3.3 Electrical Shock Hazards .................. -
Page 3: Weather Station Features
1. WEATHER STATION FEATURES 1.1 Weather Station Features ● WWVB Radio Controlled Time ● Time in optional 12/24 hour format. ● Date and weekday display. Continuous calendar up to 2099. ● ● Daily Alarm Feature. ● Automatic snooze function. ● Lunar phases display. -
Page 4: Weather Station Features Continued
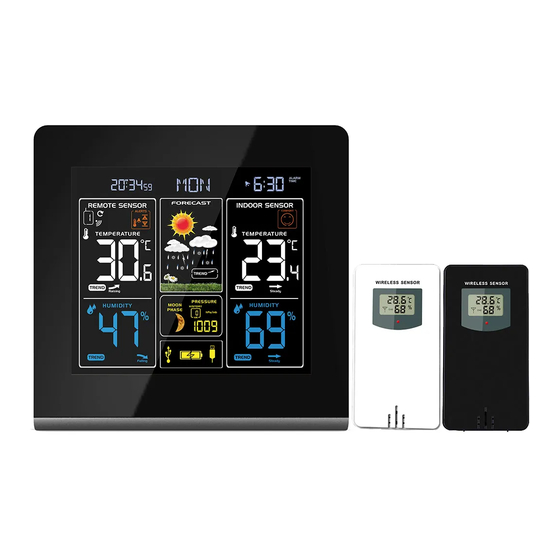
2. WEATHER STATION FEATURES CONTINUED 2.1 Weather Station Appearance Weather Station: 1: “Light/Snooze” Button 17: Outdoor Temperature Trend 2: Set Button 18: Outdoor Humidity 3: Alarm Button 19: Outdoor Humidity Trend 4: “+ / WAVE” Button 20: Moon Phase 5: “- / Channel” Button 21: USB Charge Status 6: Alarm On/Off Switch 22: Air Pressure... -
Page 5: Important Information
3. IMPORTANT INFORMATION 3.1 Important Information Thank you for purchasing the TG672 Weather Station. Please read through this instruction manual before use as it contains all the information you need about how to correctly enjoy this product. CAUTION ELECTRONIC PRODUCT Do not leave children aged 6 or below unattended with this product. -
Page 6: Important Usage Information
3.4 Important Usage Information ● In order to get the full screen brightness and easy visibility of all numbers and symbols, we recommend you use the included mains adaptor rather than batteries for the main unit. ● The remote sensor will work better if the main unit is powered by the included mains adaptor rather than batteries. -
Page 7: Automatic Time And Calendar Setting
4. AUTOMATIC TIME AND CALENDAR SETTING 4.1 Automatic Time/Date Setting ● The Weather Station automatically starts the WWVB Signal search after 7 minutes of any restart or change of batteries. To manually start the WWVB signal search, press and hold down the WAVE button for 2 ●... -
Page 8: Manual Time And Calendar Setting
5. MANUAL TIME AND CALENDAR SETTING 5.1 Manual Time / Date Setting Note: After 20 seconds without pressing any button, the clock switches automatically from Set Mode to Normal Time Mode. Press and hold down the SET button for 2 seconds, the 12/24 hour mode display starts ●... -
Page 9: Alarm Setting
6. ALARM SETTING 6.1 Setting the Daily Alarm Note: After 20 seconds without pressing any button, the clock switches automatically from Set Mode to Normal Time Mode. Pressing the ALARM button once will change the display from showing the alarm time to showing the calendar, pressing it again will switch the display back. -
Page 10: Temp / Humidity / Air Pressure Info 7.1 °C/°F Temperature Display
7. TEMP / HUMIDITY / AIR PRESSURE INFO 7.1 °C/°F Temperature Display The temperature is displayed either in °C/°F. The temperature unit can be changed by ● pressing the + button. ● If the temperature reading is below the minimum range then LL.L will be displayed. If it is above the maximum reading then HH.H is displayed. -
Page 11: Temperature And Humidity Trend Display
7.6 Temperature / Humidity Trend Display After you insert the batteries, the weather station measures the current temperature and humidity. The trend display shows a neutral temperature/humidity course . The further course of the trend display is determined as follows: ●... -
Page 12: Weather Forecast / Moon Phases 8.1 Weather Forecast
8. WEATHER FORECAST / MOON PHASES 8.1 Weather Forecast The weather station uses the air pressure data to create a weather forecast for the next 8 hours. The following weather symbols are used to represent the weather forecast: Note: ● The data shown within the first 12 hours after inserting the batteries may not be correct, as the weather station has to get used to the environmental circumstances after the restart. -
Page 13: Wireless Sensor And Usb Charging
9. WIRELESS SENSOR AND USB CHARGING 9.1 Connecting the Wireless Sensor The weather station will automatically start receiving the signal from the remote sensor once batteries have been inserted. If the weather station fails to receive the signal you can set it to manually search using the instructions below: ●... -
Page 14: Warranty
Product to you. Do not return the item to the original place of purchase, please contact Think Gizmos direct. Think Gizmos, Unit 19, Lawson Hunt Industrial Park, Broadbridge Heath, West Sussex, RH12 3JR Tel.: +44/(0)203 384 8304... - Page 15 TG672 WEATHER STATION WITH REMOTE SENSOR User Manual English FELICITACIONES POR ADQUIRIR EL THINK GIZMOS ESTACION METEOROLÓGICA. Español p 15 SIGUIENDO ESTAS INSTRUCCIONES CON CUIDADO VA A SER UN GRAN ACTIVO EN TUS LOCAL WEATHER FORCASTING NECESIDADES.
- Page 16 MANUAL ESPAÑOL – CONTENIDO CARACTERÍSTICAS DE LA ESTACIÓN METEOROLÓGICA 1.1 Características de la estación meteorológica ..........17 1.2 Características del sensor remoto (transmisor) ..........17 CARACTERÍSTICAS DE LA ESTACIÓN METEOROLÓGICA 2.1 Aspecto de la estación meteorológica ............18 INFORMACIÓN IMPORTANTE 3.1 Información de seguridad ................19 3.2 Información importante sobre la batería ............
-
Page 17: Características De La Estación Meteorológica
CARACTERÍSTICAS DE LA ESTACIÓN METEOROLÓGICA 1.1 Características de la estación meteorológica ● Reloj WWVB controlado por radio frecuencia ● Función de tiempo opcional de formato 12/24 horas ● Visualización de la fecha y de la semana. Calendario perpetuo hasta el año 2099. ●... -
Page 18: Aspecto De La Estación Meteorológica
CARACTERÍSTICAS DE LA ESTACIÓN METEOROLÓGICA 2.1 Aspecto de la estación meteorológica Estación meteorológica: 1: “Light/Snooze” Botón 17: Tendencia a la temperatura exterior 2: Set Botón 18: Humedad exterior 3: Alarm Botón 19: Tendencia de humedad en exteriores 4: “+ / WAVE” Botón 20: Fase lunar 5: “- / Channel”... -
Page 19: Información Importante
3. INFORMACIÓN IMPORTANTE 3.1 Información de seguridad Gracias por adquirir la estación meteorológica TG672. Por favor, lea este manual de instrucciones antes de usar, ya que contiene toda la información que necesita acerca de cómo disfrutar correctamente este producto. PRECAUCIÓN PRODUCTO ELECTRÓNICO... -
Page 20: Información Importante
3.4 Información importante ● Con el fin de conseguir la iluminación total de la pantalla y visibilidad de todos los números y símbolos, recomendamos utilizar el adaptador de red (incluido) con la unidad principal en lugar de pilas. ● El sensor remoto funcionará mejor si la unidad principal está alimentada por la fuente de alimentación incluida en lugar de por pilas. -
Page 21: Ajuste Automático De La Hora / Fecha
4. AJUSTE AUTOMÁTICO DE LA HORA / FECHA 4.1 Ajuste automático de la hora / fecha ● El reloj inicia automáticamente la búsqueda de la señal WWVB después de 7 minutos de cualquier reinicio o cambio de baterías nuevas. El icono de la antena de la radio comienza a parpadear. -
Page 22: Configuración Manual De Hora / Fecha
5. CONFIGURACIÓN MANUAL DE HORA / FECHA 5.1 Configuración manual de hora / fecha Después de 20 segundos sin pulsar ningún botón, el reloj cambia automáticamente del modo de ajuste al modo de hora normal. Presione y sostenga el botón SET durante 2 segundos, el modo 12/24 horas empieza a ●... -
Page 23: Configuración De La Alarma
6. CONFIGURACIÓN DE LA ALARMA 6.1 Configuración de las alarmas diarias Luego de 20 segundos sin presionar ningun botón el reloj se colocará en su modo automático. Pulse una vez el botón ALARM, puede cambiar el calendario de la pantalla o la hora de la alarma. -
Page 24: Temp / Umidita '/ Pressione
7. TEMP / UMIDITA ‘/ PRESSIONE 7.1 Presentación de temperatura C°/F° La temperatura se muestra en °C / °F. Pulsando brevemente el botón + se puede ● cambiar entre los distintos. Si la lectura de temperatura está por debajo de los rangos, se mostrará LL.L Si la lectura ●... -
Page 25: Indicador De La Temperatura Y La Humedad Tendencia
7.6 Indicador de la temperatura y la humedad tendencia Después de instalar las baterías, la estación meteorológica mide la temperatura y la humedad actual. El indicador señala que leen un punto muerto . El siguiente curso de la visualización de tendencia se determina como sigue: ●... -
Page 26: Previsión Meteorológica / Fases De Luna 8.1 Previsión Meteorológica
8. PREVISIÓN METEOROLÓGICA / FASES DE LUNA 8.1 Previsión meteorológica La estación meteorológica utiliza los datos de presión de aire para crear un pronóstico del tiempo para las próximas 8 horas. La estación meteorológica muestra los siguientes símbolos meteorológicos: ● Hay que tener en cuenta que los datos recogidos dentro de las primeras 12 horas tras introducir las baterías no son correctos, ya que la estación meteorológica tiene que habituarse a las condiciones ambientales. -
Page 27: Sensor Inalámbrico Y Usb Cargando
9. SENSOR INALÁMBRICO Y USB CARGANDO 9.1 Conexión del sensor inalámbrico La estación meteorológica comenzará automáticamente a recibir la señal del sensor remoto una vez que se hayan insertado las baterías. Si la estación meteorológica no recibe la señal, puede configurarla para buscar manualmente usando las siguientes instrucciones: ●... -
Page 28: Garantía
No devuelva el artículo al lugar original de compra, por favor póngase en contacto con Think Gizmos direct. Think Gizmos, Unit 19, Lawson Hunt Industrial Park, Broadbridge Heath, West Sussex, RH12 3JR Tel.: +44/(0)203 384 8304... - Page 29 Meaning of the ‘Dustbin’ Symbol: To protect our environment, do not dispose of electrical equipment in with domestic waste. Please return any electrical equipment that you will no longer use to the collection points provided for their disposal. This helps to avoid the potential effects of incorrect disposal on the environment and human health.
Need help?
Do you have a question about the TG672 and is the answer not in the manual?
Questions and answers
I brought the tea G672 weather station, but it only came with one remote the white one. I’m missing the black one. How can I buy the black one please let me know. Thank you.